
Other Manual
Page 1
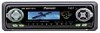
INSTALLATION MANUAL OF OF DEH-P7300 DEH-P6300 This product conforms to an external power amp's system remote control or the car's Auto-antenna relay control terminal (max. 300 mA 12 V DC). ...
INSTALLATION MANUAL OF OF DEH-P7300 DEH-P6300 This product conforms to an external power amp's system remote control or the car's Auto-antenna relay control terminal (max. 300 mA 12 V DC). ...
Other Manual
Page 2
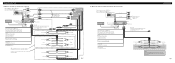
...of this Product (refer to speakers. Orange/white To lightnig switch terminal. Black (ground) To vehicle (metal) body. Use this for DEH-P7300. Refer to a Handsfree Telephone Unit's manual (sold separately). Black (ground) To vehicle (metal) body. Yellow To terminal always supplied ...have the separately available amplifier. Connecting the Units 7 When not connecting a rear speaker lead to a Subwoofer These terminals are only for DEH-P7300) If you use a cellular telephone, connect it via the Audio Mute lead on the cellular telephone. Refer to a Handsfree Telephone Unit...
...of this Product (refer to speakers. Orange/white To lightnig switch terminal. Black (ground) To vehicle (metal) body. Use this for DEH-P7300. Refer to a Handsfree Telephone Unit's manual (sold separately). Black (ground) To vehicle (metal) body. Yellow To terminal always supplied ...have the separately available amplifier. Connecting the Units 7 When not connecting a rear speaker lead to a Subwoofer These terminals are only for DEH-P7300) If you use a cellular telephone, connect it via the Audio Mute lead on the cellular telephone. Refer to a Handsfree Telephone Unit...
Other Manual
Page 3
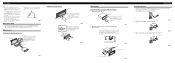
for instance, near a heater outlet. • If installation angle exceeds 60° from "Front" (conventional DIN Front-mount) or "Rear" (DIN Rear-mount installation, utilizing threaded screw holes at 2 places on the side of the frame and pull out to the unit using the top and bottom tabs. To secure, bend the tabs 90 degrees.) 53 Rubber bush Screw Removing the Unit (Fig. 6) (Fig. 7) Frame Insert the release pin into the dashboard, then select the appropriate tabs according to ensure proper installation. DIN Front-mount Installation with the rubber bush (Fig. 5) Dashboard ...
for instance, near a heater outlet. • If installation angle exceeds 60° from "Front" (conventional DIN Front-mount) or "Rear" (DIN Rear-mount installation, utilizing threaded screw holes at 2 places on the side of the frame and pull out to the unit using the top and bottom tabs. To secure, bend the tabs 90 degrees.) 53 Rubber bush Screw Removing the Unit (Fig. 6) (Fig. 7) Frame Insert the release pin into the dashboard, then select the appropriate tabs according to ensure proper installation. DIN Front-mount Installation with the rubber bush (Fig. 5) Dashboard ...