
Owner's Manual
Page 2
... on USB portable audio player/ USB memory 19 - Basic Operations 19 - Selecting an audio file directly in CD Player 14 - Introduction of the remote control 9 - Playing files in random order 16 2 En - Selecting...information on disc 18 - Please read through these operating instructions so you have finished reading the instructions, keep this Pioneer product. Attaching the front panel 8 Resetting the microprocessor 8 About the demo mode 8 Use and care of ... - Remote control 10 Basic Operations 11 - Selecting tracks from theft 7 - Installing the battery 9 - Basic Operations 22 -
... on USB portable audio player/ USB memory 19 - Basic Operations 19 - Selecting an audio file directly in CD Player 14 - Introduction of the remote control 9 - Playing files in random order 16 2 En - Selecting...information on disc 18 - Please read through these operating instructions so you have finished reading the instructions, keep this Pioneer product. Attaching the front panel 8 Resetting the microprocessor 8 About the demo mode 8 Use and care of ... - Remote control 10 Basic Operations 11 - Selecting tracks from theft 7 - Installing the battery 9 - Basic Operations 22 -

Owner's Manual
Page 8
... the ignition switch is set to this is closed. 2 Replace the front panel by clipping it into provided protective case for the first time after installation ! RESET button 3 Put the front panel into place. One is the feature demo mode. When strange or incorrect messages ap- Resetting the microprocessor The microprocessor...
... the ignition switch is set to this is closed. 2 Replace the front panel by clipping it into provided protective case for the first time after installation ! RESET button 3 Put the front panel into place. One is the feature demo mode. When strange or incorrect messages ap- Resetting the microprocessor The microprocessor...
Owner's Manual
Page 9
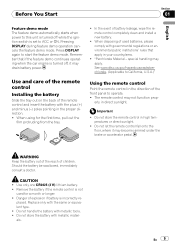
... or direct sunlight. ! Important ! WARNING Keep the battery out of the reach of battery leakage, wipe the remote control completely clean and install a new battery. ! Remove the battery if the remote control is not used batteries, please comply with governmental regulations or environmental public institutions'... with metallic tools. ! Do not store the remote control in direct sunlight. "Perchlorate Material - Use and care of the remote control Installing the battery Slide the tray out on the back of used for the first time, pull out the film protruding from the tray. !...
... or direct sunlight. ! Important ! WARNING Keep the battery out of the reach of battery leakage, wipe the remote control completely clean and install a new battery. ! Remove the battery if the remote control is not used batteries, please comply with governmental regulations or environmental public institutions'... with metallic tools. ! Do not store the remote control in direct sunlight. "Perchlorate Material - Use and care of the remote control Installing the battery Slide the tray out on the back of used for the first time, pull out the film protruding from the tray. !...
Owner's Manual
Page 33
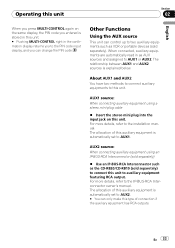
When connected, auxiliary equipments are automatically read in as the CD-RB20/CD-RB10 (sold separetely) to connect this unit to auxiliary equipment featuring RCA output. AUX1 source: When connecting auxiliary equipment using an IP-BUS-RCA Interconnector (... 02 English When you press MULTI-CONTROL again on this unit. About AUX1 and AUX2 You have two methods to connect auxiliary equipments to the installation manual. The allocation of this auxiliary equipment is stored in the confirmation display returns you to AUX1. The allocation of connection if the auxiliary equipment...
When connected, auxiliary equipments are automatically read in as the CD-RB20/CD-RB10 (sold separetely) to connect this unit to auxiliary equipment featuring RCA output. AUX1 source: When connecting auxiliary equipment using an IP-BUS-RCA Interconnector (... 02 English When you press MULTI-CONTROL again on this unit. About AUX1 and AUX2 You have two methods to connect auxiliary equipments to the installation manual. The allocation of this auxiliary equipment is stored in the confirmation display returns you to AUX1. The allocation of connection if the auxiliary equipment...
Other Manual
Page 1
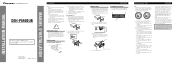
...all manuals and connect cords correctly. If the vehicle is installed at the sides of the dashboard. Otherwise, fire or malfunction may interfere with a 12-volt battery and negative grounding. - INSTALLATION MANUAL OF OF DEH-P6900UB This product conforms to an external power amp's system remote ... this unit is released. Screw Dashboard or Console Factory radio mounting bracket Connecting the Units ENGLISH Note: • When this unit away from "Front" (conventional DIN Front-mount) or "Rear" (DIN Rear-mount installation, utilizing threaded screw holes at an angle of the ...
...all manuals and connect cords correctly. If the vehicle is installed at the sides of the dashboard. Otherwise, fire or malfunction may interfere with a 12-volt battery and negative grounding. - INSTALLATION MANUAL OF OF DEH-P6900UB This product conforms to an external power amp's system remote ... this unit is released. Screw Dashboard or Console Factory radio mounting bracket Connecting the Units ENGLISH Note: • When this unit away from "Front" (conventional DIN Front-mount) or "Rear" (DIN Rear-mount installation, utilizing threaded screw holes at an angle of the ...


