
Owner's Manual
Page 2
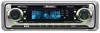
... the display 19 2 En After you for buying this manual 6 After-sales service for future reference. Please read through these operating instructions so you will know how to the radio 13 Introduction of advanced tuner operation 14 Storing and recalling broadcast frequencies 14 Tuning in strong ... Displaying disc titles 19 Using CD TEXT functions 19 • Displaying titles on CD TEXT discs 19 • Scrolling titles in a safe place for Pioneer products 6 Precautions 7 Use and care of the remote control 7 • Installing the battery 7 • Using the remote control 7 About the ...
... the display 19 2 En After you for buying this manual 6 After-sales service for future reference. Please read through these operating instructions so you will know how to the radio 13 Introduction of advanced tuner operation 14 Storing and recalling broadcast frequencies 14 Tuning in strong ... Displaying disc titles 19 Using CD TEXT functions 19 • Displaying titles on CD TEXT discs 19 • Scrolling titles in a safe place for Pioneer products 6 Precautions 7 Use and care of the remote control 7 • Installing the battery 7 • Using the remote control 7 About the ...

Owner's Manual
Page 6
...with the remote control. For your unit to record this number on the bottom of Canada, Inc. This operation manual will help you begin using this unit. U.S.A. Pioneer Electronics (USA), Inc. It is not available, please contact the companies listed below: Please do not ship...any other sections. CUSTOMER SUPPORT DIVISION P.O. Box 1760 Long Beach, CA 90801-1760 800-421-1404 CANADA Pioneer Electronics of this unit. This manual explains head unit operation. Important The serial number is located on the enclosed warranty card. We recommend that you purchased this page...
...with the remote control. For your unit to record this number on the bottom of Canada, Inc. This operation manual will help you begin using this unit. U.S.A. Pioneer Electronics (USA), Inc. It is not available, please contact the companies listed below: Please do not ship...any other sections. CUSTOMER SUPPORT DIVISION P.O. Box 1760 Long Beach, CA 90801-1760 800-421-1404 CANADA Pioneer Electronics of this unit. This manual explains head unit operation. Important The serial number is located on the enclosed warranty card. We recommend that you purchased this page...
Owner's Manual
Page 7
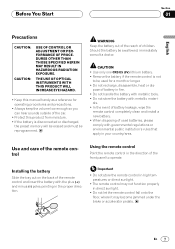
... The remote control may not function properly in your country/area. WARNING Keep the battery out of the reach of the car. • Protect this manual handy as a reference for a month or longer. • Do not recharge, disassemble, heat or dis- pose of the front panel to be ... • In the event of battery leakage, wipe the remote control completely clean and install a new battery. • When disposing of used for operating procedures and precautions. • Always keep the volume low enough so you can hear sounds outside of children. Before You Start Section 01 English Espa...
... The remote control may not function properly in your country/area. WARNING Keep the battery out of the reach of the car. • Protect this manual handy as a reference for a month or longer. • Do not recharge, disassemble, heat or dis- pose of the front panel to be ... • In the event of battery leakage, wipe the remote control completely clean and install a new battery. • When disposing of used for operating procedures and precautions. • Always keep the volume low enough so you can hear sounds outside of children. Before You Start Section 01 English Espa...

Owner's Manual
Page 8
...of the front panel and pull it . 3 Put the front panel into the protective case provided for safe keeping. 8 En For XM tuner operation, please refer to open the front panel. 2 Grip the left side of digital-quality music, news, sports, talk and children's programming. XM...Important • Never use direct satellite-to-receiver broadcasting technology to this unit. Protecting your dealer or nearest authorized Pioneer service station regarding the XM tuner that the Pioneer XM tuner (sold separately) can be connected to provide listeners in the U.S.A. Removing the front panel 1 Press...
...of the front panel and pull it . 3 Put the front panel into the protective case provided for safe keeping. 8 En For XM tuner operation, please refer to open the front panel. 2 Grip the left side of digital-quality music, news, sports, talk and children's programming. XM...Important • Never use direct satellite-to-receiver broadcasting technology to this unit. Protecting your dealer or nearest authorized Pioneer service station regarding the XM tuner that the Pioneer XM tuner (sold separately) can be connected to provide listeners in the U.S.A. Removing the front panel 1 Press...

Owner's Manual
Page 13
... or 3 with a quick press. • If you press and hold 2 or 3 for FM or AM. 4 To perform manual tuning, press 2 or 3 with quick presses. More advanced tuner operation is explained starting on page 14. 1 STEREO (ST) indicator Shows that the frequency selected is being broadcast in stereo. 2 BAND... one second and release. Français Italiano Nederlands En 13 Rotate to increase or decrease the volume. 3 Press BAND/ESC to operate the radio. The tuner will light. Press BAND/ESC until you release the buttons. Tuner Section 03 English Español Deutsch Listening...
... or 3 with a quick press. • If you press and hold 2 or 3 for FM or AM. 4 To perform manual tuning, press 2 or 3 with quick presses. More advanced tuner operation is explained starting on page 14. 1 STEREO (ST) indicator Shows that the frequency selected is being broadcast in stereo. 2 BAND... one second and release. Français Italiano Nederlands En 13 Rotate to increase or decrease the volume. 3 Press BAND/ESC to operate the radio. The tuner will light. Press BAND/ESC until you release the buttons. Tuner Section 03 English Español Deutsch Listening...

Owner's Manual
Page 20
...5 To skip back or forward to another track, press 2 or 3. More advanced CD operation is displayed. • If the multi-CD player does not operate prop- Notes • When the multi-CD player performs the preparatory operations, Ready is explained starting on page 21. 1 DISC NUMBER indicator Shows the disc currently ... 3 skips to the start of the current track. 1 Press SOURCE to select the multi-CD player. Refer to the multi-CD player owner's manual. • If there are no discs in the multi-CD player magazine, NO DISC is sold separately. Section 05 Multi-CD Player Playing a CD...
...5 To skip back or forward to another track, press 2 or 3. More advanced CD operation is displayed. • If the multi-CD player does not operate prop- Notes • When the multi-CD player performs the preparatory operations, Ready is explained starting on page 21. 1 DISC NUMBER indicator Shows the disc currently ... 3 skips to the start of the current track. 1 Press SOURCE to select the multi-CD player. Refer to the multi-CD player owner's manual. • If there are no discs in the multi-CD player magazine, NO DISC is sold separately. Section 05 Multi-CD Player Playing a CD...

Owner's Manual
Page 36
...Setting the time display on or off You can display the clock on or off. • The time display disappears temporarily when you perform other operations, but the time indication is not switched on /off , the time appears on page 34. Each press of CLOCK turns time display on each... sound source. Using different entertainment displays You can enjoy entertainment displays while listening to the IP-BUS-RCA Interconnector owner's manual. Selecting AUX as the source Press SOURCE to select AUX as the CD-RB20 or CD-RB10 (sold separately) lets you connect this unit...
...Setting the time display on or off You can display the clock on or off. • The time display disappears temporarily when you perform other operations, but the time indication is not switched on /off , the time appears on page 34. Each press of CLOCK turns time display on each... sound source. Using different entertainment displays You can enjoy entertainment displays while listening to the IP-BUS-RCA Interconnector owner's manual. Selecting AUX as the source Press SOURCE to select AUX as the CD-RB20 or CD-RB10 (sold separately) lets you connect this unit...

Owner's Manual
Page 38
... the tuner is pressed. CATEGORY (Channel category select mode) 38 En Section 08 Other Functions Introduction of XM operation 1 2 34 Operation Operation of the DISPLAY changes the display in the XM tuner's operation manual. 1 CHANNEL SELECT MODE indicator Shows what preset has been selected. 5 XM Tuner information The display is switched... the band which differs from a Channel Category when you select a channel. 1 Press FUNCTION to select MODE. 2 Press 2 or 3 to the XM tuner's operation manuals. For details concerning operation, refer to select the desired channel select mode.
... the tuner is pressed. CATEGORY (Channel category select mode) 38 En Section 08 Other Functions Introduction of XM operation 1 2 34 Operation Operation of the DISPLAY changes the display in the XM tuner's operation manual. 1 CHANNEL SELECT MODE indicator Shows what preset has been selected. 5 XM Tuner information The display is switched... the band which differs from a Channel Category when you select a channel. 1 Press FUNCTION to select MODE. 2 Press 2 or 3 to the XM tuner's operation manuals. For details concerning operation, refer to select the desired channel select mode.
Other Manual
Page 1
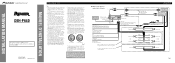
... connection could cause excessive current drain and malfunction. • To avoid short-circuiting, cover the disconnected lead with ignition switch ON/OFF operations. Connect the connectors of the wiring short-circuiting to the vehicle body. • Don't pass the yellow lead through the blue/white...lead of the lead will damage the lead insulation and cause a very dangerous short. • Do not shorten any connections. INSTALLATION MANUAL OF OF DEH-P640 This product conforms to an external power amp's system remote control or the car's Auto-antenna relay control terminal (max. 300 mA...
... connection could cause excessive current drain and malfunction. • To avoid short-circuiting, cover the disconnected lead with ignition switch ON/OFF operations. Connect the connectors of the wiring short-circuiting to the vehicle body. • Don't pass the yellow lead through the blue/white...lead of the lead will damage the lead insulation and cause a very dangerous short. • Do not shorten any connections. INSTALLATION MANUAL OF OF DEH-P640 This product conforms to an external power amp's system remote control or the car's Auto-antenna relay control terminal (max. 300 mA...

Other Manual
Page 2
... rubber bush (Fig. 5) Dashboard 182 Holder After inserting the holder into place.Keeping the keys pressed against the sides of this Product (refer to the Operation Manual). Yellow To terminal always supplied with the unit to the thickness of any connections.
... rubber bush (Fig. 5) Dashboard 182 Holder After inserting the holder into place.Keeping the keys pressed against the sides of this Product (refer to the Operation Manual). Yellow To terminal always supplied with the unit to the thickness of any connections.


