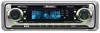

Owner's Manual
Page 2
...-in CD Player Playing a CD 16 Introduction of advanced built-in CD player operation 17 Repeating play 17 Playing tracks in a safe place for Pioneer products 6 Precautions 7 Use and care of a CD 18 Pausing CD playback 18 Using disc title functions 18 • Entering disc titles 18 ...operating instructions so you have finished reading the instructions, put them away in a random order 17 Scanning tracks of the remote control 7 • Installing the battery 7 • Using the remote control 7 About the XM READY mark 8 Protecting your model properly. Before You Start About this unit 6...
...-in CD Player Playing a CD 16 Introduction of advanced built-in CD player operation 17 Repeating play 17 Playing tracks in a safe place for Pioneer products 6 Precautions 7 Use and care of a CD 18 Pausing CD playback 18 Using disc title functions 18 • Entering disc titles 18 ...operating instructions so you have finished reading the instructions, put them away in a random order 17 Scanning tracks of the remote control 7 • Installing the battery 7 • Using the remote control 7 About the XM READY mark 8 Protecting your model properly. Before You Start About this unit 6...
Owner's Manual
Page 7
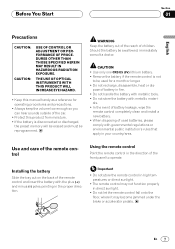
...direct sunlight. • Do not let the remote control fall onto the floor, where it may not function properly in your country/area. Installing the battery Slide the tray out on the back of battery in the proper direction. Important • Do not store the remote control in...control may become jammed under the brake or accelerator pedals. als. • In the event of battery leakage, wipe the remote control completely clean and install a new battery. • When disposing of the front panel to be used batteries, please comply with metallic materi- CAUTION • Use only one...
...direct sunlight. • Do not let the remote control fall onto the floor, where it may not function properly in your country/area. Installing the battery Slide the tray out on the back of battery in the proper direction. Important • Do not store the remote control in...control may become jammed under the brake or accelerator pedals. als. • In the event of battery leakage, wipe the remote control completely clean and install a new battery. • When disposing of the front panel to be used batteries, please comply with metallic materi- CAUTION • Use only one...
Other Manual
Page 1
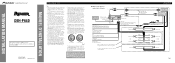
... ≠ Gray Gray/black Violet Violet/black + Front speaker ≠ Right + Rear speaker ≠ + Subwoofer ≠ Fig. 2 Before installing it cannot touch any moving parts, such as the gear shift, handbrake and seat rails. If not, keep the Audio Mute lead free of both... insulating tape. Please ground this product and those for connections when you are not connected to the supplied Installation manuals of any leads. INSTALLATION MANUAL OF OF DEH-P640 This product conforms to an external power amp's system remote control or the car's Auto-antenna relay control...
... ≠ Gray Gray/black Violet Violet/black + Front speaker ≠ Right + Rear speaker ≠ + Subwoofer ≠ Fig. 2 Before installing it cannot touch any moving parts, such as the gear shift, handbrake and seat rails. If not, keep the Audio Mute lead free of both... insulating tape. Please ground this product and those for connections when you are not connected to the supplied Installation manuals of any leads. INSTALLATION MANUAL OF OF DEH-P640 This product conforms to an external power amp's system remote control or the car's Auto-antenna relay control...

Other Manual
Page 2
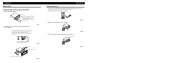
...Subwoofer ≠ Note: Change the Initial Setting of this unit is a sudden stop, like an emergency stop. • The semiconductor laser will be properly installed either from horizontal, the unit might not give its optimum performance. (Fig. 4) 60° Fig. 4 DIN Front/Rear-mount This unit can cause ...to remove the frame. (When reattaching the frame, point the side with your nearest dealer if installation requires the drilling of holes or other modifications of the vehicle. • Install the unit where it does not get in the driver's way and cannot injure the passenger if ...
...Subwoofer ≠ Note: Change the Initial Setting of this unit is a sudden stop, like an emergency stop. • The semiconductor laser will be properly installed either from horizontal, the unit might not give its optimum performance. (Fig. 4) 60° Fig. 4 DIN Front/Rear-mount This unit can cause ...to remove the frame. (When reattaching the frame, point the side with your nearest dealer if installation requires the drilling of holes or other modifications of the vehicle. • Install the unit where it does not get in the driver's way and cannot injure the passenger if ...
Other Manual
Page 3
... holes in the bottom of the head unit become aligned (are fitted), and tighten the screws at 2 places on the shape of the unit 1. Installation DIN Rear-mount Installation using fixing screws. (Fig. 13) Fixing screw Fig. 12 Fig. 13 Fastening the unit to the factory radio mounting bracket. (Fig. 9) (Fig. 10...
... holes in the bottom of the head unit become aligned (are fitted), and tighten the screws at 2 places on the shape of the unit 1. Installation DIN Rear-mount Installation using fixing screws. (Fig. 13) Fixing screw Fig. 12 Fig. 13 Fastening the unit to the factory radio mounting bracket. (Fig. 9) (Fig. 10...


