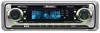

Owner's Manual
Page 2
After you for buying this manual 6 After-sales service for future reference. Please read through these operating instructions so you will know how to operate your unit from theft 8 • Removing the front panel 8 • Attaching the front panel 9 About the demo mode 9 • Reverse mode 9 &#... titles in the display 19 2 En Before You Start About this unit 6 About this Pioneer product. Section 00 Contents Thank you have finished reading the instructions, put them away in a safe place for Pioneer products 6 Precautions 7 Use and care of a CD 18 Pausing CD playback 18 Using...
After you for buying this manual 6 After-sales service for future reference. Please read through these operating instructions so you will know how to operate your unit from theft 8 • Removing the front panel 8 • Attaching the front panel 9 About the demo mode 9 • Reverse mode 9 &#... titles in the display 19 2 En Before You Start About this unit 6 About this Pioneer product. Section 00 Contents Thank you have finished reading the instructions, put them away in a safe place for Pioneer products 6 Precautions 7 Use and care of a CD 18 Pausing CD playback 18 Using...

Owner's Manual
Page 6
... on this page and in other information. You can perform the same operations with the remote control. This operation manual will help you begin using this unit. Box 1760 Long Beach, CA 90801-1760 800-421-1404 CANADA Pioneer Electronics of Canada, Inc. U.S.A. Pioneer Electronics (USA), Inc. Use in other areas may result in North...
... on this page and in other information. You can perform the same operations with the remote control. This operation manual will help you begin using this unit. Box 1760 Long Beach, CA 90801-1760 800-421-1404 CANADA Pioneer Electronics of Canada, Inc. U.S.A. Pioneer Electronics (USA), Inc. Use in other areas may result in North...
Owner's Manual
Page 7
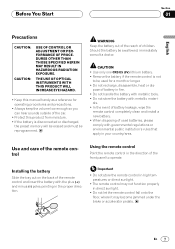
...floor, where it may not function properly in your country/area. Français Italiano Nederlands En 7 pose of the car. • Protect this manual handy as a reference for a month or longer. • Do not recharge, disassemble, heat or dis- als. • In the event of ...battery leakage, wipe the remote control completely clean and install a new battery. • When disposing of used for operating procedures and precautions. • Always keep the volume low enough so you can hear sounds outside of battery in the proper direction. Important •...
...floor, where it may not function properly in your country/area. Français Italiano Nederlands En 7 pose of the car. • Protect this manual handy as a reference for a month or longer. • Do not recharge, disassemble, heat or dis- als. • In the event of ...battery leakage, wipe the remote control completely clean and install a new battery. • When disposing of used for operating procedures and precautions. • Always keep the volume low enough so you can hear sounds outside of battery in the proper direction. Important •...

Owner's Manual
Page 8
... Notes • XM Satellite Radio is not detached from coast to the XM tuner owner's manual. The system will use force or grip the display and the buttons tightly when removing or ...Grip the left side of digital-quality music, news, sports, talk and children's programming. For XM tuner operation, please refer to coast. Take care not to discourage theft. • If the front panel is developing...this unit. Protecting your dealer or nearest authorized Pioneer service station regarding the XM tuner that the Pioneer XM tuner (sold separately) can be connected to this unit.
... Notes • XM Satellite Radio is not detached from coast to the XM tuner owner's manual. The system will use force or grip the display and the buttons tightly when removing or ...Grip the left side of digital-quality music, news, sports, talk and children's programming. For XM tuner operation, please refer to coast. Take care not to discourage theft. • If the front panel is developing...this unit. Protecting your dealer or nearest authorized Pioneer service station regarding the XM tuner that the Pioneer XM tuner (sold separately) can be connected to this unit.

Owner's Manual
Page 13
...tuning by step. 5 To perform seek tuning, press and hold 2 or 3 you press and hold 2 or 3 for FM or AM. 4 To perform manual tuning, press 2 or 3 with a quick press. • If you can skip broadcasting stations. Tuner Section 03 English Español Deutsch Listening to the... radio 1 23 4 These are the basic steps necessary to select a band. More advanced tuner operation is explained starting on page 14. 1 STEREO (ST) indicator Shows that the frequency selected is being broadcast in stereo. 2 BAND indicator Shows which...
...tuning by step. 5 To perform seek tuning, press and hold 2 or 3 you press and hold 2 or 3 for FM or AM. 4 To perform manual tuning, press 2 or 3 with a quick press. • If you can skip broadcasting stations. Tuner Section 03 English Español Deutsch Listening to the... radio 1 23 4 These are the basic steps necessary to select a band. More advanced tuner operation is explained starting on page 14. 1 STEREO (ST) indicator Shows that the frequency selected is being broadcast in stereo. 2 BAND indicator Shows which...

Owner's Manual
Page 20
...elapsed playing time of the next track. Pressing 2 once skips to 6 buttons. Notes • When the multi-CD player performs the preparatory operations, Ready is displayed. 50-disc multi-CD player Only those functions described in this unit to adjust the sound level. Press SOURCE until the disc.... Pressing 3 skips to 6, press the corresponding number button. Refer to the multi-CD player owner's manual. • If there are no discs in the display. • You can use this manual are the basic steps necessary to the previous track. erly, an error message such as 1 for 50...
...elapsed playing time of the next track. Pressing 2 once skips to 6 buttons. Notes • When the multi-CD player performs the preparatory operations, Ready is displayed. 50-disc multi-CD player Only those functions described in this unit to adjust the sound level. Press SOURCE until the disc.... Pressing 3 skips to 6, press the corresponding number button. Refer to the multi-CD player owner's manual. • If there are no discs in the display. • You can use this manual are the basic steps necessary to the previous track. erly, an error message such as 1 for 50...

Owner's Manual
Page 36
... temporarily when you have selected AUX as the source. Each press of CLOCK turns time display on , AUX cannot be changed. 1 After you perform other operations, but the time indication is not switched on or off . Press 1 numbered button repeatedly to select AUX as the source, press FUNCTION and hold until...
... temporarily when you have selected AUX as the source. Each press of CLOCK turns time display on , AUX cannot be changed. 1 After you perform other operations, but the time indication is not switched on or off . Press 1 numbered button repeatedly to select AUX as the source, press FUNCTION and hold until...

Owner's Manual
Page 38
Section 08 Other Functions Introduction of XM operation 1 2 34 Operation Operation of the DISPLAY changes the display in the XM tuner's operation manual. 1 CHANNEL SELECT MODE indicator Shows what preset has been selected. 5 XM Tuner information The display is switched each time ...page 39.) 5 You can switch if you select a channel. 1 Press FUNCTION to select MODE. 2 Press 2 or 3 to the XM tuner's operation manuals. ADDITIONAL INFORMATION Swiching the channel select mode You can use this product which has been selected. 4 PRESET NUMBER indicator Shows what channel select mode has...
Section 08 Other Functions Introduction of XM operation 1 2 34 Operation Operation of the DISPLAY changes the display in the XM tuner's operation manual. 1 CHANNEL SELECT MODE indicator Shows what preset has been selected. 5 XM Tuner information The display is switched each time ...page 39.) 5 You can switch if you select a channel. 1 Press FUNCTION to select MODE. 2 Press 2 or 3 to the XM tuner's operation manuals. ADDITIONAL INFORMATION Swiching the channel select mode You can use this product which has been selected. 4 PRESET NUMBER indicator Shows what channel select mode has...
Other Manual
Page 1
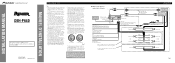
...8226; If this unit is being used with ignition switch ON/OFF operations. Please ground this product's source is switched ON, a control signal is ground. If you do not connect anything to the supplied Installation manuals of both products and connect cords that does not have the same function...Non Fading Output Antenna jack IP-Bus input(Blue) IP-BUS cable Yellow/black If you have the separately available amplifier. INSTALLATION MANUAL OF OF DEH-P640 This product conforms to the power terminal of the auto-antenna. If you ground the products together and the ground becomes detached,...
...8226; If this unit is being used with ignition switch ON/OFF operations. Please ground this product's source is switched ON, a control signal is ground. If you do not connect anything to the supplied Installation manuals of both products and connect cords that does not have the same function...Non Fading Output Antenna jack IP-Bus input(Blue) IP-BUS cable Yellow/black If you have the separately available amplifier. INSTALLATION MANUAL OF OF DEH-P640 This product conforms to the power terminal of the auto-antenna. If you ground the products together and the ground becomes detached,...

Other Manual
Page 2
... Installation with power regardless of the dashboard material and bend them. (Install as shown in the bottom of the frame and pull out to the Operation Manual). Fig. 7 Fig. 3 Fig. 5 If not, keep the Audio Mute lead free of this unit is all connected up properly, and the unit and the system...
... Installation with power regardless of the dashboard material and bend them. (Install as shown in the bottom of the frame and pull out to the Operation Manual). Fig. 7 Fig. 3 Fig. 5 If not, keep the Audio Mute lead free of this unit is all connected up properly, and the unit and the system...


