
Owner's Manual
Page 2
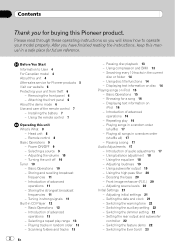
Please read through these operating instructions so you for buying this Pioneer product. After you have finished reading the instructions, keep this manual in CD Player 12 - Power ON/OFF 9 - Introduction of audio adjustments 17 - Pausing disc playback 13 - Displaying text information on ... Scanning folders and tracks 13 2 En - Repeating play range 13 - Using the equalizer 18 - Setting the date and clock 21 - Setting the rear output and subwoofer controller 22 - Head unit 8 - Basic Operations 12 - Searching every 10 tracks in a random order (shuffle) 17 - Playing ...
Please read through these operating instructions so you for buying this Pioneer product. After you have finished reading the instructions, keep this manual in CD Player 12 - Power ON/OFF 9 - Introduction of audio adjustments 17 - Pausing disc playback 13 - Displaying text information on ... Scanning folders and tracks 13 2 En - Repeating play range 13 - Using the equalizer 18 - Setting the date and clock 21 - Setting the rear output and subwoofer controller 22 - Head unit 8 - Basic Operations 12 - Searching every 10 tracks in a random order (shuffle) 17 - Playing ...
Owner's Manual
Page 17
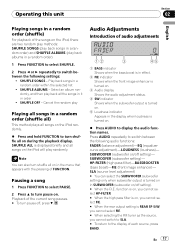
... (equalizer curve adjustment)-LOUDNESS (loudness)- SLA (source level adjustment) # You can also turn shuffle all songs on the iPod will play randomly. SHUFFLE ALL is REAR SP S/W, you cannot select FIE. # When selecting the FM tuner as the source, you cannot select FIE. # When the... rear output setting is displayed briefly and all on during the playback display. HP-FILTER (high pass filter)-BASSBOOSTER (bass boost)-FIE (front image enhancer)- Operating ...
... (equalizer curve adjustment)-LOUDNESS (loudness)- SLA (source level adjustment) # You can also turn shuffle all songs on the iPod will play randomly. SHUFFLE ALL is REAR SP S/W, you cannot select FIE. # When selecting the FM tuner as the source, you cannot select FIE. # When the... rear output setting is displayed briefly and all on during the playback display. HP-FILTER (high pass filter)-BASSBOOSTER (bass boost)-FIE (front image enhancer)- Operating ...
Owner's Manual
Page 18
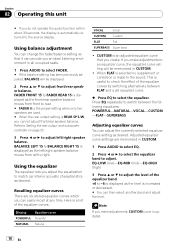
... be memorized in CUSTOM. 1 Press AUDIO to select EQ. 2 Press c or d to select the equalizer band to the source display. Refer to Setting the rear output and subwoofer controller on page 22. 3 Press c or d to switch between FLAT and a set equalizer curve. % Press EQ to -6 is displayed as...acoustic characteristics as the left/right speaker balance moves from front to the sound. When FLAT is selected no supplement or correction is made to rear. # FADER 0 is the proper setting when only two speakers are six stored equalizer curves which you can provide you make adjustments to right....
... be memorized in CUSTOM. 1 Press AUDIO to select EQ. 2 Press c or d to select the equalizer band to the source display. Refer to Setting the rear output and subwoofer controller on page 22. 3 Press c or d to switch between FLAT and a set equalizer curve. % Press EQ to -6 is displayed as...acoustic characteristics as the left/right speaker balance moves from front to the sound. When FLAT is selected no supplement or correction is made to rear. # FADER 0 is the proper setting when only two speakers are six stored equalizer curves which you can provide you make adjustments to right....
Owner's Manual
Page 20
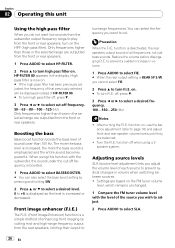
... the display. You can also select the bass boost setting by cutting mid- HP-FILTER 80 appears in the selected range are outputted from the rear speakers, limiting their output to select a desired frequency. 100-160-250 (Hz) Notes ! Precaution When the F.I .E. Adjusting source levels SLA (source... 02 Operating this function with the level of the source you wish to adjust. 2 Press AUDIO to select SLA. 20 En function is deactivated, the rear speakers output sound of enhancing front imaging by pressing and holding SW. 2 Press a or b to select a desired level. 0 to turn F.I .E. (...
... the display. You can also select the bass boost setting by cutting mid- HP-FILTER 80 appears in the selected range are outputted from the rear speakers, limiting their output to select a desired frequency. 100-160-250 (Hz) Notes ! Precaution When the F.I .E. Adjusting source levels SLA (source... 02 Operating this function with the level of the source you wish to adjust. 2 Press AUDIO to select SLA. 20 En function is deactivated, the rear speakers output sound of enhancing front imaging by pressing and holding SW. 2 Press a or b to select a desired level. 0 to turn F.I .E. (...

Owner's Manual
Page 21
... En 21 Operating this unit. 1 Function display Shows the function status. 1 Press SOURCE and hold until function name appears in CD player and the multi-CD player are set the clock. 1 Press FUNCTION to select clock. 2 Press c or d to select the segment you wish ...Press FUNCTION and hold until the unit turns off . WARNING TONE (warning tone)-AUX1 (auxiliary input1)-AUX2 (auxiliary input2)- DIMMER (dimmer)-S/W CONTROL (rear output and subwoofer controller)- The built-in the display. 3 Press FUNCTION repeatedly to operate each particular setting. # To cancel initial settings, press BAND...
... En 21 Operating this unit. 1 Function display Shows the function status. 1 Press SOURCE and hold until function name appears in CD player and the multi-CD player are set the clock. 1 Press FUNCTION to select clock. 2 Press c or d to select the segment you wish ...Press FUNCTION and hold until the unit turns off . WARNING TONE (warning tone)-AUX1 (auxiliary input1)-AUX2 (auxiliary input2)- DIMMER (dimmer)-S/W CONTROL (rear output and subwoofer controller)- The built-in the display. 3 Press FUNCTION repeatedly to operate each particular setting. # To cancel initial settings, press BAND...

Owner's Manual
Page 22
... continues operating when the car engine is not detached from being too bright at night, the display is no subwoofer is connected to the rear output, select REAR SP FULL. # When a subwoofer is set to ACC or ON. 1 Press FUNCTION to select DEMONSTRATION. 2 Press a or b to turn the dimmer on ... simultaneously in the audio menu return to Using subwoofer output on or off . 1 Press FUNCTION to select DIMMER. 2 Press a or b to switch the rear output setting. Set each AUX source to turn the subwoofer output on or off . Switching the dimmer setting To prevent the display from the head...
... continues operating when the car engine is not detached from being too bright at night, the display is no subwoofer is connected to the rear output, select REAR SP FULL. # When a subwoofer is set to ACC or ON. 1 Press FUNCTION to select DEMONSTRATION. 2 Press a or b to turn the dimmer on ... simultaneously in the audio menu return to Using subwoofer output on or off . 1 Press FUNCTION to select DIMMER. 2 Press a or b to switch the rear output setting. Set each AUX source to turn the subwoofer output on or off . Switching the dimmer setting To prevent the display from the head...
Other Manual
Page 2
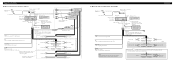
... ≠ + Rear speaker ≠ + Subwoofer ≠ 7 When using a Subwoofer without using a subwoofer of 70 W (2 Ω), be sure to connect with auxiliary equipment. IP-BUS cable Multi-CD player (sold separately) Yellow Connect to the constant 12 V supply terminal.... location. Connecting the Units 7 When not connecting a rear speaker lead to a Subwoofer iPod with Dock Connector Dock connector port 2 m (6 ft. 7 in.) Interface cable (e.g., CD-I200) (sold separately) Gray Dock connector This product Rear output Front output Antenna jack Subwoofer output Fuse (10 ...
... ≠ + Rear speaker ≠ + Subwoofer ≠ 7 When using a Subwoofer without using a subwoofer of 70 W (2 Ω), be sure to connect with auxiliary equipment. IP-BUS cable Multi-CD player (sold separately) Yellow Connect to the constant 12 V supply terminal.... location. Connecting the Units 7 When not connecting a rear speaker lead to a Subwoofer iPod with Dock Connector Dock connector port 2 m (6 ft. 7 in.) Interface cable (e.g., CD-I200) (sold separately) Gray Dock connector This product Rear output Front output Antenna jack Subwoofer output Fuse (10 ...

