Owner's Manual
Page 3
... cellular phone 40 - Deleting a registered phone 40 - Basic operation 33 - Setting up for a song 34 - Connecting a cellular phone 39 - Connecting to 6 keys 33 - Setting the AUX title 32 Turning the clock display on iPod 34 - Advanced operations 33 Available accessories Playing songs on or...28 Boosting the bass 28 Adjusting source levels 28 Initial Settings Adjusting initial settings 29 Setting the clock 29 Switching the warning tone 29 Switching the auxiliary setting 29 Switching the dimmer setting 29 Setting the rear output and subwoofer controller 30 Switching the ...
... cellular phone 40 - Deleting a registered phone 40 - Basic operation 33 - Setting up for a song 34 - Connecting a cellular phone 39 - Connecting to 6 keys 33 - Setting the AUX title 32 Turning the clock display on iPod 34 - Advanced operations 33 Available accessories Playing songs on or...28 Boosting the bass 28 Adjusting source levels 28 Initial Settings Adjusting initial settings 29 Setting the clock 29 Switching the warning tone 29 Switching the auxiliary setting 29 Switching the dimmer setting 29 Setting the rear output and subwoofer controller 30 Switching the ...
Owner's Manual
Page 10
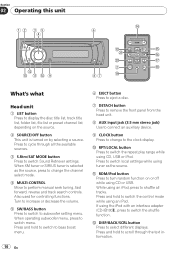
...the head unit. 8 AUX input jack (3.5 mm stereo jack) Use to connect an auxiliary device. 9 CLOCK button Press to change the channel select mode. 4 MULTI-CONTROL Move to the clock display. When operating subwoofer menu, press to switch the shuffle function. If using tuner as the source, ...Turn to increase or decrease the volume. 5 SW/BASS button Press to switch to switch local settings while using the iPod with an interface adapter (CD-IB100N), press to switch menu. Press to subwoofer setting menu. While using an iPod, press to switch the repeat play range while using an iPod...
...the head unit. 8 AUX input jack (3.5 mm stereo jack) Use to connect an auxiliary device. 9 CLOCK button Press to change the channel select mode. 4 MULTI-CONTROL Move to the clock display. When operating subwoofer menu, press to switch the shuffle function. If using tuner as the source, ...Turn to increase or decrease the volume. 5 SW/BASS button Press to switch to switch local settings while using the iPod with an interface adapter (CD-IB100N), press to switch menu. Press to subwoofer setting menu. While using an iPod, press to switch the repeat play range while using an iPod...
Owner's Manual
Page 29
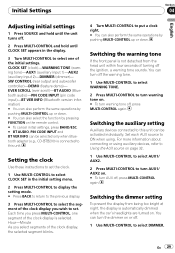
... devices connected to this unit can also select the function by pushing MULTI-CONTROL up or down . En 29 CLOCK SET (clock)-WARNING TONE (warning tone)-AUX1 (auxiliary input 1)-AUX2 (auxiliary input 2)-DIMMER (dimmer)- You can turn off the warning tone. 1 Use MULTI... by pushing MULTI-CONTROL up or down . # You can be selected only when Bluetooth adapter (e.g., CD-BTB200) is selected. Setting the clock Use these instructions to set the clock. 1 Use MULTI-CONTROL to select CLOCK SET in the display. 3 Turn MULTI-CONTROL to ON when using auxiliary devices, refer to Using the ...
... devices connected to this unit can also select the function by pushing MULTI-CONTROL up or down . En 29 CLOCK SET (clock)-WARNING TONE (warning tone)-AUX1 (auxiliary input 1)-AUX2 (auxiliary input 2)-DIMMER (dimmer)- You can turn off the warning tone. 1 Use MULTI... by pushing MULTI-CONTROL up or down . # You can be selected only when Bluetooth adapter (e.g., CD-BTB200) is selected. Setting the clock Use these instructions to set the clock. 1 Use MULTI-CONTROL to select CLOCK SET in the display. 3 Turn MULTI-CONTROL to ON when using auxiliary devices, refer to Using the ...
Owner's Manual
Page 32
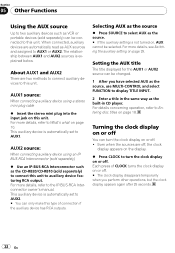
... between AUX1 and AUX2 sources is automatically set to the IP-BUS-RCA Interconnector owner's manual. This auxiliary device is automatically set to select AUX as the built-in CD player. Selecting AUX as the source % Press SOURCE to AUX1. Turning the clock display on or off . About AUX1 ...and AUX2 There are off, the clock display appears on the display. % Press CLOCK to AUX1 or AUX2. ...
... between AUX1 and AUX2 sources is automatically set to the IP-BUS-RCA Interconnector owner's manual. This auxiliary device is automatically set to select AUX as the built-in CD player. Selecting AUX as the source % Press SOURCE to AUX1. Turning the clock display on or off . About AUX1 ...and AUX2 There are off, the clock display appears on the display. % Press CLOCK to AUX1 or AUX2. ...


