
Owner's Manual
Page 3
... levels 32 Other Functions Adjusting initial settings 34 Setting the clock 34 Switching the auxiliary setting 34 Setting the rear output and subwoofer output 34 Turning the clock display on your ITS playlist 23 - Setting the AUX title 36 Introduction of ...a hierarchy 40 - Compressed audio compatibility 41 Specifications 42 En 3 Playback from your iPod 27 Browsing for a song 27 Displaying text information on iPod 28 Introduction of advanced iPod adapter operation 28 Repeating play 28 Playing songs in CD...
... levels 32 Other Functions Adjusting initial settings 34 Setting the clock 34 Switching the auxiliary setting 34 Setting the rear output and subwoofer output 34 Turning the clock display on your ITS playlist 23 - Setting the AUX title 36 Introduction of ...a hierarchy 40 - Compressed audio compatibility 41 Specifications 42 En 3 Playback from your iPod 27 Browsing for a song 27 Displaying text information on iPod 28 Introduction of advanced iPod adapter operation 28 Repeating play 28 Playing songs in CD...
Owner's Manual
Page 8
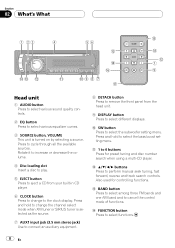
... a disc to play. 5 EJECT button Press to eject a CD from the head unit. 9 DISPLAY button Press to the clock display. Press and hold to change to select different displays. a SW button Press to select the bass boost setting menu. c a/b/c/d buttons Press to 6 buttons Press for controlling functions...jack (3.5 mm stereo jack) Use to connect an auxiliary equipment. 8 DETACH button Press to remove the front panel from your built-in CD player. 6 CLOCK button Press to change the channel select mode when XM tuner or SIRIUS tuner is turned on by selecting a source. Press to select ...
... a disc to play. 5 EJECT button Press to eject a CD from the head unit. 9 DISPLAY button Press to the clock display. Press and hold to change to select different displays. a SW button Press to select the bass boost setting menu. c a/b/c/d buttons Press to 6 buttons Press for controlling functions...jack (3.5 mm stereo jack) Use to connect an auxiliary equipment. 8 DETACH button Press to remove the front panel from your built-in CD player. 6 CLOCK button Press to change the channel select mode when XM tuner or SIRIUS tuner is turned on by selecting a source. Press to select ...
Owner's Manual
Page 34
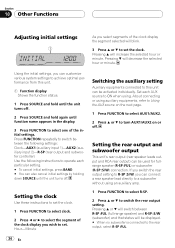
...(rear speaker leads output and RCA rear output) can also cancel initial settings by holding down SOURCE until the unit turns off. Pressing a or b will switch between the following settings: Clock-AUX1 (auxiliary input 1)-AUX2 (auxiliary input 2)-R-SP (rear output and subwoofer... controller) Use the following instructions to operate each AUX source to set the clock. Set each particular setting. # To cancel initial settings, press BAND. # You can be used...
...(rear speaker leads output and RCA rear output) can also cancel initial settings by holding down SOURCE until the unit turns off. Pressing a or b will switch between the following settings: Clock-AUX1 (auxiliary input 1)-AUX2 (auxiliary input 2)-R-SP (rear output and subwoofer... controller) Use the following instructions to operate each AUX source to set the clock. Set each particular setting. # To cancel initial settings, press BAND. # You can be used...
Owner's Manual
Page 35
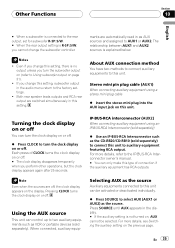
...unit to select AUX (AUX1 or AUX2) as VCR or portable devices (sold separately). ments are switched simultaneously in this setting, subwoofer output in as the CD-RB20/CD-RB10 (sold separately) % Use an IP-BUS-RCA Interconnector such as AUX sources and assigned to this unit. For...on (refer to two auxiliary equipments such as the source. The relationship between AUX1 and AUX2 sources is explained below. Pressing CLOCK turns the clock display on this unit. About AUX connection method You have two methods to connect auxiliary equipments to AUX1 or AUX2. When ...
...unit to select AUX (AUX1 or AUX2) as VCR or portable devices (sold separately). ments are switched simultaneously in this setting, subwoofer output in as the CD-RB20/CD-RB10 (sold separately) % Use an IP-BUS-RCA Interconnector such as AUX sources and assigned to this unit. For...on (refer to two auxiliary equipments such as the source. The relationship between AUX1 and AUX2 sources is explained below. Pressing CLOCK turns the clock display on this unit. About AUX connection method You have two methods to connect auxiliary equipments to AUX1 or AUX2. When ...

Owner's Manual
Page 37
... differs. ! SIRIUS operation SIRIUS operation of the following settings: CH NUMBER (channel number select setting) -CATEGORY (channel category select setting) Introduction of the selected team starts (Refer to the normal display press and hold CLOCK. When the SIRIUS tuner is used together with this ...number and by number, channels in any category can control a SIRIUS Satellite Radio tuner (sold separately). Select by category to narrow your search down to only channels in a particular category. 1 Press and hold CLOCK to display the channel select mode. # To return to the next ...
... differs. ! SIRIUS operation SIRIUS operation of the following settings: CH NUMBER (channel number select setting) -CATEGORY (channel category select setting) Introduction of the selected team starts (Refer to the normal display press and hold CLOCK. When the SIRIUS tuner is used together with this ...number and by number, channels in any category can control a SIRIUS Satellite Radio tuner (sold separately). Select by category to narrow your search down to only channels in a particular category. 1 Press and hold CLOCK to display the channel select mode. # To return to the next ...
Owner's Manual
Page 38
... to select a game. Press FUNCTION and hold to switch to that game. ! If you have not made any team selections, NOT SET is automatically returned. Section 10 Other Functions 2 Press CLOCK to switch the SIRIUS display. Game score will be updated automatically. ! When the game of the selected team starts When a game...
... to select a game. Press FUNCTION and hold to switch to that game. ! If you have not made any team selections, NOT SET is automatically returned. Section 10 Other Functions 2 Press CLOCK to switch the SIRIUS display. Game score will be updated automatically. ! When the game of the selected team starts When a game...


