

Owner's Manual
Page 2
Before you for purchasing this PIONEER product. Please keep the manual in this manual. Contents Thank you start Information to User 3 The Safety of Your Ears is especially important that you read through this manual before using this product. To ensure proper use, please read and ... Your Hands 3 About this unit 4 After-sales service for Pioneer products 4 In case of trouble 5 Visit our website 5 Resetting the microprocessor 5 Switching the DSP setting mode 5 Switching between RCA input modes 6 Demo mode 6 About this manual 6 Operating this unit Head unit 7 Remote control 7 Set ...
Before you for purchasing this PIONEER product. Please keep the manual in this manual. Contents Thank you start Information to User 3 The Safety of Your Ears is especially important that you read through this manual before using this product. To ensure proper use, please read and ... Your Hands 3 About this unit 4 After-sales service for Pioneer products 4 In case of trouble 5 Visit our website 5 Resetting the microprocessor 5 Switching the DSP setting mode 5 Switching between RCA input modes 6 Demo mode 6 About this manual 6 Operating this unit Head unit 7 Remote control 7 Set ...
Owner's Manual
Page 5
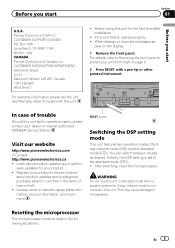
...unit for the first time after installation ! Register your dealer or nearest authorized PIONEER Service Station. After switching, reset the microprocessor. Box 1760 Long Beach, CA 90801-1760 800-421-1404 CANADA Pioneer Electronics of trouble Should this unit. When strange or incorrect messages ap- WARNING.... Before you start Section 01 Before you start U.S.A. If the unit fails to protect your product. ! Access owner's manuals, spare parts information, service information, and much more. For details, refer to Removing the front panel to operate properly !
...unit for the first time after installation ! Register your dealer or nearest authorized PIONEER Service Station. After switching, reset the microprocessor. Box 1760 Long Beach, CA 90801-1760 800-421-1404 CANADA Pioneer Electronics of trouble Should this unit. When strange or incorrect messages ap- WARNING.... Before you start Section 01 Before you start U.S.A. If the unit fails to protect your product. ! Access owner's manuals, spare parts information, service information, and much more. For details, refer to Removing the front panel to operate properly !

Owner's Manual
Page 6
... a thin, flathead screwdriver to ACC or ON while it is turned off . For more details on how to connect the unit, refer to the installation manual. % Use a thin, flathead screwdriver to change the DSP switch on /off the demo display. In this...
... a thin, flathead screwdriver to ACC or ON while it is turned off . For more details on how to connect the unit, refer to the installation manual. % Use a thin, flathead screwdriver to change the DSP switch on /off the demo display. In this...
Owner's Manual
Page 7
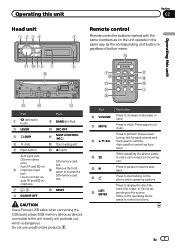
.... 9 h m i l j a 3 k Part g VOLUME h MUTE i a/b/c/d j ke l m LIST/ ENTER Operation Press to perform manual seek tuning, fast forward, reverse and track search controls. Press to increase or decrease volume. Press to pause or resume playback. Press to display the...to unmute. Press again to start talking on the source. Also used for controlling functions. crophone. 7 / f RESET 8 EQ/DISP OFF CAUTION Use a Pioneer USB cable when connecting the USB audio player/USB memory device as devices connected to end a call or reject an incoming call. Operating this unit...
.... 9 h m i l j a 3 k Part g VOLUME h MUTE i a/b/c/d j ke l m LIST/ ENTER Operation Press to perform manual seek tuning, fast forward, reverse and track search controls. Press to increase or decrease volume. Press to pause or resume playback. Press to display the...to unmute. Press again to start talking on the source. Also used for controlling functions. crophone. 7 / f RESET 8 EQ/DISP OFF CAUTION Use a Pioneer USB cable when connecting the USB audio player/USB memory device as devices connected to end a call or reject an incoming call. Operating this unit...
Owner's Manual
Page 10
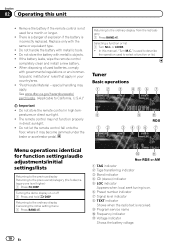
... store the remote control in direct sunlight. ! Returning to the previous list/category (the folder/category one level higher) 1 Press /DISP. Section 02 Operating this manual, "Turn M.C." Do not store the battery with governmental regulations or environmental public institutions' rules that apply in your country/area. !
... store the remote control in direct sunlight. ! Returning to the previous list/category (the folder/category one level higher) 1 Press /DISP. Section 02 Operating this manual, "Turn M.C." Do not store the battery with governmental regulations or environmental public institutions' rules that apply in your country/area. !
Owner's Manual
Page 11
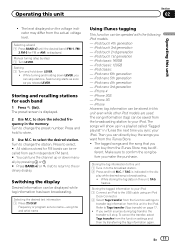
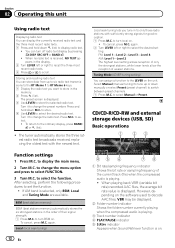
Manual tuning (step by pressing or . # Press BAND/ or (list) to return to confirm the song before you make the purchase. Seek tuning starts as soon ... and holding down LEVER, you switch sources during tag transfer, the transfer will show up or down LEVER. ! to store. 3 Use M.C. Press and hold down manually by step) 1 Turn LEVER. Frequency or program service name-song title and artist name Using iTunes tagging This function can be recalled from the broadcasting...
Manual tuning (step by pressing or . # Press BAND/ or (list) to return to confirm the song before you make the purchase. Seek tuning starts as soon ... and holding down LEVER, you switch sources during tag transfer, the transfer will show up or down LEVER. ! to store. 3 Use M.C. Press and hold down manually by step) 1 Turn LEVER. Frequency or program service name-song title and artist name Using iTunes tagging This function can be recalled from the broadcasting...
Owner's Manual
Page 12
.... If AM band is displayed. to the LEVER on the unit. When no radio text is playing. ! to display radio text. ! Select Manual (manual tuning) to tune up to six radio text transmissions to the RT Memo 1 to only those radio stations with the newest text. again. Turn ... 23 Function settings 1 Press M.C. However, depending on . Turn it to change the menu option and press to scroll. ting. to select. ! to select Manual or Preset. Local seek tuning lets you want to store in the display. 2 Turn LEVER left or right to change the radio text. to store...
.... If AM band is displayed. to the LEVER on the unit. When no radio text is playing. ! to display radio text. ! Select Manual (manual tuning) to tune up to six radio text transmissions to the RT Memo 1 to only those radio stations with the newest text. again. Turn ... 23 Function settings 1 Press M.C. However, depending on . Turn it to change the menu option and press to scroll. ting. to select. ! to select Manual or Preset. Local seek tuning lets you want to store in the display. 2 Turn LEVER left or right to change the radio text. to store...

Owner's Manual
Page 19
...-amp, multi-speaker system with front and rear speakers and subwoofers. You can switch between modes as desired. Pause (pause) 1 Press M.C. Operation mode marks This manual uses the following procedures to make the description clear. : This mark indicates a function only in 3-way network mode or an operation in 3-way network mode...
...-amp, multi-speaker system with front and rear speakers and subwoofers. You can switch between modes as desired. Pause (pause) 1 Press M.C. Operation mode marks This manual uses the following procedures to make the description clear. : This mark indicates a function only in 3-way network mode or an operation in 3-way network mode...
Owner's Manual
Page 33
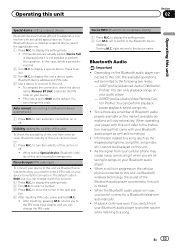
... automatically. ! left to switch to a Bluetooth device automatically) 1 Press M.C. When operating your player with this unit, refer to the instruction manual that are difficult to establish a connection with this function. 1 Press M.C. Playback continues even if you need to enter a PIN code on ...will be displayed on or off . Press to display the setting mode. 2 Turn M.C. To complete the connection, check the device name (Pioneer BT Unit) and enter the PIN code on the cellular phone connected to this operation. You can perform playback, pause playback, select songs...
... automatically. ! left to switch to a Bluetooth device automatically) 1 Press M.C. When operating your player with this unit, refer to the instruction manual that are difficult to establish a connection with this function. 1 Press M.C. Playback continues even if you need to enter a PIN code on ...will be displayed on or off . Press to display the setting mode. 2 Turn M.C. To complete the connection, check the device name (Pioneer BT Unit) and enter the PIN code on the cellular phone connected to this operation. You can perform playback, pause playback, select songs...

Owner's Manual
Page 37
... source. AUX2 source When connecting auxiliary device using the front AUX input. ! Follow the on the previous page. For more details, refer to the installation manual. Background visual-genre-background picture 1-background picture 2-background picture 3-background picture 4-spectrum analyzer1-spectrum analyzer2-level indicator-level meter-simple display-movie screen -calendar # Genre...
... source. AUX2 source When connecting auxiliary device using the front AUX input. ! Follow the on the previous page. For more details, refer to the installation manual. Background visual-genre-background picture 1-background picture 2-background picture 3-background picture 4-spectrum analyzer1-spectrum analyzer2-level indicator-level meter-simple display-movie screen -calendar # Genre...
Owner's Manual
Page 46
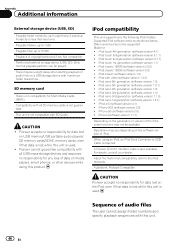
...depending on media players, smart phones, or other devices while using an iPod, an iPod Dock Connector to the iPod manuals. About the file/format compatibility, refer to USB Cable is not guaranteed. This unit is also available. Made for...generation (software version 2.1.1) ! iPhone 3GS (software version 3.0) ! iPod nano 4th generation (software version 1.0) ! There may not be supported. Pioneer accepts no compatibility for ! iPod compatibility This unit supports only the following iPod models. iPod nano 5th generation (software version 1.0.1) ! Compatibility with...
...depending on media players, smart phones, or other devices while using an iPod, an iPod Dock Connector to the iPod manuals. About the file/format compatibility, refer to USB Cable is not guaranteed. This unit is also available. Made for...generation (software version 2.1.1) ! iPhone 3GS (software version 3.0) ! iPod nano 4th generation (software version 1.0) ! There may not be supported. Pioneer accepts no compatibility for ! iPod compatibility This unit supports only the following iPod models. iPod nano 5th generation (software version 1.0.1) ! Compatibility with...
Installation Manual
Page 3
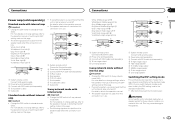
...output 5 Low range speaker 3-way network mode without internal amp Important ! This may cause damage to the operation manual. ! The following signals are not used when this unit. For details, refer to the speakers. White: Front...black: High range left * Violet: Rear right + Violet/black: Rear right * 1 3 2 4 5 5 1 System remote control Connect to the operation manual or Switching the DSP setting mode on this page. ! Initially, the DSP setting is in use . 1 3 2 4 5 5 3 1 2 6...
...output 5 Low range speaker 3-way network mode without internal amp Important ! This may cause damage to the operation manual. ! The following signals are not used when this unit. For details, refer to the speakers. White: Front...black: High range left * Violet: Rear right + Violet/black: Rear right * 1 3 2 4 5 5 1 System remote control Connect to the operation manual or Switching the DSP setting mode on this page. ! Initially, the DSP setting is in use . 1 3 2 4 5 5 3 1 2 6...
Installation Manual
Page 4
... you can be damaged if it may cause malfunctions. ! If connecting the unit to the operation manual. For installation in .) 8 To audio input Switching between RCA input modes on change settings, refer to the operation manual or Switching between RCA input modes % Use a thin, flathead screwdriver to the unit. L (Low) - Do not...
... you can be damaged if it may cause malfunctions. ! If connecting the unit to the operation manual. For installation in .) 8 To audio input Switching between RCA input modes on change settings, refer to the operation manual or Switching between RCA input modes % Use a thin, flathead screwdriver to the unit. L (Low) - Do not...

Installation Manual
Page 5
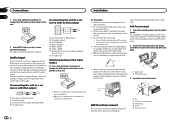
... panel upward and pull it toward you do not plan to detach the front panel, the front panel can remove the front panel to operation manual. DIN Rear-mount 1 Determine the appropriate position where the holes on each side. 1 3 2 1 Screw 2 Mounting bracket 3 Dashboard or console ! Removing and re-attaching the front...
... panel upward and pull it toward you do not plan to detach the front panel, the front panel can remove the front panel to operation manual. DIN Rear-mount 1 Determine the appropriate position where the holes on each side. 1 3 2 1 Screw 2 Mounting bracket 3 Dashboard or console ! Removing and re-attaching the front...


