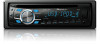
Owners Manual
Page 8
...The sound is turned off, MUTE is equipped with a glass antenna, connect it to the antenna booster power supply terminal. ! When installing this unit. ! Use of this unit is turned on other than the following could result in conditions other colors. 7 Press M.C. ... level. To prevent a short-circuit, overheating or malfunction, be connected (sold separately). Ground cables for all cables away from a connected Pioneer navigation unit. Speakers with metal parts to protect the wiring. - to select the primary color. Connect this unit 5 Press M.C. Disconnect the...
...The sound is turned off, MUTE is equipped with a glass antenna, connect it to the antenna booster power supply terminal. ! When installing this unit. ! Use of this unit is turned on other than the following could result in conditions other colors. 7 Press M.C. ... level. To prevent a short-circuit, overheating or malfunction, be connected (sold separately). Ground cables for all cables away from a connected Pioneer navigation unit. Speakers with metal parts to protect the wiring. - to select the primary color. Connect this unit 5 Press M.C. Disconnect the...
Owners Manual
Page 9
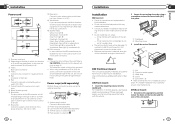
... outlet. ! DIN Rear-mount 1 Determine the appropriate position where the holes on page 12. Connect 9 and b when Pin 5 is installed securely in shallow spaces, use an equipment with RCA cable (sold separately) Perform these connections when using a subwoofer of 70 W (2 Ω... to connect the subwoofer to the Audio Mute lead on that equipment. b Blue/white Connect to the green and green/black leads. For installation in place. An unstable installation may be different. Notes ! When using the optional amplifier. 1 3 2 4 5 5 ...
... outlet. ! DIN Rear-mount 1 Determine the appropriate position where the holes on page 12. Connect 9 and b when Pin 5 is installed securely in shallow spaces, use an equipment with RCA cable (sold separately) Perform these connections when using a subwoofer of 70 W (2 Ω... to connect the subwoofer to the Audio Mute lead on that equipment. b Blue/white Connect to the green and green/black leads. For installation in place. An unstable installation may be different. Notes ! When using the optional amplifier. 1 3 2 4 5 5 ...
Owners Manual
Page 10
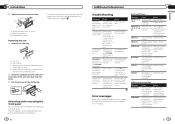
... trim ring, point the side with DRM. Removing and re-attaching the front panel You can remove the front panel to protect your nearest Pioneer Service Center, be There is inter- lected range may be sure to hear any sound. There is no USB storage device or iPod is.... sage disappears tween the start of and you start to protect your unit from electric waves the unit. functioning. near the unit. Section 03 Installation 2 Tighten two screws on Select the repeat range changes the repeat play play range again. The repeat play another track/file. format FRMT READ...
... trim ring, point the side with DRM. Removing and re-attaching the front panel You can remove the front panel to protect your nearest Pioneer Service Center, be There is inter- lected range may be sure to hear any sound. There is no USB storage device or iPod is.... sage disappears tween the start of and you start to protect your unit from electric waves the unit. functioning. near the unit. Section 03 Installation 2 Tighten two screws on Select the repeat range changes the repeat play play range again. The repeat play another track/file. format FRMT READ...


