Owner's Manual
Page 5
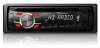
... ! Seek tuning starts as soon as sunshine, fire or the like. Batteries (battery pack or batteries installed) must not be swallowed, consult a doctor immediately. ! If the battery leaks, wipe the remote control completely clean and install a new battery. ! The remote control may become jammed under the brake or accelerator pedal. Menu operations...
... ! Seek tuning starts as soon as sunshine, fire or the like. Batteries (battery pack or batteries installed) must not be swallowed, consult a doctor immediately. ! If the battery leaks, wipe the remote control completely clean and install a new battery. ! The remote control may become jammed under the brake or accelerator pedal. Menu operations...

Owner's Manual
Page 10
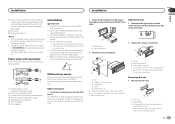
...antenna booster power supply terminal. ! Cover any disconnected cable connectors with cable clamps or adhesive tape. Use a fuse of the battery before installation. - Also, never connect it to the battery by ignition switch (12 V DC). i Subwoofer (4 Ω) Failure to the ... overheating or malfunction, be connected to the car separately with other device must be sure to share the power with different screws. Section 03 Installation Installation T Connections WARNING ! Use speakers over 50 W (output value) and between 4 W to the constant 12 V ...
...antenna booster power supply terminal. ! Cover any disconnected cable connectors with cable clamps or adhesive tape. Use a fuse of the battery before installation. - Also, never connect it to the battery by ignition switch (12 V DC). i Subwoofer (4 Ω) Failure to the ... overheating or malfunction, be connected to the car separately with other device must be sure to share the power with different screws. Section 03 Installation Installation T Connections WARNING ! Use speakers over 50 W (output value) and between 4 W to the constant 12 V ...
Owner's Manual
Page 11
... when using the optional amplifier. 1 3 2 4 5 5 3 1 2 6 7 7 Installation Important ! Power amp (sold separately) 4 To Rear output or subwoofer output 5 Rear speaker or subwoofer 6 To Front output 7 Front speaker DIN Front-mount 1... depending on each side. 1 3 2 1 Screw 2 Mounting bracket 3 Dashboard or console ! Releasing the front panel allows easier ac- Do not install this unit. Removing the unit 1 Remove the trim ring. 1 Trim ring 2 Notched tab ! l Subwoofer (4 Ω)× 2 Notes ! Change...
... when using the optional amplifier. 1 3 2 4 5 5 3 1 2 6 7 7 Installation Important ! Power amp (sold separately) 4 To Rear output or subwoofer output 5 Rear speaker or subwoofer 6 To Front output 7 Front speaker DIN Front-mount 1... depending on each side. 1 3 2 1 Screw 2 Mounting bracket 3 Dashboard or console ! Releasing the front panel allows easier ac- Do not install this unit. Removing the unit 1 Remove the trim ring. 1 Trim ring 2 Notched tab ! l Subwoofer (4 Ω)× 2 Notes ! Change...
Owner's Manual
Page 12
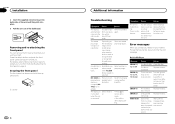
... disc. ERROR-15 ERROR-23 FRMT READ The inserted disc is interference. between the pears and you contact your dealer or your nearest Pioneer Service Center, be secured with the supplied screw. 1 1 Screw 12 En Additional Information Troubleshooting Symptom Cause Action The display automatically returns ... you start to note the error message. switch OFF and chanical error. Unsupported CD format Replace the disc. and when you . Appendix Installation 2 Insert the supplied extraction keys into both sides of the unit until the there is not played back. Turn off . There is ...
... disc. ERROR-15 ERROR-23 FRMT READ The inserted disc is interference. between the pears and you contact your dealer or your nearest Pioneer Service Center, be secured with the supplied screw. 1 1 Screw 12 En Additional Information Troubleshooting Symptom Cause Action The display automatically returns ... you start to note the error message. switch OFF and chanical error. Unsupported CD format Replace the disc. and when you . Appendix Installation 2 Insert the supplied extraction keys into both sides of the unit until the there is not played back. Turn off . There is ...


