
Operation Manual
Page 3
...any other media), broadcasting/streaming via internet, intranets and/ or other networks or in other countries. Protecting your dealer or nearest authorized Pioneer Service Station. Important ! About WMA About MP3 Supply of direct sunlight and high temperatures. Removing the front panel 1 Press DETACH to... details, please visit http://www.mp3licensing.com. Do not allow this manual handy as pay-audio or audio-on the application used to come into contact with liquids. ! Before You Start Section 01 English About this unit damage, smoke, and overheat could result. Also, this...
...any other media), broadcasting/streaming via internet, intranets and/ or other networks or in other countries. Protecting your dealer or nearest authorized Pioneer Service Station. Important ! About WMA About MP3 Supply of direct sunlight and high temperatures. Removing the front panel 1 Press DETACH to... details, please visit http://www.mp3licensing.com. Do not allow this manual handy as pay-audio or audio-on the application used to come into contact with liquids. ! Before You Start Section 01 English About this unit damage, smoke, and overheat could result. Also, this...
Operation Manual
Page 5
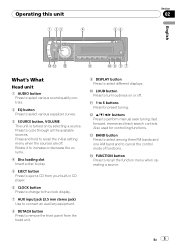
...the control mode of functions. Also used for preset tuning. c a/b/c/d buttons Press to cycle through all the available sources. Press to perform manual seek tuning, fast forward, reverse and track search controls. En 5 Rotate it to increase or decrease the volume. 4 Disc loading slot ... to remove the front panel from the head unit. 9 DISPLAY button Press to select different displays. Operating this unit 1 23 4 56 Section 02 English ed c b a9 8 7 What's What Head unit 1 AUDIO button Press to select various sound quality controls. 2 EQ button Press to select various...
...the control mode of functions. Also used for preset tuning. c a/b/c/d buttons Press to cycle through all the available sources. Press to perform manual seek tuning, fast forward, reverse and track search controls. En 5 Rotate it to increase or decrease the volume. 4 Disc loading slot ... to remove the front panel from the head unit. 9 DISPLAY button Press to select different displays. Operating this unit 1 23 4 56 Section 02 English ed c b a9 8 7 What's What Head unit 1 AUDIO button Press to select various sound quality controls. 2 EQ button Press to select various...

Operation Manual
Page 7
... the following cases, the sound source will scan the frequencies until the desired band (F1, F2, F3 for FM or AM) is displayed. 3 To perform manual tuning, briefly press c or d. 4 To perform seek tuning, press and hold c or d you can skip stations. Press BAND until a broadcast strong enough ... % When you find a frequency that you want to listen to. When the AUX (auxiliary input) is turned on. Operating this unit Section 02 English Basic Operations Turning the unit on and selecting a source You can select a source you want to store in memory, press one second and release. ...
... the following cases, the sound source will scan the frequencies until the desired band (F1, F2, F3 for FM or AM) is displayed. 3 To perform manual tuning, briefly press c or d. 4 To perform seek tuning, press and hold c or d you can skip stations. Press BAND until a broadcast strong enough ... % When you find a frequency that you want to listen to. When the AUX (auxiliary input) is turned on. Operating this unit Section 02 English Basic Operations Turning the unit on and selecting a source You can select a source you want to store in memory, press one second and release. ...

Installation Manual
Page 1
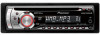
... it .) • It becomes easy to new cord colors. Insert the supplied extraction keys into place. 3. Screw Dashboard or Console Factory radio mounting bracket ENGLISH As cores dos fios deste produto seguem um novo padrão de cores. Æ...b¹b uë lÄ "UN'« «c¼ ...the side of the unit until they are not blocking the vents. Secure the mounting sleeve by using this unit where: - INSTALLATION MANUAL DEH-2950MP DEH-1950 DEH-1950G This product conforms to remove the trim ring if the front panel is released. Trim ring 2. Extend top and bottom of ...
... it .) • It becomes easy to new cord colors. Insert the supplied extraction keys into place. 3. Screw Dashboard or Console Factory radio mounting bracket ENGLISH As cores dos fios deste produto seguem um novo padrão de cores. Æ...b¹b uë lÄ "UN'« «c¼ ...the side of the unit until they are not blocking the vents. Secure the mounting sleeve by using this unit where: - INSTALLATION MANUAL DEH-2950MP DEH-1950 DEH-1950G This product conforms to remove the trim ring if the front panel is released. Trim ring 2. Extend top and bottom of ...

Installation Manual
Page 4
... the speaker negative cable directly to the constant 12 V supply terminal. 10. Power amp (sold separately) + 12. Red Connect to check all manuals and connect cords correctly. White/black 19. ENGLISH Rear output 3. Black (chassis ground) Connect to the constant 12 V supply terminal. 10. Fuse (10 A) 6. Blue/white Connect to system control...
... the speaker negative cable directly to the constant 12 V supply terminal. 10. Power amp (sold separately) + 12. Red Connect to check all manuals and connect cords correctly. White/black 19. ENGLISH Rear output 3. Black (chassis ground) Connect to the constant 12 V supply terminal. 10. Fuse (10 A) 6. Blue/white Connect to system control...


