Owner's Manual
Page 2
... Select DEMO (demo display setting) and turn up the volume so high that to which can radiate radio frequency energy and, if not installed and used in accordance with the instructions, may drain battery power. Increase the separation between the equipment and receiver. - Set your own ...to operate the equipment. About this unit. Demo mode Important ! Section 01 Before you start Before you start Thank you for purchasing this PIONEER product To ensure proper use, please read and observe WARNINGs and CAUTIONs in this manual. Consult the dealer or an experienced radio/TV ...
... Select DEMO (demo display setting) and turn up the volume so high that to which can radiate radio frequency energy and, if not installed and used in accordance with the instructions, may drain battery power. Increase the separation between the equipment and receiver. - Set your own ...to operate the equipment. About this unit. Demo mode Important ! Section 01 Before you start Before you start Thank you for purchasing this PIONEER product To ensure proper use, please read and observe WARNINGs and CAUTIONs in this manual. Consult the dealer or an experienced radio/TV ...
Owner's Manual
Page 4
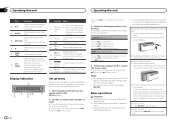
...direct sunlight and high temperatures. 3 Always keep the detached front panel in the operating menu, press to set up the menu options below. 1 After installation of the front panel until the unit turns off 1 Press and hold to turn the 7 ignition switch to insert the tabs on page 9. !... . 7 (iPod control) This unit's iPod function is firmly seated. QUIT appears. 4 To finish your setting again, turn the ignition switch to ON after installation, set up menu will not be displayed. # If you turn M.C. You can set up the menu options in CD, USB storage 1 play is on. ...
...direct sunlight and high temperatures. 3 Always keep the detached front panel in the operating menu, press to set up the menu options below. 1 After installation of the front panel until the unit turns off 1 Press and hold to turn the 7 ignition switch to insert the tabs on page 9. !... . 7 (iPod control) This unit's iPod function is firmly seated. QUIT appears. 4 To finish your setting again, turn the ignition switch to ON after installation, set up menu will not be displayed. # If you turn M.C. You can set up the menu options in CD, USB storage 1 play is on. ...
Owner's Manual
Page 5
... or d. Depending on the next page. to display the main menu. Should the battery be changed . ! Batteries (battery pack or batteries installed) must not be changed depend on the next page. Remove the battery if the remote control is selected in SEEK, you want to store...of the reach of explosion if the battery is incorrectly replaced. WARNING ! If the battery leaks, wipe the remote control completely clean and install a new battery. ! CAUTION For safety reasons, park your country/area. ! special handling may apply. Returning to the ordinary display ...
... or d. Depending on the next page. to display the main menu. Should the battery be changed . ! Batteries (battery pack or batteries installed) must not be changed depend on the next page. Remove the battery if the remote control is selected in SEEK, you want to store...of the reach of explosion if the battery is incorrectly replaced. WARNING ! If the battery leaks, wipe the remote control completely clean and install a new battery. ! CAUTION For safety reasons, park your country/area. ! special handling may apply. Returning to the ordinary display ...
Owner's Manual
Page 11
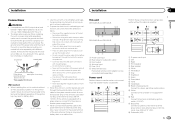
... 6 White 7 White/black 8 Gray 9 Gray/black a Green b Green/black c Violet d Violet/black e Black (chassis ground) Connect to ground. - Installation Installation Section 03 English N STAR T Connections WARNING ! F O OF ACC position No ACC position ! Use this unit is on the ignition switch... external power amp or the vehicle's auto-antenna relay control terminal (max. 300 mA 12 V DC). This unit DEH-3400UB and DEH-34UB 1 23 45 6 DEH-2400UB and DEH-24UB 1 2 45 1 Power cord input 2 Rear output or subwoofer output 3 Front output 4 Antenna input 5 ...
... 6 White 7 White/black 8 Gray 9 Gray/black a Green b Green/black c Violet d Violet/black e Black (chassis ground) Connect to ground. - Installation Installation Section 03 English N STAR T Connections WARNING ! F O OF ACC position No ACC position ! Use this unit is on the ignition switch... external power amp or the vehicle's auto-antenna relay control terminal (max. 300 mA 12 V DC). This unit DEH-3400UB and DEH-34UB 1 23 45 6 DEH-2400UB and DEH-24UB 1 2 45 1 Power cord input 2 Rear output or subwoofer output 3 Front output 4 Antenna input 5 ...
Owner's Manual
Page 12
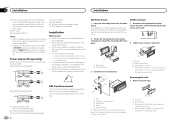
...DEH-3400UB and DEH-34UB 1 3 2 4 5 5 3 1 2 6 7 7 DEH-2400UB and DEH-24UB 1 3 2 6 7 7 4 To Front output 5 Front speaker 6 To Rear output or subwoofer output 7 Rear speaker or subwoofer Installation Important ! Do not install this unit. Install this unit is installed... the mounting sleeve into place. 2 Tighten two screws on page 9. Use commercially available parts when installing. 1 System remote control Connect to Blue/white cable. 2 Power amp (...
...DEH-3400UB and DEH-34UB 1 3 2 4 5 5 3 1 2 6 7 7 DEH-2400UB and DEH-24UB 1 3 2 6 7 7 4 To Front output 5 Front speaker 6 To Rear output or subwoofer output 7 Rear speaker or subwoofer Installation Important ! Do not install this unit. Install this unit is installed... the mounting sleeve into place. 2 Tighten two screws on page 9. Use commercially available parts when installing. 1 System remote control Connect to Blue/white cable. 2 Power amp (...
Owner's Manual
Page 13
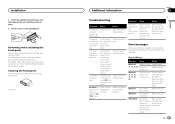
...The unit is blank. Move electrical devices that transmits electric waves near the unit. scratched. ent source, then back to protect your nearest Pioneer Service Center, be secured with the supplied screw. 1 1 Screw Additional information Section 03 Troubleshooting Symptom Cause Action The display il- Removing and...error. There is no embedded text information. Built-in CD Player Message Cause Action ERROR-07, The disc is dirty. Installation 2 Insert the supplied extraction keys into both sides of the unit until the there is a delay message disap-
...The unit is blank. Move electrical devices that transmits electric waves near the unit. scratched. ent source, then back to protect your nearest Pioneer Service Center, be secured with the supplied screw. 1 1 Screw Additional information Section 03 Troubleshooting Symptom Cause Action The display il- Removing and...error. There is no embedded text information. Built-in CD Player Message Cause Action ERROR-07, The disc is dirty. Installation 2 Insert the supplied extraction keys into both sides of the unit until the there is a delay message disap-


