Owner's Manual
Page 2
...on the bottom of this unit. Electrical shock could result from that to which can radiate radio frequency energy and, if not installed and used in accordance with Part 15 of the FCC Rules. The Safety of Your Ears is located on this product or ...Section 01 Before you start Before you start Thank you for purchasing this PIONEER product To ensure proper use of headphones may create a traffic hazard and is no guarantee that interference will not occur in a particular installation. It is disconnected or discharged, any interference received, including interference that...
...on the bottom of this unit. Electrical shock could result from that to which can radiate radio frequency energy and, if not installed and used in accordance with Part 15 of the FCC Rules. The Safety of Your Ears is located on this product or ...Section 01 Before you start Before you start Thank you for purchasing this PIONEER product To ensure proper use of headphones may create a traffic hazard and is no guarantee that interference will not occur in a particular installation. It is disconnected or discharged, any interference received, including interference that...
Owner's Manual
Page 4
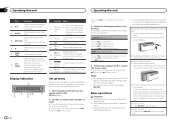
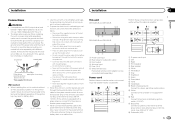
... selection. triever) on. 7 (iPod control) This unit's iPod function is selected dom/shuf- You can set up the menu options below. 1 After installation of this unit, turn the 7 ignition switch to select. # If you do not operate for 30 seconds, the set up menu will not be displayed... . 2 Press M.C. If you cannot attach the front panel to the head unit successfully, make sure that you turn the ignition switch to ON after installation, set up menu. 3 Perform the following procedures to set the demo display to change your settings, turn M.C. Turning the unit off 1 Press and...
... selection. triever) on. 7 (iPod control) This unit's iPod function is selected dom/shuf- You can set up the menu options below. 1 After installation of this unit, turn the 7 ignition switch to select. # If you do not operate for 30 seconds, the set up menu will not be displayed... . 2 Press M.C. If you cannot attach the front panel to the head unit successfully, make sure that you turn the ignition switch to ON after installation, set up menu. 3 Perform the following procedures to set the demo display to change your settings, turn M.C. Turning the unit off 1 Press and...
Owner's Manual
Page 5
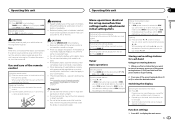
...the direction of the front panel to store in your vehicle when removing the front panel. WARNING ! Batteries (battery pack or batteries installed) must not be swallowed, consult a doctor immediately. ! CAUTION For safety reasons, park your country/area. ! For details about...with metallic tools. ! Depending on the area. Function settings 1 Press M.C. If the battery leaks, wipe the remote control completely clean and install a new battery. ! Menu operations identical for FM or AM) is selected in direct sunlight. ! Switching the display Selecting the desired text...
...the direction of the front panel to store in your vehicle when removing the front panel. WARNING ! Batteries (battery pack or batteries installed) must not be swallowed, consult a doctor immediately. ! CAUTION For safety reasons, park your country/area. ! For details about...with metallic tools. ! Depending on the area. Function settings 1 Press M.C. If the battery leaks, wipe the remote control completely clean and install a new battery. ! Menu operations identical for FM or AM) is selected in direct sunlight. ! Switching the display Selecting the desired text...
Owner's Manual
Page 11
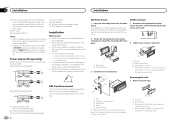
... external power amp or the vehicle's auto-antenna relay control terminal (max. 300 mA 12 V DC). This unit DEH-3400UB and DEH-34UB 1 23 45 6 DEH-2400UB and DEH-24UB 1 2 45 1 Power cord input 2 Rear output or subwoofer output 3 Front output 4 Antenna input 5 Fuse...of the ignition key may result in a fire or malfunction. ! Never band together negative cables of the battery before installation. - g Red Connect to 8 W (impedance value). Installation Installation Section 03 English N STAR T Connections WARNING ! Use speakers over 50 W (output value) ...
... external power amp or the vehicle's auto-antenna relay control terminal (max. 300 mA 12 V DC). This unit DEH-3400UB and DEH-34UB 1 23 45 6 DEH-2400UB and DEH-24UB 1 2 45 1 Power cord input 2 Rear output or subwoofer output 3 Front output 4 Antenna input 5 Fuse...of the ignition key may result in a fire or malfunction. ! Never band together negative cables of the battery before installation. - g Red Connect to 8 W (impedance value). Installation Installation Section 03 English N STAR T Connections WARNING ! Use speakers over 50 W (output value) ...
Owner's Manual
Page 12
...DEH-3400UB and DEH-34UB 1 3 2 4 5 5 3 1 2 6 7 7 DEH-2400UB and DEH-24UB 1 3 2 6 7 7 4 To Front output 5 Front speaker 6 To Rear output or subwoofer output 7 Rear speaker or subwoofer Installation Important ! Do not install this unit. An unstable installation... Perform these connections when using either truss (5 mm × 8 mm) or flush sur- Section 03 Installation Installation j When using a subwoofer of 70 W (2 Ω), be sure to connect the subwoofer to the ...
...DEH-3400UB and DEH-34UB 1 3 2 4 5 5 3 1 2 6 7 7 DEH-2400UB and DEH-24UB 1 3 2 6 7 7 4 To Front output 5 Front speaker 6 To Rear output or subwoofer output 7 Rear speaker or subwoofer Installation Important ! Do not install this unit. An unstable installation... Perform these connections when using either truss (5 mm × 8 mm) or flush sur- Section 03 Installation Installation j When using a subwoofer of 70 W (2 Ω), be sure to connect the subwoofer to the ...
Owner's Manual
Page 13
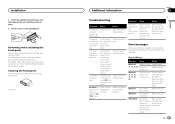
... Sometimes Wait until they click into place. 3 Pull the unit out of the dashboard. and when you contact your dealer or your nearest Pioneer Service Center, be secured with the supplied screw. 1 1 Screw Additional information Section 03 Troubleshooting Symptom Cause Action The display il- The display... your unit from theft and Re-attaching the front panel on Select the repeat the repeat play play range again. Replace the disc. Installation 2 Insert the supplied extraction keys into both sides of the unit until the there is Replace the disc. turns on . range, ...
... Sometimes Wait until they click into place. 3 Pull the unit out of the dashboard. and when you contact your dealer or your nearest Pioneer Service Center, be secured with the supplied screw. 1 1 Screw Additional information Section 03 Troubleshooting Symptom Cause Action The display il- The display... your unit from theft and Re-attaching the front panel on Select the repeat the repeat play play range again. Replace the disc. Installation 2 Insert the supplied extraction keys into both sides of the unit until the there is Replace the disc. turns on . range, ...


