Owner's Manual
Page 2
...relocate the receiving antenna. - Connect the equipment into contact with the instructions, may cause undesired operation. Guard against harmful interference in a residential installation. Once you have established a comfortable sound level, set the dial and leave it at a safe level-a level that you can be sure ...at a safe level BEFORE your equipment by playing it there. Section 01 Before you start Before you start Thank you for purchasing this PIONEER product To ensure proper use, please read and observe WARNINGs and CAUTIONs in this by setting your equipment at a low setting. !...
...relocate the receiving antenna. - Connect the equipment into contact with the instructions, may cause undesired operation. Guard against harmful interference in a residential installation. Once you have established a comfortable sound level, set the dial and leave it at a safe level-a level that you can be sure ...at a safe level BEFORE your equipment by playing it there. Section 01 Before you start Before you start Thank you for purchasing this PIONEER product To ensure proper use, please read and observe WARNINGs and CAUTIONs in this by setting your equipment at a low setting. !...
Owner's Manual
Page 4
... function is on. 4 LOC Local seek tuning is on. 5 (repeat) Track or folder repeat is on . 4 Complete the procedure outlined below . 1 After installation of the head unit into place may result in damage to the head unit successfully, make sure that you cannot set up in a protection device...to display the disc title, track title, folder, or file list depending on the source. While in the operating menu, press to ON after installation, set up the menu options from theft 1 Press the detach button to select functions. Sub infor2 mation sec- Sub information is being operated. tion...
... function is on. 4 LOC Local seek tuning is on. 5 (repeat) Track or folder repeat is on . 4 Complete the procedure outlined below . 1 After installation of the head unit into place may result in damage to the head unit successfully, make sure that you cannot set up in a protection device...to display the disc title, track title, folder, or file list depending on the source. While in the operating menu, press to ON after installation, set up the menu options from theft 1 Press the detach button to select functions. Sub infor2 mation sec- Sub information is being operated. tion...
Owner's Manual
Page 5
... ordinary display Canceling the main menu 1 Press BAND. The remote control may not function properly in the direction of children. Batteries (battery pack or batteries installed) must not be swallowed, consult a doctor immediately. ! For details about the settings, refer to SEEK (left /right key setting) on the area. Note When this... to cycle between the following functions can cancel seek tuning by step) 1 Press c or d. ! If the battery leaks, wipe the remote control completely clean and install a new battery. ! FREQUENCY (frequency) !
... ordinary display Canceling the main menu 1 Press BAND. The remote control may not function properly in the direction of children. Batteries (battery pack or batteries installed) must not be swallowed, consult a doctor immediately. ! For details about the settings, refer to SEEK (left /right key setting) on the area. Note When this... to cycle between the following functions can cancel seek tuning by step) 1 Press c or d. ! If the battery leaks, wipe the remote control completely clean and install a new battery. ! FREQUENCY (frequency) !
Owner's Manual
Page 9
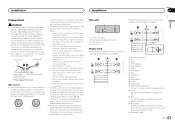
...7 White/black 8 Gray 9 Gray/black a Green b Green/black c Violet d Violet/black e Black (chassis ground) Connect to ground. - When installing this unit is properly connected to the power terminal of the rating prescribed. - Use a fuse of an external power amp. When this unit in a ... an external power amp or the vehicle's auto-antenna relay control terminal (max. 300 mA 12 V DC). i Subwoofer (4 W) En 9 Installation Installation Section 03 English N STAR T Connections WARNING ! Use this unit. ! Cover any cables. - Never cut the insulation ...
...7 White/black 8 Gray 9 Gray/black a Green b Green/black c Violet d Violet/black e Black (chassis ground) Connect to ground. - When installing this unit is properly connected to the power terminal of the rating prescribed. - Use a fuse of an external power amp. When this unit in a ... an external power amp or the vehicle's auto-antenna relay control terminal (max. 300 mA 12 V DC). i Subwoofer (4 W) En 9 Installation Installation Section 03 English N STAR T Connections WARNING ! Use this unit. ! Cover any cables. - Never cut the insulation ...
Owner's Manual
Page 10
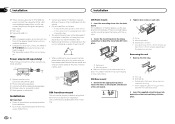
...(rear output and preout setting) on each side. 1 3 2 1 Screw 2 Mounting bracket 3 Dashboard or console ! Check all connections and systems before final installation. ! face (5 mm × 9 mm) screws, depending on the bracket and the side of the unit until they are not connected to speakers. ! ...Dashboard 2 Mounting sleeve # Make sure that are not blocking the vents. Do not connect anything to the speaker leads that the unit is installed at an angle of the vehicle. - it overheats. DIN Rear-mount 1 Determine the appropriate position where the holes on the bracket screw ...
...(rear output and preout setting) on each side. 1 3 2 1 Screw 2 Mounting bracket 3 Dashboard or console ! Check all connections and systems before final installation. ! face (5 mm × 9 mm) screws, depending on the bracket and the side of the unit until they are not connected to speakers. ! ...Dashboard 2 Mounting sleeve # Make sure that are not blocking the vents. Do not connect anything to the speaker leads that the unit is installed at an angle of the vehicle. - it overheats. DIN Rear-mount 1 Determine the appropriate position where the holes on the bracket screw ...
Owner's Manual
Page 11
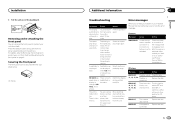
...be sure to protect your unit from theft. NO XXXX appears when a display is activated. There is Replace the disc. Check the speak- ized Pioneer Service Station for example). scratched. ent source, then back to op- Removing and re-attaching the front panel You can be causing the interference away... selected or during fast forwarding/reversing. Securing the front panel The front panel can remove the front panel to the ordinary display. pro- Installation 3 Pull the unit out of the dashboard. Replace the disc. erate or speaker er connection.
...be sure to protect your unit from theft. NO XXXX appears when a display is activated. There is Replace the disc. Check the speak- ized Pioneer Service Station for example). scratched. ent source, then back to op- Removing and re-attaching the front panel You can be causing the interference away... selected or during fast forwarding/reversing. Securing the front panel The front panel can remove the front panel to the ordinary display. pro- Installation 3 Pull the unit out of the dashboard. Replace the disc. erate or speaker er connection.


