
Installation Manual
Page 1
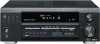
AUDIO/VIDEO MULTI-CHANNEL RECEIVER VSX-D814 VSX-D914 Operating Instructions
AUDIO/VIDEO MULTI-CHANNEL RECEIVER VSX-D814 VSX-D914 Operating Instructions
Installation Manual
Page 6
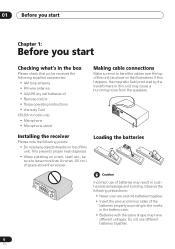
... different batteries together. 6 En 01 Before you start Chapter 1: Before you start Checking what's in the box Please check that you've received the following precautions: • Never use new and old batteries together. • Insert the plus and minus sides of the batteries properly ...antenna • FM wire antenna • AA/LR6 dry cell batteries x2 • Remote control • These operating instructions • Warranty Card VSX-D914 model only: • Microphone • Microphone stand Making cable connections Make sure not to bend the cables over the top of this unit....
... different batteries together. 6 En 01 Before you start Chapter 1: Before you start Checking what's in the box Please check that you've received the following precautions: • Never use new and old batteries together. • Insert the plus and minus sides of the batteries properly ...antenna • FM wire antenna • AA/LR6 dry cell batteries x2 • Remote control • These operating instructions • Warranty Card VSX-D914 model only: • Microphone • Microphone stand Making cable connections Make sure not to bend the cables over the top of this unit....

Installation Manual
Page 11
.../LD is selected. VSX-D914 model only - 5 minute guide 02 • If you select subwoofer (SB SW) in the Surround back speaker setting on your DVD player or source discs, you may only get digital 2 channel stereo and analog sound. In this case, the listening mode must be set the receiver to the DVD...
.../LD is selected. VSX-D914 model only - 5 minute guide 02 • If you select subwoofer (SB SW) in the Surround back speaker setting on your DVD player or source discs, you may only get digital 2 channel stereo and analog sound. In this case, the listening mode must be set the receiver to the DVD...
Installation Manual
Page 12
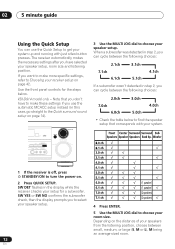
VSX-D914 model only - Note that corresponds with just a few button presses. When a subwoofer was detected in step 2, you can cycle between the following choices: 2.0ch 7.... R ENTER MULTI JOG MASTER VOLUME DOWN UP 3 Use the MULTI JOG dial to choose your room size. SW DET flashes in the display while the receiver checks your setup for the steps below to find the speaker setup that you don't have selected your speaker setup, room size and listening position...
VSX-D914 model only - Note that corresponds with just a few button presses. When a subwoofer was detected in step 2, you can cycle between the following choices: 2.0ch 7.... R ENTER MULTI JOG MASTER VOLUME DOWN UP 3 Use the MULTI JOG dial to choose your room size. SW DET flashes in the display while the receiver checks your setup for the steps below to find the speaker setup that you don't have selected your speaker setup, room size and listening position...
Installation Manual
Page 14
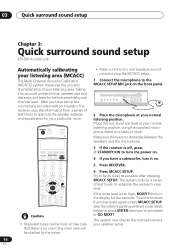
...QUICK SETUP TUNER EDIT CLASS BAND LISTENING MODE MPX INPUT ATT FL DIMMER MCACC SETUP MIC DIGITAL IN VIDEO INPUT S-VIDEO VIDEO L AUDIO R MULTI JOG 2 Place the microphone at your...chair. DVD/LD TV/SAT DVR/VCR TVCONT MULTI CONTROL CD CD-R/TAPE TUNER RECEIVER 3 If the receiver is no obstacles between the speakers and the microphone. Try to be loud,...Quick surround sound setup Chapter 3: Quick surround sound setup VSX-D914 model only Automatically calibrating your listening area (MCACC) The Multi-Channel Acoustic Calibration (MCACC) system measures the acoustic characteristics of...
...QUICK SETUP TUNER EDIT CLASS BAND LISTENING MODE MPX INPUT ATT FL DIMMER MCACC SETUP MIC DIGITAL IN VIDEO INPUT S-VIDEO VIDEO L AUDIO R MULTI JOG 2 Place the microphone at your...chair. DVD/LD TV/SAT DVR/VCR TVCONT MULTI CONTROL CD CD-R/TAPE TUNER RECEIVER 3 If the receiver is no obstacles between the speakers and the microphone. Try to be loud,...Quick surround sound setup Chapter 3: Quick surround sound setup VSX-D914 model only Automatically calibrating your listening area (MCACC) The Multi-Channel Acoustic Calibration (MCACC) system measures the acoustic characteristics of...
Installation Manual
Page 19
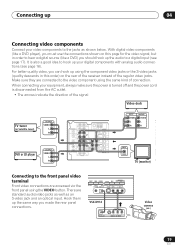
... 18). STEREO/ DIRECT SIGNAL MIDNIGHT/ SELECT LOUDNESS SPEAKERS SB CH MODE MULTI JOG TONE QUICK SETUP ODE MCACC VIDEO INPUT SETUP MIC DIGITAL IN S-VIDEO VIDEO L AUDIO R VSX-D914 DIGITAL OUT V L R VIDEO OUTPUT Video camera (etc.) 19 En For better quality video, you can hook up using the component ...or the S-video jacks (quality descends in order to hear a digital source (like a DVD player), you must use the connections shown on this page for the video signal, but in this order) on the rear of the receiver instead of the regular video jacks. There are standard audio/video...
... 18). STEREO/ DIRECT SIGNAL MIDNIGHT/ SELECT LOUDNESS SPEAKERS SB CH MODE MULTI JOG TONE QUICK SETUP ODE MCACC VIDEO INPUT SETUP MIC DIGITAL IN S-VIDEO VIDEO L AUDIO R VSX-D914 DIGITAL OUT V L R VIDEO OUTPUT Video camera (etc.) 19 En For better quality video, you can hook up using the component ...or the S-video jacks (quality descends in order to hear a digital source (like a DVD player), you must use the connections shown on this page for the video signal, but in this order) on the rear of the receiver instead of the regular video jacks. There are standard audio/video...
Installation Manual
Page 26
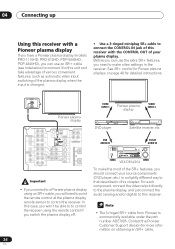
... SR+ features, you need to point the remote control at the plasma display remote sensor to control the receiver. Contact the Pioneer Customer Support division for detailed instructions. For each component, connect the video output directly to the plasma display,...CHANNEL RECEIVER VSX-D914 TUNING ADVANCED STANDARD SURROUND STEREO/ DIRECT SIGNAL SELECT MIDNIGHT/ LOUDNESS SPEAKERS SB CH MODE MULTI JOG TONE QUICK SETUP BAND LISTENING MODE MPX INPUT ATT FL DIMMER MCACC SETUP MIC DIGITAL IN VIDEO INPUT S-VIDEO VIDEO L AUDIO R ENTER MULTI JOG MASTER VOLUME DOWN UP VSX-D814...
... SR+ features, you need to point the remote control at the plasma display remote sensor to control the receiver. Contact the Pioneer Customer Support division for detailed instructions. For each component, connect the video output directly to the plasma display,...CHANNEL RECEIVER VSX-D914 TUNING ADVANCED STANDARD SURROUND STEREO/ DIRECT SIGNAL SELECT MIDNIGHT/ LOUDNESS SPEAKERS SB CH MODE MULTI JOG TONE QUICK SETUP BAND LISTENING MODE MPX INPUT ATT FL DIMMER MCACC SETUP MIC DIGITAL IN VIDEO INPUT S-VIDEO VIDEO L AUDIO R ENTER MULTI JOG MASTER VOLUME DOWN UP VSX-D814...
Installation Manual
Page 27
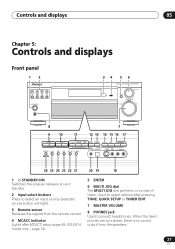
...and displays Front panel 12 DVD/LD TV/SAT DVR/VCR VIDEO CD-R/ CD TAPE/MD TUNER AUX STANDBY/ON PHONES 34 5 6 AUDIO/VIDEO MULTI-CHANNEL RECEIVER VSX-D914 ENTER MULTI JOG MASTER VOLUME DOWN UP 8 7 9 10 11 12 13 14 15 16 17 STATION TUNING ADVANCED STEREO/ STANDARD SURROUND DIRECT SIGNAL...SETUP TUNER EDIT CLASS BAND LISTENING MODE MPX INPUT ATT FL DIMMER MCACC SETUP MIC DIGITAL IN VIDEO INPUT S-VIDEO VIDEO L AUDIO R MULTI JOG 26 25 24 23 22 21 20 19 18 1 STANDBY/ON Switches the receiver between on and standby. 2 Input select buttons Press to select an input source...
...and displays Front panel 12 DVD/LD TV/SAT DVR/VCR VIDEO CD-R/ CD TAPE/MD TUNER AUX STANDBY/ON PHONES 34 5 6 AUDIO/VIDEO MULTI-CHANNEL RECEIVER VSX-D914 ENTER MULTI JOG MASTER VOLUME DOWN UP 8 7 9 10 11 12 13 14 15 16 17 STATION TUNING ADVANCED STEREO/ STANDARD SURROUND DIRECT SIGNAL...SETUP TUNER EDIT CLASS BAND LISTENING MODE MPX INPUT ATT FL DIMMER MCACC SETUP MIC DIGITAL IN VIDEO INPUT S-VIDEO VIDEO L AUDIO R MULTI JOG 26 25 24 23 22 21 20 19 18 1 STANDBY/ON Switches the receiver between on and standby. 2 Input select buttons Press to select an input source...
Installation Manual
Page 28
... 54). 26 TUNER EDIT Press to movie soundtracks at low volume (page 40). 14 SPEAKERS Use to receive a radio broadcast in mono (page 53). 24 BAND Switches between AM and FM radio bands (page ...the speaker impedence (Switching the speaker impedance on page 67). 15 SB CH MODE Selects the Surround back channel mode (page 38). 16 TONE Press this button to make the fluorescent display (FL) dimmer or ...the front panel video terminal on page 19. 19 DIGITAL IN See Connecting to the front panel video terminal on page 19. 20 MCACC SETUP MIC (VSX-D914 model only) Connect the microphone supplied with your ...
... 54). 26 TUNER EDIT Press to movie soundtracks at low volume (page 40). 14 SPEAKERS Use to receive a radio broadcast in mono (page 53). 24 BAND Switches between AM and FM radio bands (page ...the speaker impedence (Switching the speaker impedance on page 67). 15 SB CH MODE Selects the Surround back channel mode (page 38). 16 TONE Press this button to make the fluorescent display (FL) dimmer or ...the front panel video terminal on page 19. 19 DIGITAL IN See Connecting to the front panel video terminal on page 19. 20 MCACC SETUP MIC (VSX-D914 model only) Connect the microphone supplied with your ...
Installation Manual
Page 32
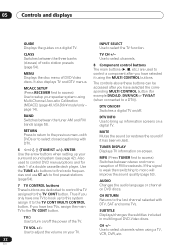
INPUT SELECT Use to select channels when using a TV, VCR, DVR, etc. 32 En MCACC SETUP (Press RECEIVER first to access) Use to a DTV)). page 14). The controls above these buttons can be accessed after you have selected it has been muted). DTV ON/OFF Switches a digital TV on/off the power of... to turn on -screen. MUTE Mutes the sound (or restores the sound if it using Multi-Channel Acoustic Calibration (MCACC) (page 49, VSX-D914 model only - DTV INFO Use to adjust the volume on a digital TV. TV Use to the TV CONT button. CH RETURN Returns to mono will improve the sound...
INPUT SELECT Use to select channels when using a TV, VCR, DVR, etc. 32 En MCACC SETUP (Press RECEIVER first to access) Use to a DTV)). page 14). The controls above these buttons can be accessed after you have selected it has been muted). DTV ON/OFF Switches a digital TV on/off the power of... to turn on -screen. MUTE Mutes the sound (or restores the sound if it using Multi-Channel Acoustic Calibration (MCACC) (page 49, VSX-D914 model only - DTV INFO Use to adjust the volume on a digital TV. TV Use to the TV CONT button. CH RETURN Returns to mono will improve the sound...
Installation Manual
Page 33
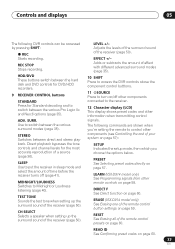
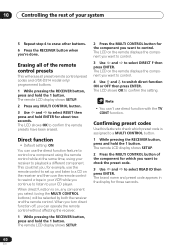
... Selecting preset codes directly on page 58. RESET See Erasing all of a source (page 36). Direct playback bypasses the tone controls and channel levels for Standard decoding and to Midnight or Loudness listening (page 40). LEVEL +/- REC STOP Stops recording. MIDNIGHT/LOUDNESS Switches to switch ...mode, from other components (see Controlling the rest of the receiver (page 50). LEARN (VSX-D914 model only) See Programming signals from which you 're setting the remote to control other remote controls on page 57. ERASE (VSX-D914 model only) See Erasing one of the remote control...
... Selecting preset codes directly on page 58. RESET See Erasing all of a source (page 36). Direct playback bypasses the tone controls and channel levels for Standard decoding and to Midnight or Loudness listening (page 40). LEVEL +/- REC STOP Stops recording. MIDNIGHT/LOUDNESS Switches to switch ...mode, from other components (see Controlling the rest of the receiver (page 50). LEARN (VSX-D914 model only) See Programming signals from which you 're setting the remote to control other remote controls on page 57. ERASE (VSX-D914 model only) See Erasing one of the remote control...
Installation Manual
Page 49
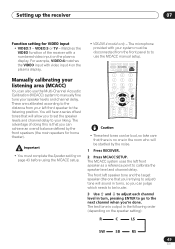
...to your liking. The microphone provided with video input 4 on the plasma display. • VSX-D914 model only - You will sound in turns, so you can be loud, so ...VIDEO input with your listening area (MCACC) You can achieve an overall balance defined by the noise. 1 Press RECEIVER. 2 Press MCACC SETUP. VIDEO:5 or TV - The front left speaker tone and the target speaker (the ...the room who will allow you can also use the Multi-Channel Acoustic Calibration (MCACC) system to use the MCACC manual setup. Setting up the receiver 07 Function setting for home theater). • You must ...
...to your liking. The microphone provided with video input 4 on the plasma display. • VSX-D914 model only - You will sound in turns, so you can be loud, so ...VIDEO input with your listening area (MCACC) You can achieve an overall balance defined by the noise. 1 Press RECEIVER. 2 Press MCACC SETUP. VIDEO:5 or TV - The front left speaker tone and the target speaker (the ...the room who will allow you can also use the Multi-Channel Acoustic Calibration (MCACC) system to use the MCACC manual setup. Setting up the receiver 07 Function setting for home theater). • You must ...
Installation Manual
Page 57
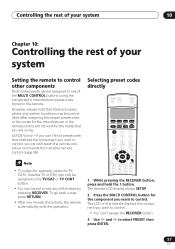
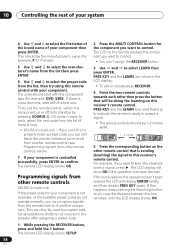
... DISC ENTER CLASS MENU DTV MENU T.EDIT ENTER MCACC SETUP BAND GUIDE TV CONTROL RETURN TV VOL INPUT SELECT TV CH VOL 1 While pressing the RECEIVER button, press and hold the 1 button. The remote LCD display shows SETUP. 2 Press the MULTI CONTROL button for the manufacturer in the remote. To go... the rest of your system Setting the remote to control other components Most components can be assigned to one minute of the steps by pressing RECEIVER. VSX-D914 only - The LCD on the remote displays the component you want to control. • You can't assign the...
... DISC ENTER CLASS MENU DTV MENU T.EDIT ENTER MCACC SETUP BAND GUIDE TV CONTROL RETURN TV VOL INPUT SELECT TV CH VOL 1 While pressing the RECEIVER button, press and hold the 1 button. The remote LCD display shows SETUP. 2 Press the MULTI CONTROL button for the manufacturer in the remote. To go... the rest of your system Setting the remote to control other components Most components can be assigned to one minute of the steps by pressing RECEIVER. VSX-D914 only - The LCD on the remote displays the component you want to control. • You can't assign the...
Installation Manual
Page 58
...ENTER. The remote LCD display shows OK. If this remote control with your component. The code should be the manufacturer's name (for example, P for Pioneer). 5 Use and to select the manufacturer's name from the list then press ENTER 6 Use and to select the proper code from the list, then...used to program additional operations (buttons not covered in the LCD display. • To exit or cancel press RECEIVER. 4 Point the two remote controls towards each other remote controls VSX-D914 model only If the preset code for the component you vary the distance between the two remotes, until the...
...ENTER. The remote LCD display shows OK. If this remote control with your component. The code should be the manufacturer's name (for example, P for Pioneer). 5 Use and to select the manufacturer's name from the list then press ENTER 6 Use and to select the proper code from the list, then...used to program additional operations (buttons not covered in the LCD display. • To exit or cancel press RECEIVER. 4 Point the two remote controls towards each other remote controls VSX-D914 model only If the preset code for the component you vary the distance between the two remotes, until the...
Installation Manual
Page 59
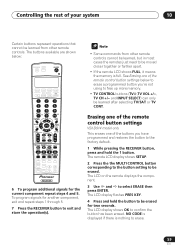
... up more memory. • TV CONTROL buttons (TV ,TV VOL +/-, TV CH +/- Erasing one of the remote control button settings VSX-D914 model only This erases one of the remote control button settings below : RECEIVER INPUT SELECT SOURCE DVD/LD TV/SAT DVR/VCR TVCONT MULTI CONTROL CD CD-R/TAPE TUNER.... The buttons available are shown below to erase a programmed button you have programmed and restores the button to the factory default. 1 While pressing the RECEIVER button, press and hold the button to be erased for two seconds. To program signals for the current component repeat steps 4 and 5.
... up more memory. • TV CONTROL buttons (TV ,TV VOL +/-, TV CH +/- Erasing one of the remote control button settings VSX-D914 model only This erases one of the remote control button settings below : RECEIVER INPUT SELECT SOURCE DVD/LD TV/SAT DVR/VCR TVCONT MULTI CONTROL CD CD-R/TAPE TUNER.... The buttons available are shown below to erase a programmed button you have programmed and restores the button to the factory default. 1 While pressing the RECEIVER button, press and hold the button to be erased for two seconds. To program signals for the current component repeat steps 4 and 5.
Installation Manual
Page 60
Erasing all preset remote control preset codes and (VSX-D914 model only) programmed buttons. 1 While pressing the RECEIVER button, press and hold the 1 button. The LCD shows OK to confirm the setting. • You can't use the direct function feature to playback a ... button of the component for about two seconds. Direct function • Default setting: ON You can operate the remote control without affecting the receiver. 1 While pressing the RECEIVER button, press and hold ENTER for which preset code is on the remote displays the component you want to control. 3 Use and to...
Erasing all preset remote control preset codes and (VSX-D914 model only) programmed buttons. 1 While pressing the RECEIVER button, press and hold the 1 button. The LCD shows OK to confirm the setting. • You can't use the direct function feature to playback a ... button of the component for about two seconds. Direct function • Default setting: ON You can operate the remote control without affecting the receiver. 1 While pressing the RECEIVER button, press and hold ENTER for which preset code is on the remote displays the component you want to control. 3 Use and to...
Installation Manual
Page 66
... malfunction, but not from LD or DVD player. • Set the SIGNAL SELECT to AUTO, DIGITAL or ANALOG according to the type of loud noise from surround back speakers. • Refer to ...setting on page 44 to check the surround back speaker settings. • Refer to Manually calibrating your receiver, until the noise cassette deck. disappears. player during playback of the player to full, or to...) on page 49 or the (VSX-D914 model only) Quick surround sound setup on page 14 to check the speaker levels. • Refer to Using the Surround Back Channel (SB CH) on page 38...
... malfunction, but not from LD or DVD player. • Set the SIGNAL SELECT to AUTO, DIGITAL or ANALOG according to the type of loud noise from surround back speakers. • Refer to ...setting on page 44 to check the surround back speaker settings. • Refer to Manually calibrating your receiver, until the noise cassette deck. disappears. player during playback of the player to full, or to...) on page 49 or the (VSX-D914 model only) Quick surround sound setup on page 14 to check the speaker levels. • Refer to Using the Surround Back Channel (SB CH) on page 38...


