
Owner's Manual
Page 2
Contents Before Using this Product 2 About this Product 2 Precaution 2 Connecting the Units 3 Connecting the Power Cord and Controller Unit 4 Connecting the System (1 5 Connecting the System (2 7 Connecting the Audio/Video equipment 9 Installation 10 Installing Hide-away Unit 10 Installing Controller Unit 11 Part Names And Applications 14 Controller Unit 14 Hide-away Unit 15 Specifications 16 1
Contents Before Using this Product 2 About this Product 2 Precaution 2 Connecting the Units 3 Connecting the Power Cord and Controller Unit 4 Connecting the System (1 5 Connecting the System (2 7 Connecting the Audio/Video equipment 9 Installation 10 Installing Hide-away Unit 10 Installing Controller Unit 11 Part Names And Applications 14 Controller Unit 14 Hide-away Unit 15 Specifications 16 1
Owner's Manual
Page 4
...recreational vehicle, truck, or bus, check the battery voltage. • To avoid shorts in places that there are no mistakes. Re-install any parts removed from the car during installation, then connect the battery negative terminal. • Refer to the owner's manual for vehicles with cable clamps or...the Units Note: • This product is a danger of the wiring short-circuiting to the vehicle body. • Do not shorten any moving parts, such as near the heater outlet. Do not route wiring in the electrical system, be sure to disconnect the ≠ battery cable before beginning...
...recreational vehicle, truck, or bus, check the battery voltage. • To avoid shorts in places that there are no mistakes. Re-install any parts removed from the car during installation, then connect the battery negative terminal. • Refer to the owner's manual for vehicles with cable clamps or...the Units Note: • This product is a danger of the wiring short-circuiting to the vehicle body. • Do not shorten any moving parts, such as near the heater outlet. Do not route wiring in the electrical system, be sure to disconnect the ≠ battery cable before beginning...
Owner's Manual
Page 11
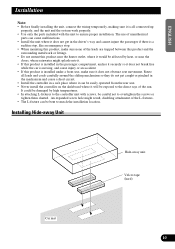
... the unit to the controller unit with screws, be affected by high temperatures. • In attaching L-fixtures to ensure proper installation. The use of unauthorized parts can be bent to overtighten the screws or tighten them slanted. Installing Hide-away Unit Hide-away unit Velcro tape (hard) Car mat 10 FRAN...
... the unit to the controller unit with screws, be affected by high temperatures. • In attaching L-fixtures to ensure proper installation. The use of unauthorized parts can be bent to overtighten the screws or tighten them slanted. Installing Hide-away Unit Hide-away unit Velcro tape (hard) Car mat 10 FRAN...
Owner's Manual
Page 15
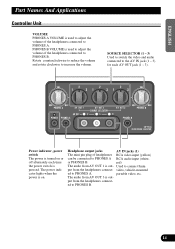
... switch the video and audio connected to PHONES B. 14 The audio from AV OUT 1 is out- red) The audio from AV OUT 3 is out- ENGLISH Part Names And Applications Controller Unit VOLUME PHONES A VOLUME is used to adjust the volume of the headphones connected to PHONES A. ed to the AV IN...
... switch the video and audio connected to PHONES B. 14 The audio from AV OUT 1 is out- red) The audio from AV OUT 3 is out- ENGLISH Part Names And Applications Controller Unit VOLUME PHONES A VOLUME is used to adjust the volume of the headphones connected to PHONES A. ed to the AV IN...
Owner's Manual
Page 16
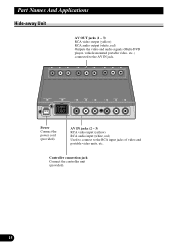
Part Names And Applications Hide-away Unit AV OUT jacks (1 - 3) RCA video output (yellow) RCA audio output (white, red) Outputs the video and audio signals (Multi-DVD player, vehicle-mounted portable video, etc.) connected to the RCA input jacks of video and portable video units, etc. Power Connect the power cord (provided). AV IN jacks (2 - 3) RCA video input (yellow) RCA audio input (white, red) Used to connect to the AV IN jack. Controller connection jack Connect the controller unit (provided). 15
Part Names And Applications Hide-away Unit AV OUT jacks (1 - 3) RCA video output (yellow) RCA audio output (white, red) Outputs the video and audio signals (Multi-DVD player, vehicle-mounted portable video, etc.) connected to the RCA input jacks of video and portable video units, etc. Power Connect the power cord (provided). AV IN jacks (2 - 3) RCA video input (yellow) RCA audio input (white, red) Used to connect to the AV IN jack. Controller connection jack Connect the controller unit (provided). 15


