
Operation Manual
Page 2
... Sure to Adjust Picture Brightness 5 About Screen Brightness During the Daytime and Nighttime 5 Resetting the Microprocessor 5 Operation of the Display 6 CAUTION 6 Deploying the Display 6 Screen Angle Adjustment 7 Closing the Display 8 Brightness Adjustment 9 Switching the Auto-Dimmer Mode 9 Changing the Wide Mode 10 • Just (JUST) • Full (FULL) • Cinema (CINEMA) • Zoom (ZOOM) • Normal (NORMAL) Canceling the Automatic Close/Open Mode 11 Switching the Illumination Color 12 Using the CD Player 13 Operating with Different...
... Sure to Adjust Picture Brightness 5 About Screen Brightness During the Daytime and Nighttime 5 Resetting the Microprocessor 5 Operation of the Display 6 CAUTION 6 Deploying the Display 6 Screen Angle Adjustment 7 Closing the Display 8 Brightness Adjustment 9 Switching the Auto-Dimmer Mode 9 Changing the Wide Mode 10 • Just (JUST) • Full (FULL) • Cinema (CINEMA) • Zoom (ZOOM) • Normal (NORMAL) Canceling the Automatic Close/Open Mode 11 Switching the Illumination Color 12 Using the CD Player 13 Operating with Different...
Operation Manual
Page 3
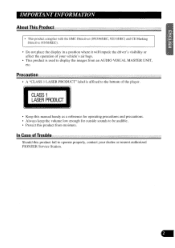
... the display in a position where it will impede the driver's visibility or affect the operation of Trouble Should this product from an AUDIO VISUAL MASTER UNIT, etc. In Case of your dealer or nearest authorized PIONEER Service Station. CLASS 1 LASER PRODUCT • Keep this manual handy as a reference for operating procedures and precautions. • Always keep the volume low enough for outside sounds to...
... the display in a position where it will impede the driver's visibility or affect the operation of Trouble Should this product from an AUDIO VISUAL MASTER UNIT, etc. In Case of your dealer or nearest authorized PIONEER Service Station. CLASS 1 LASER PRODUCT • Keep this manual handy as a reference for operating procedures and precautions. • Always keep the volume low enough for outside sounds to...
Operation Manual
Page 4
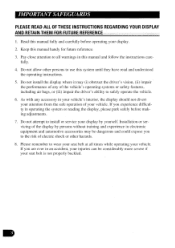
.... As with any of the vehicle's operating systems or safety features, including air bags, or (iii) impair the driver's ability to use this manual handy for future reference. 3. Installation or servicing of any accessory in this manual fully and carefully before making adjustments. 7. IMPORTANT SAFEGUARDS PLEASE READ ALL OF THESE INSTRUCTIONS REGARDING YOUR DISPLAY AND RETAIN THEM FOR FUTURE REFERENCE 1. Do...
.... As with any of the vehicle's operating systems or safety features, including air bags, or (iii) impair the driver's ability to use this manual handy for future reference. 3. Installation or servicing of any accessory in this manual fully and carefully before making adjustments. 7. IMPORTANT SAFEGUARDS PLEASE READ ALL OF THESE INSTRUCTIONS REGARDING YOUR DISPLAY AND RETAIN THEM FOR FUTURE REFERENCE 1. Do...

Operation Manual
Page 5
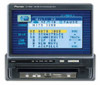
Key Finder This Product The following diagram shows the display when it is deployed. AVM-P7000R) 4 A/V button A TA npa SOURCE button 4I/► button BAND button FUNCTION button PGM button Display Wide mode indicators Disc loading slot EJECT button BRIGHTNESS button =1- • LJ Release Section RESET button WIDE button ANGLE button Signal Receptor OPEN/CLOSE button Note: • Use the remote control products for the AUDIO VISUAL MASTER UNIT by pointing them at this product's signal receptor. Remote Controller (e.g.
Key Finder This Product The following diagram shows the display when it is deployed. AVM-P7000R) 4 A/V button A TA npa SOURCE button 4I/► button BAND button FUNCTION button PGM button Display Wide mode indicators Disc loading slot EJECT button BRIGHTNESS button =1- • LJ Release Section RESET button WIDE button ANGLE button Signal Receptor OPEN/CLOSE button Note: • Use the remote control products for the AUDIO VISUAL MASTER UNIT by pointing them at this product's signal receptor. Remote Controller (e.g.
Operation Manual
Page 6
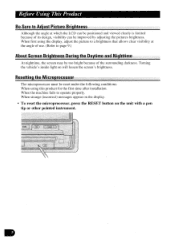
... visibility at which the LCD can be positioned and viewed clearly is limited because of the surrounding darkness. When strange (incorrect) messages appear on the display. • To reset the microprocessor, press the RESET button on will lessen the screen's brightness. Resetting the Microprocessor The microprocessor must be improved by adjusting the pictures brightness. Before Using This Product Be Sure to Adjust Picture Brightness Although the angle at...
... visibility at which the LCD can be positioned and viewed clearly is limited because of the surrounding darkness. When strange (incorrect) messages appear on the display. • To reset the microprocessor, press the RESET button on will lessen the screen's brightness. Resetting the Microprocessor The microprocessor must be improved by adjusting the pictures brightness. Before Using This Product Be Sure to Adjust Picture Brightness Although the angle at...
Operation Manual
Page 7
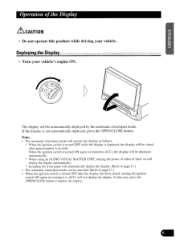
... automatically deploy the display. (Refer to page 11.) • The automatic close/open mode can be canceled. (Refer to page 11.) • When the ignition switch is turned OFF after the display has been closed after approximately 6 seconds. When using an AUDIO VISUAL MASTER UNIT, turning the power of either of the Display &CAUTION o Do not operate this case, press the OPEN/CLOSE button to deploy the...
... automatically deploy the display. (Refer to page 11.) • The automatic close/open mode can be canceled. (Refer to page 11.) • When the ignition switch is turned OFF after the display has been closed after approximately 6 seconds. When using an AUDIO VISUAL MASTER UNIT, turning the power of either of the Display &CAUTION o Do not operate this case, press the OPEN/CLOSE button to deploy the...

Operation Manual
Page 8
... this product's screen continues changing as long as you can hear the display knocking against your vehicle's console or dashboard, press the ANGLE button on the (-) side to move the screen a little forward. If f - Precaution: • If you keep pressing the ANGLE button. • Adjust the screen to an easily viewable angle. Operation of the Display Screen Angle Adjustment The angle of...
... this product's screen continues changing as long as you can hear the display knocking against your vehicle's console or dashboard, press the ANGLE button on the (-) side to move the screen a little forward. If f - Precaution: • If you keep pressing the ANGLE button. • Adjust the screen to an easily viewable angle. Operation of the Display Screen Angle Adjustment The angle of...

Operation Manual
Page 10
... screen may be adjusted. (You can be too bright because of the surrounding darkness. Turning the vehicle's inside light is red. II Ill. Switching the Auto-Dimmer Mode This function is used to automatically adjust LCD brightness according to the ambient brightness in order to switch the Auto-Dimmer mode OFF. • Wide Mode Indicator Illumination Color Auto-Dimmer mode Selected mode ON Red (Green*) OFF Green (Red*) Other modes Green (Red*) OFF When the selected illumination color...
... screen may be adjusted. (You can be too bright because of the surrounding darkness. Turning the vehicle's inside light is red. II Ill. Switching the Auto-Dimmer Mode This function is used to automatically adjust LCD brightness according to the ambient brightness in order to switch the Auto-Dimmer mode OFF. • Wide Mode Indicator Illumination Color Auto-Dimmer mode Selected mode ON Red (Green*) OFF Green (Red*) Other modes Green (Red*) OFF When the selected illumination color...
Operation Manual
Page 11
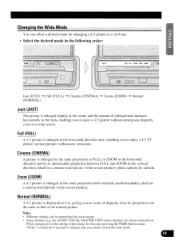
... proportion between FULL and ZOOM in the same proportion both vertically and horizontally; Note: • Different settings can select a desired mode for enlarging a 4:3 picture to enjoy a 4:3 picture without any disparity even on a wide screen. In this mode. Some displays (e.g. the AUDIO VISUAL MASTER UNIT source display) are the same as FULL or ZOOM in the following order: "al SEAM MST :011 Zuu...
... proportion between FULL and ZOOM in the same proportion both vertically and horizontally; Note: • Different settings can select a desired mode for enlarging a 4:3 picture to enjoy a 4:3 picture without any disparity even on a wide screen. In this mode. Some displays (e.g. the AUDIO VISUAL MASTER UNIT source display) are the same as FULL or ZOOM in the following order: "al SEAM MST :011 Zuu...
Operation Manual
Page 14
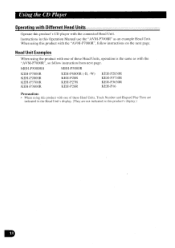
... Unit. Head Unit Examples When using this product's display.) 110 When using the product with one of these Head Units, Track Number and Elapsed Play Time are indicated in the Head Unit's display. (They are not indicated in this product's CD player with the connected Head Unit. Instructions in this product with the "AVM-P7000R", follow instruction from next page. Using the CD Player Operating with Different Head Units Operate this Operation Manual use...
... Unit. Head Unit Examples When using this product's display.) 110 When using the product with one of these Head Units, Track Number and Elapsed Play Time are indicated in the Head Unit's display. (They are not indicated in this product's CD player with the connected Head Unit. Instructions in this product with the "AVM-P7000R", follow instruction from next page. Using the CD Player Operating with Different Head Units Operate this Operation Manual use...
Operation Manual
Page 15
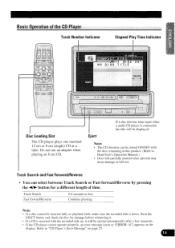
Do not use an adapter when playing an 8 cm CD. Eject 1 If a disc title has been input when a multi-CD player is down. Refer to Head Unit's Operation Manual.) • Discs left partially inserted after a few moments. • If the CD player cannot operate properly, an error message (such as "ERROR-14") appears on page 25. Basic Operation of time. Track Search Fast forward/Reverse 0.5 seconds or less Continue pressing Note...
Do not use an adapter when playing an 8 cm CD. Eject 1 If a disc title has been input when a multi-CD player is down. Refer to Head Unit's Operation Manual.) • Discs left partially inserted after a few moments. • If the CD player cannot operate properly, an error message (such as "ERROR-14") appears on page 25. Basic Operation of time. Track Search Fast forward/Reverse 0.5 seconds or less Continue pressing Note...

Operation Manual
Page 16
... operation within about 30 seconds, the Function Menu is unavailable. AUSE I) I ,3 0 "" I . To cancel the Function Menu, press the BAND button. Switch the Pause mode ON/OFF. 10 IADII A FUNCTION I PAUSE Note: • After entering the Function Menu, if you pause play (SCAN) -* Pause (PAUSE) CD Sound Quality Adjustment (COMP SELECT)* * You cannot select this mode for a head unit for which this function is automatically canceled. Press the FUNCTION button...
... operation within about 30 seconds, the Function Menu is unavailable. AUSE I) I ,3 0 "" I . To cancel the Function Menu, press the BAND button. Switch the Pause mode ON/OFF. 10 IADII A FUNCTION I PAUSE Note: • After entering the Function Menu, if you pause play (SCAN) -* Pause (PAUSE) CD Sound Quality Adjustment (COMP SELECT)* * You cannot select this mode for a head unit for which this function is automatically canceled. Press the FUNCTION button...

Operation Manual
Page 17
... in the Function Menu. 2. Press the FUNCTION button and select the Random mode (RANDOM) in random order for variety. 1. "RDM" 16 le • :J 1 i.:1" di 34 NO DISC TITLE RAND - aVIDED-A 0- 34 H "TRK" PEAT tiE UFT Note: • If you perform Track Search or Fast forward/Reverse, Repeat Play is automatically canceled. Switch Random Play ON/OFF. Repeat Play (REPEAT) Repeat Play plays the...
... in the Function Menu. 2. Press the FUNCTION button and select the Random mode (RANDOM) in random order for variety. 1. "RDM" 16 le • :J 1 i.:1" di 34 NO DISC TITLE RAND - aVIDED-A 0- 34 H "TRK" PEAT tiE UFT Note: • If you perform Track Search or Fast forward/Reverse, Repeat Play is automatically canceled. Switch Random Play ON/OFF. Repeat Play (REPEAT) Repeat Play plays the...

Operation Manual
Page 19
Select the desired mode in the Function Menu. 2. Press the FUNCTION button and select the COMP/DBE switching mode (COMP SELECT) in the following order: WO' COMP OFF -0- DBE 2 18 COMP/DBE ON/OFF Switching 1. Both of the functions enable adjustment on two levels. • COMP The COMP (Compression) function eliminates distortions caused by imbalances between loud and subdued sounds at higher volumes. •...
Select the desired mode in the Function Menu. 2. Press the FUNCTION button and select the COMP/DBE switching mode (COMP SELECT) in the following order: WO' COMP OFF -0- DBE 2 18 COMP/DBE ON/OFF Switching 1. Both of the functions enable adjustment on two levels. • COMP The COMP (Compression) function eliminates distortions caused by imbalances between loud and subdued sounds at higher volumes. •...
Operation Manual
Page 20
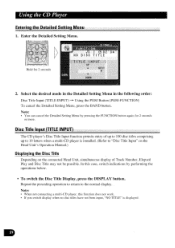
... the Detailed Setting Menu by performing the operations below. • To switch the Disc Title Display, press the DISPLAY button. Using the CD Player Entering the Detailed Setting Menu 1. In this function does not work. • If you switch display when no disc titles have not been input, "NO TITLE" is installed. (Refer to the normal display. Note: • When not connecting a multi-CD player, this case, switch indications by pressing the FUNCTION button again...
... the Detailed Setting Menu by performing the operations below. • To switch the Disc Title Display, press the DISPLAY button. Using the CD Player Entering the Detailed Setting Menu 1. In this function does not work. • If you switch display when no disc titles have not been input, "NO TITLE" is installed. (Refer to the normal display. Note: • When not connecting a multi-CD player, this case, switch indications by pressing the FUNCTION button again...
Operation Manual
Page 21
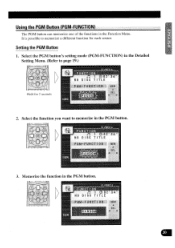
Select the function you want to memorize in the Detailed Setting Menu. (Refer to memorize a different function for 2 seconds 2. Select the PGM button's setting mode (PGM-FUNCTION) in the PGM button. Memorize the function in the Function Menu. NO CJ IU TITLE PONI •F: 14 U 'HON trini 20 L,1)-Liz S4 NO DISC TITLE FUN0C I LjUi S4' HO DISC TITLE PCM-FUNCTi OH Hold for each source. Using the PGM Button (PGM-FUNCTION) The PGM button can memorize one of the functions in the PGM button. Setting the PGM Button 1. It is possible to page 19.) •AT .4.4 I ON if 3.
Select the function you want to memorize in the Detailed Setting Menu. (Refer to memorize a different function for 2 seconds 2. Select the PGM button's setting mode (PGM-FUNCTION) in the PGM button. Memorize the function in the Function Menu. NO CJ IU TITLE PONI •F: 14 U 'HON trini 20 L,1)-Liz S4 NO DISC TITLE FUN0C I LjUi S4' HO DISC TITLE PCM-FUNCTi OH Hold for each source. Using the PGM Button (PGM-FUNCTION) The PGM button can memorize one of the functions in the PGM button. Setting the PGM Button 1. It is possible to page 19.) •AT .4.4 I ON if 3.
Operation Manual
Page 24
... in failure of the system. • Do not remove the rear cover of the display by hand. Applying strong force to the display may stop working. Using the product in this condition may result in a fire...adjustments or repairs. Also, do not press strongly on it as this product, close the display and avoid exposing it to place anything on the display when it . • Do not touch the LCD screen as there are high-voltage components inside the product, turn OFF the power immediately and consult your dealer or the nearest authorized PIONEER Service Station. Using the Display...
... in failure of the system. • Do not remove the rear cover of the display by hand. Applying strong force to the display may stop working. Using the product in this condition may result in a fire...adjustments or repairs. Also, do not press strongly on it as this product, close the display and avoid exposing it to place anything on the display when it . • Do not touch the LCD screen as there are high-voltage components inside the product, turn OFF the power immediately and consult your dealer or the nearest authorized PIONEER Service Station. Using the Display...
Operation Manual
Page 25
... turned ON. • The LCD screen will be shortened. • Small black dots or white dots (bright dots) may be dark for approximately 10,000 hours, depending on operating conditions. (Using the display at low temperatures reduces the service life of the fluorescent tube.) * When the fluorescent tube reaches the end of its useful life, the screen will be dark and the image...
... turned ON. • The LCD screen will be shortened. • Small black dots or white dots (bright dots) may be dark for approximately 10,000 hours, depending on operating conditions. (Using the display at low temperatures reduces the service life of the fluorescent tube.) * When the fluorescent tube reaches the end of its useful life, the screen will be dark and the image...
Operation Manual
Page 26
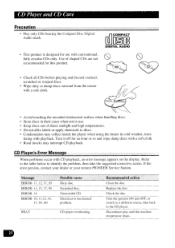
... error message appears on the display. CD Player's Error Message When problems occur with a soft cloth. • Avoid touching the recorded (iridescent) surface when handling discs. • Store discs in their cases when not in use with a soft cloth. • Road shocks may collect inside the player when using the heater in cold weather, inter- If the error persists, contact your dealer or your nearest PIONEER Service Station...
... error message appears on the display. CD Player's Error Message When problems occur with a soft cloth. • Avoid touching the recorded (iridescent) surface when handling discs. • Store discs in their cases when not in use with a soft cloth. • Road shocks may collect inside the player when using the heater in cold weather, inter- If the error persists, contact your dealer or your nearest PIONEER Service Station...
Operation Manual
Page 27
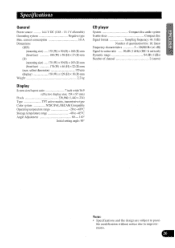
...) Dynamic range 94 dB (I kHz) Number of channel 2 (stereo) Note: • Specifications and the design are subject to +85°C Angle Adjustment 60- 110° Initial setting angle: 90° CD player System Compact disc audio system Usable discs Compact disc Signal format Sampling frequency: 44.1 kHz Number of quantization bits: 16; Specifications General Power source 14.4 V DC (10.8 -15.1 V allowable) Grounding system Negative type Max. current...
...) Dynamic range 94 dB (I kHz) Number of channel 2 (stereo) Note: • Specifications and the design are subject to +85°C Angle Adjustment 60- 110° Initial setting angle: 90° CD player System Compact disc audio system Usable discs Compact disc Signal format Sampling frequency: 44.1 kHz Number of quantization bits: 16; Specifications General Power source 14.4 V DC (10.8 -15.1 V allowable) Grounding system Negative type Max. current...


