Manual
Page 2
... 11 Speaker Input Jack Connection 12 VIDEO Input/Output Connection 13 Connection Diagram 14 Connecting the Power Cord 14 Key Finder 16 • Remote Controller Before Using This Product 17 About This Product 17 About This Manual 18 To Ensure Safe Driving 18 Resetting the Microprocessor 19 Precaution... 19 In Case of Trouble 19 Using the Remote Controller 20 • Batteries Basic Operation 21 To Listen to Music 21 Basic Operation of Tuner 23 • Band • Manual and...
... 11 Speaker Input Jack Connection 12 VIDEO Input/Output Connection 13 Connection Diagram 14 Connecting the Power Cord 14 Key Finder 16 • Remote Controller Before Using This Product 17 About This Product 17 About This Manual 18 To Ensure Safe Driving 18 Resetting the Microprocessor 19 Precaution... 19 In Case of Trouble 19 Using the Remote Controller 20 • Batteries Basic Operation 21 To Listen to Music 21 Basic Operation of Tuner 23 • Band • Manual and...

Manual
Page 5
... unit onto the mounting base until it being a hindrance to driving, always install the remote control unit to the passenger's side - Fitting horizontally Fitting vertically Installation Using Only the Mounting Base • To avoid it clicks into place. not the ... slanting upwards at an angle when fitted. Passenger seat Mounting Base Double-sided tape Not used Used • Install the mounting base so that the remote controller is to be attached.
... unit onto the mounting base until it being a hindrance to driving, always install the remote control unit to the passenger's side - Fitting horizontally Fitting vertically Installation Using Only the Mounting Base • To avoid it clicks into place. not the ... slanting upwards at an angle when fitted. Passenger seat Mounting Base Double-sided tape Not used Used • Install the mounting base so that the remote controller is to be attached.

Manual
Page 6
Screws (3 10 mm) Bracket Mounting base Method A This example is for the mounting base. Method B This example is for when the console is not wide enough to have installation space for the mounting base. • Install the mounting base in such a way that it being a hindrance to driving, always install the remote control unit to have installation space for when the console is wide enough to the passenger's side - not the driver's side. Installation Using the Mounting Base and the Bracket • To avoid it will not hit the seat when the seat is adjusted.
Screws (3 10 mm) Bracket Mounting base Method A This example is for the mounting base. Method B This example is for when the console is not wide enough to have installation space for the mounting base. • Install the mounting base in such a way that it being a hindrance to driving, always install the remote control unit to have installation space for when the console is wide enough to the passenger's side - not the driver's side. Installation Using the Mounting Base and the Bracket • To avoid it will not hit the seat when the seat is adjusted.

Manual
Page 9
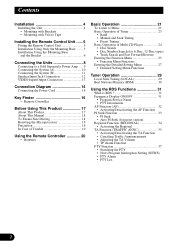
... Auto-antenna relay control terminal. (Max. 300 mA 12 V DC) Power amp (sold separately) Power amp (sold separately) Power amp (sold separately) System remote control System remote control System remote control Front speaker Front speaker Rear speaker Subwoofer Perform these connections when using a different amp (sold separately power amp using the RCA output...
... Auto-antenna relay control terminal. (Max. 300 mA 12 V DC) Power amp (sold separately) Power amp (sold separately) Power amp (sold separately) System remote control System remote control System remote control Front speaker Front speaker Rear speaker Subwoofer Perform these connections when using a different amp (sold separately power amp using the RCA output...

Manual
Page 16
Remote Controller V.SEL button button AUDIO button TA button DISPLAY button ATT button Buttons 1- 6 +/- button SOURCE button button BAND button FUNCTION button MENU button PTY button PGM button
Remote Controller V.SEL button button AUDIO button TA button DISPLAY button ATT button Buttons 1- 6 +/- button SOURCE button button BAND button FUNCTION button MENU button PTY button PGM button

Manual
Page 20
... batteries. • Do not mix new and used for convenient operation. • Point the controller in direct sunlight. • Do not let the remote controller fall onto the floor, where it may not function properly in the direction of battery leakage, wipe the...the color display (sold separately) to operate. • When the controller is equipped with a remote controller for a month or longer. • Do not attempt to the provided Mounting base. • Do not store the remote controller in high temperatures or direct sunlight. • The controller may become jammed under the ...
... batteries. • Do not mix new and used for convenient operation. • Point the controller in direct sunlight. • Do not let the remote controller fall onto the floor, where it may not function properly in the direction of battery leakage, wipe the...the color display (sold separately) to operate. • When the controller is equipped with a remote controller for a month or longer. • Do not attempt to the provided Mounting base. • Do not store the remote controller in high temperatures or direct sunlight. • The controller may become jammed under the ...


