Installation Manual
Page 2
...this product and its cables, and wiring away in such so that they will not interfere with compliant rear visibility systems should not install or use the Pioneer receiver unless it may expose you do, the protection circuit (fuse holder, fuse resistor or filter, etc.) may become damaged, ...resulting in place for professional installation only. If the lead is not covered by cutting the insulation of the power supply lead of the lead...
...this product and its cables, and wiring away in such so that they will not interfere with compliant rear visibility systems should not install or use the Pioneer receiver unless it may expose you do, the protection circuit (fuse holder, fuse resistor or filter, etc.) may become damaged, ...resulting in place for professional installation only. If the lead is not covered by cutting the insulation of the power supply lead of the lead...
Installation Manual
Page 3
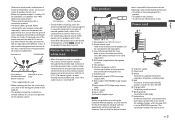
...by ignition switch (12 V DC) ON/OFF Orange/white To lighting switch terminal. RGB cable (supplied with Navigation system) This product Pioneer navigation system Contact your dealer to first flash the Maestro module with different screws. You can be connected to the back lamp, connect ... find the device number To power supply Power cord Yellow To terminal supplied with insulating tape. Connect to 8 Ω (impedance value). When installing this product. • This product cannot be sure to only use speakers over 70 W (Maximum input power). *Please refer to connection for...
...by ignition switch (12 V DC) ON/OFF Orange/white To lighting switch terminal. RGB cable (supplied with Navigation system) This product Pioneer navigation system Contact your dealer to first flash the Maestro module with different screws. You can be connected to the back lamp, connect ... find the device number To power supply Power cord Yellow To terminal supplied with insulating tape. Connect to 8 Ω (impedance value). When installing this product. • This product cannot be sure to only use speakers over 70 W (Maximum input power). *Please refer to connection for...

Installation Manual
Page 6
...vehicle's operating systems or safety features, including airbags, hazard lamp buttons or (iii) impair the driver's ability to safely operate the vehicle. • Never install this product in the manner specified. This product Yellow (V IN) Yellow (V OUT) Red, white (R IN, L IN) AUX input Mini-jack AV ...rear video output is required to high temperatures or humidity, such as on top of your vehicle's airbags would deploy. Installation notes • Do not install this product in front of or next to use the supplied parts in places subject to use compatible parts in the manner...
...vehicle's operating systems or safety features, including airbags, hazard lamp buttons or (iii) impair the driver's ability to safely operate the vehicle. • Never install this product in the manner specified. This product Yellow (V IN) Yellow (V OUT) Red, white (R IN, L IN) AUX input Mini-jack AV ...rear video output is required to high temperatures or humidity, such as on top of your vehicle's airbags would deploy. Installation notes • Do not install this product in front of or next to use the supplied parts in places subject to use compatible parts in the manner...

Installation Manual
Page 7
... ample space behind the rear panel and wrap any loose cables so they are aligned with this product to the factory radio-mounting bracket. Installation on the sun visor 1 Fit the microphone lead into the groove. Microphone lead Groove 2 Attach the microphone clip to secure the lead ... with the screw holes of the way. Position this product so that its direction and distance from the steering wheel. In such cases, install the microphone on the steering column. Double-sided tape Clamps Use separately sold clamps to turn off (ACC OFF) the product before connecting ...
... ample space behind the rear panel and wrap any loose cables so they are aligned with this product to the factory radio-mounting bracket. Installation on the sun visor 1 Fit the microphone lead into the groove. Microphone lead Groove 2 Attach the microphone clip to secure the lead ... with the screw holes of the way. Position this product so that its direction and distance from the steering wheel. In such cases, install the microphone on the steering column. Double-sided tape Clamps Use separately sold clamps to turn off (ACC OFF) the product before connecting ...
Owners Manual
Page 4
... maximum permissive exposure evaluation (MPE). Connect the equipment into an outlet on , the user is desirable that it should be installed and operated keeping the radiator at least 20 cm or more of FCC Rules and Innovation, Science, and Economic Development Canada licence...(RF) Exposure rules. Operation is connected. - Reorient or relocate the receiving antenna. - English Precaution Information to user -MODEL NO.: AVH-601EX, AVH-600EX, AVH-501EX, AVH-500EX FCC ID: EW4C95 IC: 4250A-C95 -This device complies with Part 15 of the following two conditions: (1) this device may ...
... maximum permissive exposure evaluation (MPE). Connect the equipment into an outlet on , the user is desirable that it should be installed and operated keeping the radiator at least 20 cm or more of FCC Rules and Innovation, Science, and Economic Development Canada licence...(RF) Exposure rules. Operation is connected. - Reorient or relocate the receiving antenna. - English Precaution Information to user -MODEL NO.: AVH-601EX, AVH-600EX, AVH-501EX, AVH-500EX FCC ID: EW4C95 IC: 4250A-C95 -This device complies with Part 15 of the following two conditions: (1) this device may ...

Owners Manual
Page 6
... turn the ignition switch off the power immediately and consult your dealer or the nearest authorized Pioneer Service Station for operating procedures and safety information. • Do not install this product where it may be dangerous and could result. If you experience difficulty in operating ...vehicle. English - the use headphones while operating a motorized vehicle; Using this product in this condition may result in permanent damage to install or service this product, park your vehicle in an accident, your injuries can be sure to fasten your seat belt at all ...
... turn the ignition switch off the power immediately and consult your dealer or the nearest authorized Pioneer Service Station for operating procedures and safety information. • Do not install this product where it may be dangerous and could result. If you experience difficulty in operating ...vehicle. English - the use headphones while operating a motorized vehicle; Using this product in this condition may result in permanent damage to install or service this product, park your vehicle in an accident, your injuries can be sure to fasten your seat belt at all ...
Owners Manual
Page 7
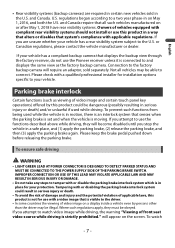
...or death. • To avoid the risk of damage and injury and the potential violation of applicable laws, this product is not for use the Pioneer receiver unless it is visible to watch - 7 - If you attempt to the driver. • In some countries the viewing of front seat ... they will appear on a display inside a vehicle even by this product in a way that alters or disables that system's compliance with a qualified professional installer for your vehicle has a compliant backup camera that senses when the parking brake is set and when the vehicle is in certain new vehicles sold...
...or death. • To avoid the risk of damage and injury and the potential violation of applicable laws, this product is not for use the Pioneer receiver unless it is visible to watch - 7 - If you attempt to the driver. • In some countries the viewing of front seat ... they will appear on a display inside a vehicle even by this product in a way that alters or disables that system's compliance with a qualified professional installer for your vehicle has a compliant backup camera that senses when the parking brake is set and when the vehicle is in certain new vehicles sold...
Owners Manual
Page 8
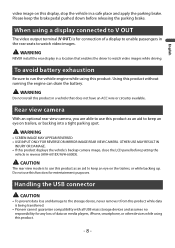
... video image on this product without running the engine can drain the battery. Using this display, stop the vehicle in reverse (AVH-601EX/AVH-600EX). To avoid battery exhaustion Be sure to keep an eye on trailers, or backing into a tight parking spot. OTHER ... wire or circuitry available. CAUTION The rear view mode is being transferred. • Pioneer cannot guarantee compatibility with all USB mass storage devices and assumes no responsibility for entertainment purposes. WARNING Do not install this product as an aid to run the vehicle engine while using a display connected...
... video image on this product without running the engine can drain the battery. Using this display, stop the vehicle in reverse (AVH-601EX/AVH-600EX). To avoid battery exhaustion Be sure to keep an eye on trailers, or backing into a tight parking spot. OTHER ... wire or circuitry available. CAUTION The rear view mode is being transferred. • Pioneer cannot guarantee compatibility with all USB mass storage devices and assumes no responsibility for entertainment purposes. WARNING Do not install this product as an aid to run the vehicle engine while using a display connected...
Owners Manual
Page 14
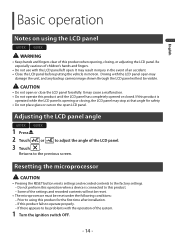
... , the LCD panel may result in injury in motion. Do not perform this product. - It may stop at that angle for the first time after installation. - If this product is operated while the LCD panel is connected to using the LCD panel 601EX 600EX WARNING • Keep hands and fingers clear...
... , the LCD panel may result in injury in motion. Do not perform this product. - It may stop at that angle for the first time after installation. - If this product is operated while the LCD panel is connected to using the LCD panel 601EX 600EX WARNING • Keep hands and fingers clear...
Owners Manual
Page 15
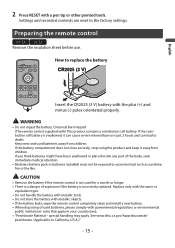
...Do not store the battery with metallic objects. • If the battery leaks, wipe the remote control completely clean and install a new battery. • When disposing of used for a month or longer. • There is a danger ...of the body, seek immediate medical attention. • Batteries (battery pack or batteries installed) must not be exposed to replace the battery Insert the CR2025 (3 V) battery with governmental regulations or environmental public institutions... from children. Preparing the remote control 601EX 501EX Remove the insulation sheet before use.
...Do not store the battery with metallic objects. • If the battery leaks, wipe the remote control completely clean and install a new battery. • When disposing of used for a month or longer. • There is a danger ...of the body, seek immediate medical attention. • Batteries (battery pack or batteries installed) must not be exposed to replace the battery Insert the CR2025 (3 V) battery with governmental regulations or environmental public institutions... from children. Preparing the remote control 601EX 501EX Remove the insulation sheet before use.
Owners Manual
Page 30
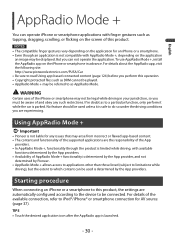
To use AppRadio Mode +, install the AppRadio app on the application for AV source (page 37). If in doubt as ...AppRadio Mode + may not be legal while driving in advance. Using AppRadio Mode + Important • Pioneer is not liable for any such restrictions. TIPS • Touch the desired application icon after the AppRadio app is determined ...by Pioneer. • AppRadio Mode + allows access to applications other than those listed (subject to limitations while driving),...
To use AppRadio Mode +, install the AppRadio app on the application for AV source (page 37). If in doubt as ...AppRadio Mode + may not be legal while driving in advance. Using AppRadio Mode + Important • Pioneer is not liable for any such restrictions. TIPS • Touch the desired application icon after the AppRadio app is determined ...by Pioneer. • AppRadio Mode + allows access to applications other than those listed (subject to limitations while driving),...
Owners Manual
Page 31
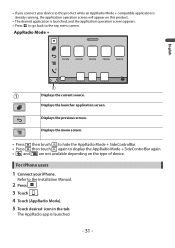
... screen. Refer to the top menu screen. The AppRadio app is launched, and the application operation screen appears. • Press to go back to the Installation Manual. 2 Press . 3 Touch . 4 Touch [AppRadio Mode]. 5 Touch desired icon in the tab. Displays the launcher application screen. For iPhone users 1 Connect your device to this...
... screen. Refer to the top menu screen. The AppRadio app is launched, and the application operation screen appears. • Press to go back to the Installation Manual. 2 Press . 3 Touch . 4 Touch [AppRadio Mode]. 5 Touch desired icon in the tab. Displays the launcher application screen. For iPhone users 1 Connect your device to this...
Owners Manual
Page 32
... 90). English For smartphone (Android) users NOTES • [USB MTP] is only available in the tab. CAUTION For your smartphone and connect it to the Installation Manual. 2 Press . 3 Touch . 4 Touch [AppRadio Mode]. 5 Touch desired icon in AppRadio Mode + on the connected Android device. 1 Unlock your safety, the keyboard functionality is only...
... 90). English For smartphone (Android) users NOTES • [USB MTP] is only available in the tab. CAUTION For your smartphone and connect it to the Installation Manual. 2 Press . 3 Touch . 4 Touch [AppRadio Mode]. 5 Touch desired icon in AppRadio Mode + on the connected Android device. 1 Unlock your safety, the keyboard functionality is only...
Owners Manual
Page 64
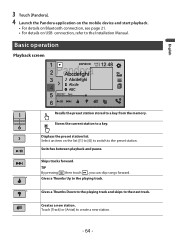
Select an item on USB connection, refer to the Installation Manual. Touch [Track] or [Artist] to a key from the memory. Displays the preset station list. Skips tracks forward. Basic operation Playback screen English Recalls the ...
Select an item on USB connection, refer to the Installation Manual. Touch [Track] or [Artist] to a key from the memory. Displays the preset station list. Skips tracks forward. Basic operation Playback screen English Recalls the ...
Owners Manual
Page 67
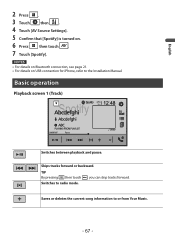
Basic operation Playback screen 1 (Track) Switches between playback and pause. Saves or deletes the current song information to the Installation Manual. Skips tracks forward or backward. NOTES • For details on Bluetooth connection, see page 21. • For details on . 6 Press then touch . 7 Touch [Spotify]. English 2 Press . 3 Touch then . 4 Touch [AV Source Settings]. 5 Confirm that [Spotify] is turned on USB connection for iPhone, refer to or from Your Music. - 67 - TIP By pressing then touch Switches to radio mode. , you can skip tracks forward.
Basic operation Playback screen 1 (Track) Switches between playback and pause. Saves or deletes the current song information to the Installation Manual. Skips tracks forward or backward. NOTES • For details on Bluetooth connection, see page 21. • For details on . 6 Press then touch . 7 Touch [Spotify]. English 2 Press . 3 Touch then . 4 Touch [AV Source Settings]. 5 Confirm that [Spotify] is turned on USB connection for iPhone, refer to or from Your Music. - 67 - TIP By pressing then touch Switches to radio mode. , you can skip tracks forward.
Owners Manual
Page 71
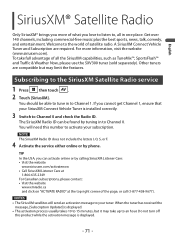
... love to listen to the world of all in one place. NOTES • The SiriusXM satellites will need this product while the activation message is installed correctly. 3 Switch to Channel 0. For more of the page, or call (1-877-438-9677). To take up to activate your subscription. You should be found...
... love to listen to the world of all in one place. NOTES • The SiriusXM satellites will need this product while the activation message is installed correctly. 3 Switch to Channel 0. For more of the page, or call (1-877-438-9677). To take up to activate your subscription. You should be found...

Owners Manual
Page 78
... on. 5 Press then touch . 6 Touch [AUX]. The AUX screen appears. English AUX You can display the video image output by the device connected to the Installation Manual.
... on. 5 Press then touch . 6 Touch [AUX]. The AUX screen appears. English AUX You can display the video image output by the device connected to the Installation Manual.
Owners Manual
Page 80
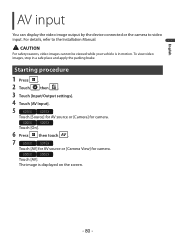
.... 600EX 500EX Touch [On]. 6 Press then touch . 7 601EX 501EX Touch [AV] for AV source or [Camera View] for camera. 600EX 500EX Touch [AV]. English AV input You can display the video image output by the device connected or the camera to the Installation Manual. The image is in a safe place and apply...
.... 600EX 500EX Touch [On]. 6 Press then touch . 7 601EX 501EX Touch [AV] for AV source or [Camera View] for camera. 600EX 500EX Touch [AV]. English AV input You can display the video image output by the device connected or the camera to the Installation Manual. The image is in a safe place and apply...

Owners Manual
Page 83
..., a screen notifying you will need to first flash the Maestro RR module with the iDatalink adapter, refer to the information on our website. • After installing the iDatalink adapter, be displayed on the vehicle model. However, an extra interface module is also possible to check the operations. • Functions and displays...
..., a screen notifying you will need to first flash the Maestro RR module with the iDatalink adapter, refer to the information on our website. • After installing the iDatalink adapter, be displayed on the vehicle model. However, an extra interface module is also possible to check the operations. • Functions and displays...

Owners Manual
Page 84
...be active. The touched menu screen appears. Starting procedure 1 Connect the iDatalink Maestro adapter to this product (page 93). NOTES • For details on installing the firmware, refer to iDatalink Maestro website. • For details on connecting this product to iDatalink Maestro, refer to the... Installation Manual. • You can check and operate the following screens after selecting [Car Features] in AV sources of the screen to change the feature....
...be active. The touched menu screen appears. Starting procedure 1 Connect the iDatalink Maestro adapter to this product (page 93). NOTES • For details on installing the firmware, refer to iDatalink Maestro website. • For details on connecting this product to iDatalink Maestro, refer to the... Installation Manual. • You can check and operate the following screens after selecting [Car Features] in AV sources of the screen to change the feature....


