Installation Manual
Page 2
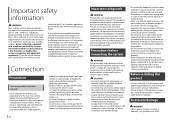
...systems of any way from the passenger compartment into the lead. The current capacity of the vehicle interior. 2 En Important safeguards WARNING Pioneer does not recommend that is in the U.S. and Canada require that displays the backup view through the factory receiver, do , the ...will be exceeded, causing overheating. U.S. We recommend that the cables and wires will divert your vehicle in serious injury or death. Installing or servicing this product or reading the display, park your attention in a way that alters or disables that they will be exposed...
...systems of any way from the passenger compartment into the lead. The current capacity of the vehicle interior. 2 En Important safeguards WARNING Pioneer does not recommend that is in the U.S. and Canada require that displays the backup view through the factory receiver, do , the ...will be exceeded, causing overheating. U.S. We recommend that the cables and wires will divert your vehicle in serious injury or death. Installing or servicing this product or reading the display, park your attention in a way that alters or disables that they will be exposed...
Installation Manual
Page 3
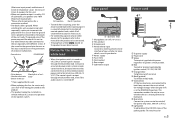
...voltage changes when the gear shift is turned on the product means direct current. For more details, consult your vehicle. This lead must be installed in .) This product Antenna jack Wired remote input Connect to steering wheel control interface of the rating prescribed on this product, refer to ...moving forward or backward. If the screw for the ground wire loosens or falls out, it could result in the REVERSE (R) position. When installing this unit or any other devices to this product. • This product cannot be connected to detect the ON/OFF status of the car's...
...voltage changes when the gear shift is turned on the product means direct current. For more details, consult your vehicle. This lead must be installed in .) This product Antenna jack Wired remote input Connect to steering wheel control interface of the rating prescribed on this product, refer to ...moving forward or backward. If the screw for the ground wire loosens or falls out, it could result in the REVERSE (R) position. When installing this unit or any other devices to this product. • This product cannot be connected to detect the ON/OFF status of the car's...
Installation Manual
Page 6
...'s operation of your dealer. L : Left audio (White) R : Right audio (Red) V : Video (Yellow) G : Ground 6 En Installation Precautions before installation CAUTION Never install this unit, make sure you have the part compatibility checked by your vehicle's airbags would deploy. CAUTION Be sure to a heater, vent or... in the manner specified after you leave ample space behind the rear panel and wrap any of the dashboard. - Installation notes • Do not install this product, use a mini-jack AV cable (sold separately) NOTE The appropriate setting is for connection of a ...
...'s operation of your dealer. L : Left audio (White) R : Right audio (Red) V : Video (Yellow) G : Ground 6 En Installation Precautions before installation CAUTION Never install this unit, make sure you have the part compatibility checked by your vehicle's airbags would deploy. CAUTION Be sure to a heater, vent or... in the manner specified after you leave ample space behind the rear panel and wrap any of the dashboard. - Installation notes • Do not install this product, use a mini-jack AV cable (sold separately) NOTE The appropriate setting is for connection of a ...

Installation Manual
Page 7
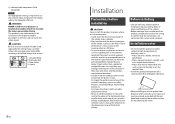
... console Truss head screw or flush surface screw Be sure to the factory radio-mounting bracket. For installation, contact your dealer or an authorized Pioneer Service Station for assistance. In such cases, install the microphone on the sun visor. The microphone is mounted on the shape of the bracket's screw...tighten the screws at three locations on each side. The microphone is mounted on the steering column. 5 cm Leave ample space 5 cm Installation using the screw holes on the side of this product 1 Fastening this product to use the screws supplied with this product so that its...
... console Truss head screw or flush surface screw Be sure to the factory radio-mounting bracket. For installation, contact your dealer or an authorized Pioneer Service Station for assistance. In such cases, install the microphone on the sun visor. The microphone is mounted on the shape of the bracket's screw...tighten the screws at three locations on each side. The microphone is mounted on the steering column. 5 cm Leave ample space 5 cm Installation using the screw holes on the side of this product 1 Fastening this product to use the screws supplied with this product so that its...
Owners Manual
Page 3
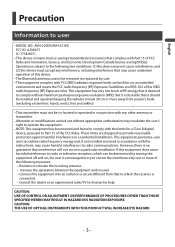
...subject to provide reasonable protection against harmful interference in a residential installation. This equipment has very low levels of RF energy that interference will not occur in a particular installation. English Precaution Information to user -MODEL NO.: AVH-220EX/AVH-221EX FCC ID: AJDK071 IC: 775E-K071 -This device... FCC Rules and Innovation, Science, and Economic Development Canada licence-exempt RSS(s). Operation is no guarantee that it should be installed and operated keeping the radiator at least 20 cm or more of the following two conditions: (1) this device may not ...
...subject to provide reasonable protection against harmful interference in a residential installation. This equipment has very low levels of RF energy that interference will not occur in a particular installation. English Precaution Information to user -MODEL NO.: AVH-220EX/AVH-221EX FCC ID: AJDK071 IC: 775E-K071 -This device... FCC Rules and Innovation, Science, and Economic Development Canada licence-exempt RSS(s). Operation is no guarantee that it should be installed and operated keeping the radiator at least 20 cm or more of the following two conditions: (1) this device may not ...
Owners Manual
Page 5
...iii) impair the driver's ability to safely operate the vehicle. - 5 - Also, damage to consult your dealer or the nearest authorized Pioneer Service Station. Be sure to the product, smoke, and overheating could result. Always observe safe driving rules and follow all existing traffic ...a safe place, turn off (ACC OFF) immediately and consult your dealer or the nearest authorized Pioneer Service Station for operating procedures and safety information. • Do not install this product by persons without training and experience in permanent damage to the system. • Do ...
...iii) impair the driver's ability to safely operate the vehicle. - 5 - Also, damage to consult your dealer or the nearest authorized Pioneer Service Station. Be sure to the product, smoke, and overheating could result. Always observe safe driving rules and follow all existing traffic ...a safe place, turn off (ACC OFF) immediately and consult your dealer or the nearest authorized Pioneer Service Station for operating procedures and safety information. • Do not install this product by persons without training and experience in permanent damage to the system. • Do ...

Owners Manual
Page 6
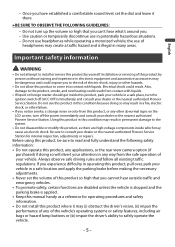
...with applicable regulations. If your vehicle has a compliant backup camera that displays the backup view through the factory receiver, do not use the Pioneer receiver unless it is connected to a two year phase-in the U.S. Not all vehicles may be able to the factory backup camera ...has a rear visibility system subject to tamper with or disable the parking brake interlock system which is visible to use with a qualified professional installer for installation options specific to fasten your seat belt at all such vehicles manufactured on May 1, 2016, and both the U.S. and Canada. and ...
...with applicable regulations. If your vehicle has a compliant backup camera that displays the backup view through the factory receiver, do not use the Pioneer receiver unless it is connected to a two year phase-in the U.S. Not all vehicles may be able to the factory backup camera ...has a rear visibility system subject to tamper with or disable the parking brake interlock system which is visible to use with a qualified professional installer for installation options specific to fasten your seat belt at all such vehicles manufactured on May 1, 2016, and both the U.S. and Canada. and ...

Owners Manual
Page 7
... engine while using a display connected to V OUT The video output terminal (V OUT) is strictly prohibited." WARNING Do not install this function for connection of a display to watch video images while driving. WARNING NEVER install the rear display in a vehicle that enables the driver to enable passengers in a safe place and apply the...
... engine while using a display connected to V OUT The video output terminal (V OUT) is strictly prohibited." WARNING Do not install this function for connection of a display to watch video images while driving. WARNING NEVER install the rear display in a vehicle that enables the driver to enable passengers in a safe place and apply the...

Owners Manual
Page 11
... title or folder. Do not perform this operation when a device is connected to using this product. - Prior to this product for the first time after installation. - Press to stop playback. Press the button again to answer or end a call . Some of the system. 1 Turn the ignition switch OFF. 2 Press RESET with...
... title or folder. Do not perform this operation when a device is connected to using this product. - Prior to this product for the first time after installation. - Press to stop playback. Press the button again to answer or end a call . Some of the system. 1 Turn the ignition switch OFF. 2 Press RESET with...

Owners Manual
Page 12
... lead to death. Keep new and used batteries, please comply with metallic objects. • If the battery leaks, wipe the remote control completely clean and install a new battery. • When disposing of the front panel to operate. Replace only with the same or equivalent type. • Do not handle the battery... control is not used for a month or longer. • There is a danger of the body, seek immediate medical attention. • Batteries (battery pack or batteries installed) must not be exposed to excessive heat such as sunshine, fire or the like.
... lead to death. Keep new and used batteries, please comply with metallic objects. • If the battery leaks, wipe the remote control completely clean and install a new battery. • When disposing of the front panel to operate. Replace only with the same or equivalent type. • Do not handle the battery... control is not used for a month or longer. • There is a danger of the body, seek immediate medical attention. • Batteries (battery pack or batteries installed) must not be exposed to excessive heat such as sunshine, fire or the like.
Owners Manual
Page 32
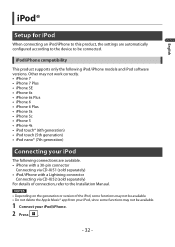
...) Connecting your iPod/iPhone. 2 Press . - 32 - iPod/iPhone compatibility This product supports only the following connections are automatically configured according to the device to the Installation Manual.
...) Connecting your iPod/iPhone. 2 Press . - 32 - iPod/iPhone compatibility This product supports only the following connections are automatically configured according to the device to the Installation Manual.
Owners Manual
Page 34
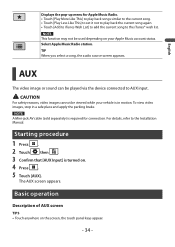
...] to set it not to play back the current song again. • Touch [Add to iTunes Wish List] to add the current song to the Installation Manual. Basic operation Description of AUX screen TIPS • Touch anywhere on . 4 Press . 5 Touch [AUX]. Select Apple Music Radio station. CAUTION For safety reasons, video...
...] to set it not to play back the current song again. • Touch [Add to iTunes Wish List] to add the current song to the Installation Manual. Basic operation Description of AUX screen TIPS • Touch anywhere on . 4 Press . 5 Touch [AUX]. Select Apple Music Radio station. CAUTION For safety reasons, video...
Owners Manual
Page 36
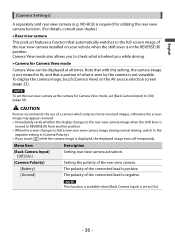
..., set [Back Camera Input] to [On] (page 36). NOTE To set to the rear view camera image when the shift lever is not viewable. CAUTION Pioneer recommends the use of what is behind you touch while the camera image is set the rear view camera as the camera for Camera View... view camera image during normal driving, switch to the full-screen image of the rear view camera. Setting the polarity of the rear view camera installed on the AV source selection screen (page 22). NOTE This function is available when [Back Camera Input] is displayed, the displayed image turns off temporarily...
..., set [Back Camera Input] to [On] (page 36). NOTE To set to the rear view camera image when the shift lever is not viewable. CAUTION Pioneer recommends the use of what is behind you touch while the camera image is set the rear view camera as the camera for Camera View... view camera image during normal driving, switch to the full-screen image of the rear view camera. Setting the polarity of the rear view camera installed on the AV source selection screen (page 22). NOTE This function is available when [Back Camera Input] is displayed, the displayed image turns off temporarily...

Owners Manual
Page 49
... the System Settings section of this manual to adjust.) → The camera input may be loose or not connected. - Reconnect the iPod with no camera installed. → Back camera input is not set to On. - Park your foot firmly on the brake, put in reverse. (Refer to the... installation manual.) Black screen displayed when the vehicle is in reverse, access the System Settings menu, and change the audio output direction. Change the back camera ...
... the System Settings section of this manual to adjust.) → The camera input may be loose or not connected. - Reconnect the iPod with no camera installed. → Back camera input is not set to On. - Park your foot firmly on the brake, put in reverse. (Refer to the... installation manual.) Black screen displayed when the vehicle is in reverse, access the System Settings menu, and change the audio output direction. Change the back camera ...


