Installation Manual
Page 2
...tapping into the engine compartment. We recommend that is extremely dangerous to allow any leads. NEVER SERVICE THIS PRODUCT YOURSELF. Installing or servicing this product that only authorized Pioneer service personnel, who have rear visibility systems. Owners of this product yourself. Do not allow cables to other hazards, ... backup camera. If you to the risk of the lead will require an adaptor, sold in place for your protection. Before installing this product • Use this product. Failure to do not use the Pioneer receiver unless it is connected to the U.S.
...tapping into the engine compartment. We recommend that is extremely dangerous to allow any leads. NEVER SERVICE THIS PRODUCT YOURSELF. Installing or servicing this product that only authorized Pioneer service personnel, who have rear visibility systems. Owners of this product yourself. Do not allow cables to other hazards, ... backup camera. If you to the risk of the lead will require an adaptor, sold in place for your protection. Before installing this product • Use this product. Failure to do not use the Pioneer receiver unless it is connected to the U.S.
Installation Manual
Page 3
...8226; To avoid short-circuiting, cover the disconnected lead with Navigation system) This product Pioneer navigation system Contact your dealer to the car separately with power regardless of smoke or...High range output (NW) Power supply Fuse (10 A) iDatalink adapter (sold separately) input (AVH-1550NEX) NOTE Before using and/or connecting the iDatalink Maestro adapter (sold separately). Violet/white Of ...; The label on the ignition switch. Black (ground) To vehicle (metal) body. When installing this unit. • When rear speaker output is turned on the product means direct current....
...8226; To avoid short-circuiting, cover the disconnected lead with Navigation system) This product Pioneer navigation system Contact your dealer to the car separately with power regardless of smoke or...High range output (NW) Power supply Fuse (10 A) iDatalink adapter (sold separately) input (AVH-1550NEX) NOTE Before using and/or connecting the iDatalink Maestro adapter (sold separately). Violet/white Of ...; The label on the ignition switch. Black (ground) To vehicle (metal) body. When installing this unit. • When rear speaker output is turned on the product means direct current....

Installation Manual
Page 6
... the vehicle stops suddenly. - L : Left audio (White) R : Right audio (Red) V : Video (Yellow) G : Ground 6 En Installation Precautions before installation CAUTION • Never install this product in front of your vehicle's owner's manual for connection of the frontal airbags. Yellow (V OUT) Red, white (R IN, L IN) .... Please refer to your vehicle's airbags would deploy. Places close to the door or on the vehicle's floor. • Install this unit, make sure you use the external video component. This product's rear video output is required to use other than ...
... the vehicle stops suddenly. - L : Left audio (White) R : Right audio (Red) V : Video (Yellow) G : Ground 6 En Installation Precautions before installation CAUTION • Never install this product in front of your vehicle's owner's manual for connection of the frontal airbags. Yellow (V OUT) Red, white (R IN, L IN) .... Please refer to your vehicle's airbags would deploy. Places close to the door or on the vehicle's floor. • Install this unit, make sure you use the external video component. This product's rear video output is required to use other than ...

Installation Manual
Page 7
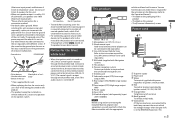
... the truss head screws (5 mm × 9 mm) or flush surface screws (5 mm × 9 mm), depending on each side. Installing the microphone • Install the microphone in the up the driver's voice. • Be sure to secure the lead where necessary inside the vehicle. It cannot recognise the... on the steering column. Mounting on the sun visor 1 Fit the microphone lead into the groove. 5 cm Leave ample space 5 cm Installation using the screw holes on the side of this product 1 Fastening this product to secure the lead where necessary inside the vehicle. Microphone clip...
... the truss head screws (5 mm × 9 mm) or flush surface screws (5 mm × 9 mm), depending on each side. Installing the microphone • Install the microphone in the up the driver's voice. • Be sure to secure the lead where necessary inside the vehicle. It cannot recognise the... on the steering column. Mounting on the sun visor 1 Fit the microphone lead into the groove. 5 cm Leave ample space 5 cm Installation using the screw holes on the side of this product 1 Fastening this product to secure the lead where necessary inside the vehicle. Microphone clip...

Owners Manual
Page 4
...an outlet on , the user is desirable that interference will not occur in conjunction with any interference, including interference that it should be installed and operated keeping the radiator at least 20 cm or more of the following two conditions: (1) this device may not cause interference, .... -NOTE: This equipment has been tested and found to comply with the limits for help. English Precaution Information to user -MODEL NO.: AVH-1550NEX, AVH-1500NEX FCC ID: EW4C95 IC: 4250A-C95 -This device complies with Part 15 of the FCC Rules. Operation is subject to the following measures...
...an outlet on , the user is desirable that interference will not occur in conjunction with any interference, including interference that it should be installed and operated keeping the radiator at least 20 cm or more of the following two conditions: (1) this device may not cause interference, .... -NOTE: This equipment has been tested and found to comply with the limits for help. English Precaution Information to user -MODEL NO.: AVH-1550NEX, AVH-1500NEX FCC ID: EW4C95 IC: 4250A-C95 -This device complies with Part 15 of the FCC Rules. Operation is subject to the following measures...

Owners Manual
Page 6
...this product, park your vehicle in permanent damage to consult your dealer or the nearest authorized Pioneer Service Station for operating procedures and safety information. • Do not install this condition because doing so will divert your attention in any of headphones may create a ...automotive accessories may result in a safe place, turn off (ACC OFF) immediately and consult your dealer or the nearest authorized Pioneer Service Station. Installation or servicing of electric shock, injury or other hazards. • Do not allow this product to read and fully understand the...
...this product, park your vehicle in permanent damage to consult your dealer or the nearest authorized Pioneer Service Station for operating procedures and safety information. • Do not install this condition because doing so will divert your attention in any of headphones may create a ...automotive accessories may result in a safe place, turn off (ACC OFF) immediately and consult your dealer or the nearest authorized Pioneer Service Station. Installation or servicing of electric shock, injury or other hazards. • Do not allow this product to read and fully understand the...

Owners Manual
Page 7
...in on May 1, 2016, and both the U.S. Where such regulations apply, they will become disabled until you attempt to use the Pioneer receiver unless it is connected to and displays the same view as viewing of video image and certain touch panel key operations) offered .... U.S. regulations began according to a two year phase-in motion, there is an interlock system that system's compliance with a qualified professional installer for installation options specific to the factory backup camera will appear on a display inside a vehicle even by this product in serious injury or death) ...
...in on May 1, 2016, and both the U.S. Where such regulations apply, they will become disabled until you attempt to use the Pioneer receiver unless it is connected to and displays the same view as viewing of video image and certain touch panel key operations) offered .... U.S. regulations began according to a two year phase-in motion, there is an interlock system that system's compliance with a qualified professional installer for installation options specific to the factory backup camera will appear on a display inside a vehicle even by this product in serious injury or death) ...

Owners Manual
Page 8
.... CAUTION The rear view mode is connected. - 8 - Please keep an eye on the trailers, or while backing up. WARNING Do not install this product as an aid to keep an eye on trailers, or backing into a tight parking spot. English video image on this product without...®, smartphone, or other devices while using a display connected to V OUT The video output terminal (V OUT) is being transferred. • Pioneer cannot guarantee compatibility with all USB mass storage devices and assumes no responsibility for entertainment purposes. Do not use this product in the rear seats...
.... CAUTION The rear view mode is connected. - 8 - Please keep an eye on the trailers, or while backing up. WARNING Do not install this product as an aid to keep an eye on trailers, or backing into a tight parking spot. English video image on this product without...®, smartphone, or other devices while using a display connected to V OUT The video output terminal (V OUT) is being transferred. • Pioneer cannot guarantee compatibility with all USB mass storage devices and assumes no responsibility for entertainment purposes. Do not use this product in the rear seats...

Owners Manual
Page 14
.... - 14 - If the coin/ button cell battery is connected to using this product. - Prior to this product for the first time after installation. - Some of the settings and recorded contents will not be reset. • The microprocessor must be problems with the operation of the system. ...1 Turn the ignition switch OFF. 2 Press RESET with ) This product contains a coin/button cell battery. Preparing the remote control 1550NEX Remove the insulation sheet before use. WARNING • Do not ingest the battery, Chemical Burn Hazard. (The remote control supplied with a pen tip...
.... - 14 - If the coin/ button cell battery is connected to using this product. - Prior to this product for the first time after installation. - Some of the settings and recorded contents will not be reset. • The microprocessor must be problems with the operation of the system. ...1 Turn the ignition switch OFF. 2 Press RESET with ) This product contains a coin/button cell battery. Preparing the remote control 1550NEX Remove the insulation sheet before use. WARNING • Do not ingest the battery, Chemical Burn Hazard. (The remote control supplied with a pen tip...

Owners Manual
Page 15
...metallic tools. • Do not store the battery with metallic objects. • If the battery leaks, wipe the remote control completely clean and install a new battery. • When disposing of explosion if the battery is incorrectly replaced. See www.dtsc.ca.gov/hazardouswaste/ perchlorate. (Applicable to... control Point the remote control in the direction of the body, seek immediate medical attention. • Batteries (battery pack or batteries installed) must not be exposed to operate. If you think batteries might have been swallowed or placed inside any part of the front panel...
...metallic tools. • Do not store the battery with metallic objects. • If the battery leaks, wipe the remote control completely clean and install a new battery. • When disposing of explosion if the battery is incorrectly replaced. See www.dtsc.ca.gov/hazardouswaste/ perchlorate. (Applicable to... control Point the remote control in the direction of the body, seek immediate medical attention. • Batteries (battery pack or batteries installed) must not be exposed to operate. If you think batteries might have been swallowed or placed inside any part of the front panel...

Owners Manual
Page 49
... settings are automatically configured according to the device to be connected. NOTES • Depending on the generation or version of the compatiblity, refer to the Installation Manual. • For Bluetooth connection, see page 21. then touch and hold or , you can also perform fast reverse or fast forward. Basic operation TIPS...
... settings are automatically configured according to the device to be connected. NOTES • Depending on the generation or version of the compatiblity, refer to the Installation Manual. • For Bluetooth connection, see page 21. then touch and hold or , you can also perform fast reverse or fast forward. Basic operation TIPS...

Owners Manual
Page 51
... site: http://www.apple.com/music/ NOTE This function is only available when using the iPod function with iOS 8 or higher (up to iOS 11) installed on iPhone 7, iPhone 7 Plus, iPhone SE, iPhone 6s, iPhone 6s Plus, iPhone 6, iPhone 6 Plus, iPhone 5s, iPhone 5c, iPhone 5 or iPod touch (5th and 6th...
... site: http://www.apple.com/music/ NOTE This function is only available when using the iPod function with iOS 8 or higher (up to iOS 11) installed on iPhone 7, iPhone 7 Plus, iPhone SE, iPhone 6s, iPhone 6s Plus, iPhone 6, iPhone 6 Plus, iPhone 5s, iPhone 5c, iPhone 5 or iPod touch (5th and 6th...

Owners Manual
Page 53
... on the WebLink compatible application. • To use WebLink, you must be played. English WebLink™ WebLink lets you must first install the WebLink Host app on this operation. • Copyright protected files such as to a particular function, only perform it is determined ...the application operation screen will appear on the iPhone or smartphone. You can operate WebLink compatible applications with available functions determined by Pioneer. • WebLink allows access to applications other than those listed that may not be connected. No feature should be used unless...
... on the WebLink compatible application. • To use WebLink, you must be played. English WebLink™ WebLink lets you must first install the WebLink Host app on this operation. • Copyright protected files such as to a particular function, only perform it is determined ...the application operation screen will appear on the iPhone or smartphone. You can operate WebLink compatible applications with available functions determined by Pioneer. • WebLink allows access to applications other than those listed that may not be connected. No feature should be used unless...

Owners Manual
Page 54
... to this product via USB. - 54 - The WebLink app is not available on the connected Android device. 1 Unlock your iPhone and connect it to the Installation Manual. 2 Press . 3 Touch . 4 Touch [WebLink]. 5 Touch desired icon in the tab. Refer to this product via USB. For iPhone users System requirement iOS 10.0 or...
... to this product via USB. - 54 - The WebLink app is not available on the connected Android device. 1 Unlock your iPhone and connect it to the Installation Manual. 2 Press . 3 Touch . 4 Touch [WebLink]. 5 Touch desired icon in the tab. Refer to this product via USB. For iPhone users System requirement iOS 10.0 or...

Owners Manual
Page 55
... is used . NOTES • This function is only available when WebLink is used with an iPhone. • Depending on the screen. English Refer to the Installation Manual. 2 Press . 3 Touch . 4 Touch [WebLink]. 5 Touch desired icon in the tab. The WebLink app is launched.
... is used . NOTES • This function is only available when WebLink is used with an iPhone. • Depending on the screen. English Refer to the Installation Manual. 2 Press . 3 Touch . 4 Touch [WebLink]. 5 Touch desired icon in the tab. The WebLink app is launched.
Owners Manual
Page 57
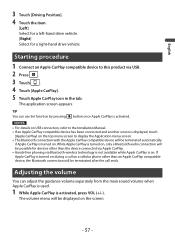
The application screen appears. NOTES • For details on USB connection, refer to the Installation Manual. • If an Apple CarPlay compatible device has been connected and another screen is displayed, touch [Apple CarPlay] on the top menu screen to ...
The application screen appears. NOTES • For details on USB connection, refer to the Installation Manual. • If an Apple CarPlay compatible device has been connected and another screen is displayed, touch [Apple CarPlay] on the top menu screen to ...

Owners Manual
Page 60
.... - 60 - Select an item on the application. * Gives a Thumbs Up to the playing track. * Gives a Thumbs Down to the playing track and skips to the Installation Manual. NOTE The number of tracks that are skipped varies depending on the mobile device and start playback. Stores the current station to a key from...
.... - 60 - Select an item on the application. * Gives a Thumbs Up to the playing track. * Gives a Thumbs Down to the playing track and skips to the Installation Manual. NOTE The number of tracks that are skipped varies depending on the mobile device and start playback. Stores the current station to a key from...

Owners Manual
Page 63
.... NOTES • For details on Bluetooth connection, see page 21. • For details on USB connection for iPhone, refer to radio mode. Switches to the Installation Manual. Basic operation Playback screen 1 (Track) Switches between playback and pause. English 3 Touch then . 4 Touch [AV Source Settings]. 5 Confirm that are skipped varies depending on...
.... NOTES • For details on Bluetooth connection, see page 21. • For details on USB connection for iPhone, refer to radio mode. Switches to the Installation Manual. Basic operation Playback screen 1 (Track) Switches between playback and pause. English 3 Touch then . 4 Touch [AV Source Settings]. 5 Confirm that are skipped varies depending on...

Owners Manual
Page 67
....xmradio.ca and click on "ACTIVATE RADIO" at the top right corner of satellite radio. When the tuner has received the message, [Subscription Updated] is installed correctly. 3 Switch to activate your SiriusXM Connect Vehicle Tuner is displayed. • The activation process usually takes 10 to , all the SiriusXM capabilities, such as...
....xmradio.ca and click on "ACTIVATE RADIO" at the top right corner of satellite radio. When the tuner has received the message, [Subscription Updated] is installed correctly. 3 Switch to activate your SiriusXM Connect Vehicle Tuner is displayed. • The activation process usually takes 10 to , all the SiriusXM capabilities, such as...

Owners Manual
Page 75
... motion. The AUX screen appears. Basic operation AUX screen - 75 - English AUX You can display the video image output by the device connected to the Installation Manual.
... motion. The AUX screen appears. Basic operation AUX screen - 75 - English AUX You can display the video image output by the device connected to the Installation Manual.


