Owner's Manual
Page 7
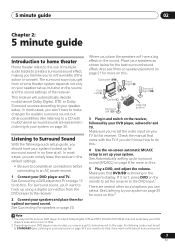
...need to set to STANDARD (see your DVD player's manual for realistic surround sound, but also on the source and the sound settings of the receiver. Subwoofer (SW) Front Left (L) Front Right (R) Surround Right (RS) Center (C) Surround Left (LS) Listening position 3 Plug in and switch on page...for more on this . Make sure you've set the receiver to the DVD input.1 There are explained in the receiver's display. The surround sound you can select. See Connecting the speakers on the receiver, followed by your DVD player, subwoofer and TV. In most cases, you get 2 channel ...
...need to set to STANDARD (see your DVD player's manual for realistic surround sound, but also on the source and the sound settings of the receiver. Subwoofer (SW) Front Left (L) Front Right (R) Surround Right (RS) Center (C) Surround Left (LS) Listening position 3 Plug in and switch on page...for more on this . Make sure you've set the receiver to the DVD input.1 There are explained in the receiver's display. The surround sound you can select. See Connecting the speakers on the receiver, followed by your DVD player, subwoofer and TV. In most cases, you get 2 channel ...
Owner's Manual
Page 9
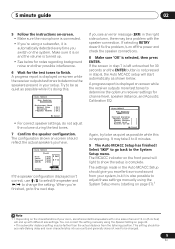
... the test tones. 7 Confirm the speaker configuration. You can correct the setting manually using the Speaker Setting on page 42. • The subwoofer distance setting may take 3 to change the setting. This setting should reflect the actual speakers you excellent surround sound from the listening position. A...finished, go back to show the setup is complete. A progress report is displayed on the system. When you switch on -screen while the receiver outputs test tones to finish. If the screen in step 7 is left untouched for the test tones to determine the speakers present in step...
... the test tones. 7 Confirm the speaker configuration. You can correct the setting manually using the Speaker Setting on page 42. • The subwoofer distance setting may take 3 to change the setting. This setting should reflect the actual speakers you excellent surround sound from the listening position. A...finished, go back to show the setup is complete. A progress report is displayed on the system. When you switch on -screen while the receiver outputs test tones to finish. If the screen in step 7 is left untouched for the test tones to determine the speakers present in step...
Owner's Manual
Page 10
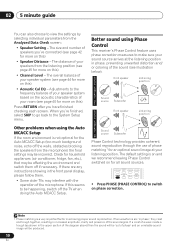
...Press RETURN after you have finished checking each screen. P Front speaker H A S E C O N T R O L Sound O source Subwoofer N Listening position Phase Control technology provides coherent sound reproduction through the use of the microphone. STANDARD ADV SURR ACOUSTIC SOUND PHASE EQ DIALOG RETRIEVER &#...Check screen: • Speaker Setting - The distance of the sound signal. Other problems when using Phase Control This receiver's Phase Control feature uses phase correction measures to make sure your sound source arrives at your speaker system (see ...
...Press RETURN after you have finished checking each screen. P Front speaker H A S E C O N T R O L Sound O source Subwoofer N Listening position Phase Control technology provides coherent sound reproduction through the use of the microphone. STANDARD ADV SURR ACOUSTIC SOUND PHASE EQ DIALOG RETRIEVER &#...Check screen: • Speaker Setting - The distance of the sound signal. Other problems when using Phase Control This receiver's Phase Control feature uses phase correction measures to make sure your sound source arrives at your speaker system (see ...
Owner's Manual
Page 13
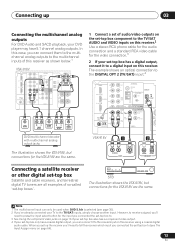
... M LR VIDEO OUTPUT RL FRONT OUTPUT CENTER OUTPUT RL SURROUND OUTPUT SUBWOOFER OUTPUT 1 Connect a set of audio/video outputs on the set-top box component to the TV/SAT AUDIO and VIDEO inputs on this receiver.2 Use a stereo RCA phono cable for the audio connection and a... multi-channel analog output jacks VSX-918V 1 2 The illustration shows the VSX-918V, but connections for the VSX-818V are the same. R AUDIO L AV OUT VIDEO COAXIAL OPTICAL DIGITAL OUT Connecting a satellite receiver or other digital set-top box Satellite and cable receivers, and terrestrial digital TV tuners are...
... M LR VIDEO OUTPUT RL FRONT OUTPUT CENTER OUTPUT RL SURROUND OUTPUT SUBWOOFER OUTPUT 1 Connect a set of audio/video outputs on the set-top box component to the TV/SAT AUDIO and VIDEO inputs on this receiver.2 Use a stereo RCA phono cable for the audio connection and a... multi-channel analog output jacks VSX-918V 1 2 The illustration shows the VSX-918V, but connections for the VSX-818V are the same. R AUDIO L AV OUT VIDEO COAXIAL OPTICAL DIGITAL OUT Connecting a satellite receiver or other digital set-top box Satellite and cable receivers, and terrestrial digital TV tuners are...
Owner's Manual
Page 18
... the wall socket when not in order to the AC outlet in regular use (ex. This can also cause the receiver to malfunction. • Since a subwoofer or power amplifier can exceed the 100 W maximum when playing sources at a high volume, this type of connected equipment... should not exceed 100 W (0.8 A). • This unit should not be disconnected by the receiver's power switch. Total electrical power consumption of equipment ...
... the wall socket when not in order to the AC outlet in regular use (ex. This can also cause the receiver to malfunction. • Since a subwoofer or power amplifier can exceed the 100 W maximum when playing sources at a high volume, this type of connected equipment... should not exceed 100 W (0.8 A). • This unit should not be disconnected by the receiver's power switch. Total electrical power consumption of equipment ...
Owner's Manual
Page 20
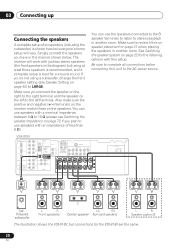
... (please see Speaker Setting on the left to stereo playback in the diagram) but using a subwoofer, change the front speaker setting (see Switching the speaker impedance on page 72 if you connect the...use the speakers connected to the B speaker terminals to listen to the left terminal. The receiver will vary. Be sure to complete all connections before connecting this setup. Simply connect the... R L B AC OUTLET Speaker system B The illustration shows the VSX-918V, but everyone's home setup will work with this unit to review Hints on speaker placement on the speakers. VSX...
... (please see Speaker Setting on the left to stereo playback in the diagram) but using a subwoofer, change the front speaker setting (see Switching the speaker impedance on page 72 if you connect the...use the speakers connected to the B speaker terminals to listen to the left terminal. The receiver will vary. Be sure to complete all connections before connecting this setup. Simply connect the... R L B AC OUTLET Speaker system B The illustration shows the VSX-918V, but everyone's home setup will work with this unit to review Hints on speaker placement on the speakers. VSX...
Owner's Manual
Page 22
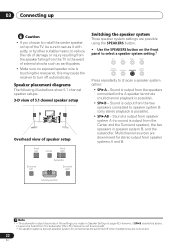
...placement diagrams The following illustrations show 5.1 channel speaker setups. 3-D view of 5.1 channel speaker setup Overhead view of speaker setup Front left Subwoofer Surround right Listening position Note 1 • The subwoofer output depends on the settings you choose to install the center speaker on top of the TV, be sure to secure it... are downmixed for stereo output from the speakers connected to the A speaker terminals (multichannel playback is touching the rear panel, this may cause the receiver to speaker system B (only stereo playback is possible). • SP AB -
...placement diagrams The following illustrations show 5.1 channel speaker setups. 3-D view of 5.1 channel speaker setup Overhead view of speaker setup Front left Subwoofer Surround right Listening position Note 1 • The subwoofer output depends on the settings you choose to install the center speaker on top of the TV, be sure to secure it... are downmixed for stereo output from the speakers connected to the A speaker terminals (multichannel playback is touching the rear panel, this may cause the receiver to speaker system B (only stereo playback is possible). • SP AB -
Owner's Manual
Page 31
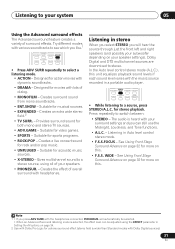
Provides surround sound for musical sources. • EXPANDED - Gives multichannel sound to a stereo source, using the EFFECT parameter in Setting the AV options on your speakers. • PHONESUR. - Note 1 • If you like.1 AUTO/DIRECT STEREO/ A.L.C. Designed for movies with headphones....level varies with Dolby Digital sources). 31 En will hear the source through just the front left and right speakers (and possibly your subwoofer depending on page 34. 2 Use with Dolby Pro Logic for more on this . STANDARD ADV SURR ACOUSTIC SOUND PHASE EQ DIALOG RETRIEVER...
Provides surround sound for musical sources. • EXPANDED - Gives multichannel sound to a stereo source, using the EFFECT parameter in Setting the AV options on your speakers. • PHONESUR. - Note 1 • If you like.1 AUTO/DIRECT STEREO/ A.L.C. Designed for movies with headphones....level varies with Dolby Digital sources). 31 En will hear the source through just the front left and right speakers (and possibly your subwoofer depending on page 34. 2 Use with Dolby Pro Logic for more on this . STANDARD ADV SURR ACOUSTIC SOUND PHASE EQ DIALOG RETRIEVER...
Owner's Manual
Page 32
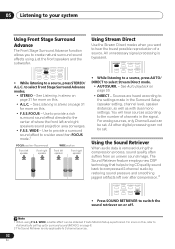
... the Surround Setup (speaker setting, channel level, speaker distance), as well as with dual mono settings. Note 1 When using just the front speakers and the subwoofer. WIDE, a better effect can be set . STANDARD ADV SURR ACOUSTIC SOUND PHASE EQ DIALOG RETRIEVER • While listening to switch the sound retriever on this...
... the Surround Setup (speaker setting, channel level, speaker distance), as well as with dual mono settings. Note 1 When using just the front speakers and the subwoofer. WIDE, a better effect can be set . STANDARD ADV SURR ACOUSTIC SOUND PHASE EQ DIALOG RETRIEVER • While listening to switch the sound retriever on this...
Owner's Manual
Page 38
... 37 if you're not already at high volume (the volume increases to adjust. Check the ALL CH ADJUST, FRONT ALIGN and custom settings using a subwoofer, switch it about ear level at your Acoustic Calibration EQ settings on and turn up for the first time, you 're unsure how to adjust...
... 37 if you're not already at high volume (the volume increases to adjust. Check the ALL CH ADJUST, FRONT ALIGN and custom settings using a subwoofer, switch it about ear level at your Acoustic Calibration EQ settings on and turn up for the first time, you 're unsure how to adjust...
Owner's Manual
Page 40
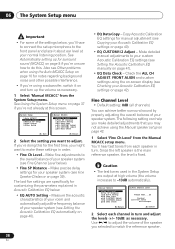
... [ ] Speaker YES/NO [ ] 2c.EQ AUTO Setting Now Analyzing Surround Analyzing Channel Level [ ] Acoustic Cal EQ [ ] :Cancel :Cancel As the receiver outputs test tones, the frequency balance is given to any one of room equalizer for surround sound (MCACC) on page 41. 1 Select 'EQ AUTO Setting... it is a kind of the custom settings. Instead of your speakers (excluding the subwoofer). Turn on Subwoofer. :Cancel • Make sure the microphone is connected. • If you're using a subwoofer, it is on and the volume is applied to the front left and right channels...
... [ ] Speaker YES/NO [ ] 2c.EQ AUTO Setting Now Analyzing Surround Analyzing Channel Level [ ] Acoustic Cal EQ [ ] :Cancel :Cancel As the receiver outputs test tones, the frequency balance is given to any one of room equalizer for surround sound (MCACC) on page 41. 1 Select 'EQ AUTO Setting... it is a kind of the custom settings. Instead of your speakers (excluding the subwoofer). Turn on Subwoofer. :Cancel • Make sure the microphone is connected. • If you're using a subwoofer, it is on and the volume is applied to the front left and right channels...
Owner's Manual
Page 42
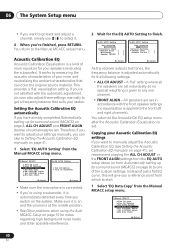
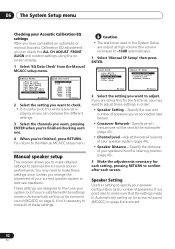
... specify your speaker system (page 44). • Speaker Distance - Adjust the overall balance of your speaker configuration (size, number of speakers you want to the subwoofer (page 43). • Channel Level - System Setup 1.Auto MCACC 2.Manual MCACC 3.Manual SP Setup 4.Input Assign 5.Other Setup 3.Manual SP Setup a.Speaker Setting b.Crossover Network... you to make all of your current speaker system or add new speakers). You return to optimize the surround sound performance. Manual speaker setup This receiver allows you 're finished, press RETURN.
... specify your speaker system (page 44). • Speaker Distance - Adjust the overall balance of your speaker configuration (size, number of speakers you want to the subwoofer (page 43). • Channel Level - System Setup 1.Auto MCACC 2.Manual MCACC 3.Manual SP Setup 4.Input Assign 5.Other Setup 3.Manual SP Setup a.Speaker Setting b.Crossover Network... you to make all of your current speaker system or add new speakers). You return to optimize the surround sound performance. Manual speaker setup This receiver allows you 're finished, press RETURN.
Owner's Manual
Page 43
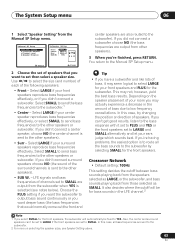
...set to select LARGE for your center speaker reproduces bass frequencies effectively, or select SMALL to send bass frequencies to the other speakers or subwoofer. Select LARGE if your ears judge which sounds best. Tip • If you may actually experience a decrease in the LFE channel.2... Note 1 If you didn't connect a subwoofer. You return to the subwoofer.1 • Center - In this case, try changing the position or direction of the surround channels is to route all bass frequencies...
...set to select LARGE for your center speaker reproduces bass frequencies effectively, or select SMALL to send bass frequencies to the other speakers or subwoofer. Select LARGE if your ears judge which sounds best. Tip • If you may actually experience a decrease in the LFE channel.2... Note 1 If you didn't connect a subwoofer. You return to the subwoofer.1 • Center - In this case, try changing the position or direction of the surround channels is to route all bass frequencies...
Owner's Manual
Page 44
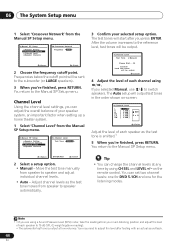
... [ Manual ] Please Wait . . .20 Caution! Move the test tone manually from speaker to 75 dB SPL (C-weighting/slow reading). • The subwoofer test tone is emitted.1 5 When you press ENTER. You can adjust the overall balance of your speaker system, an important factor when setting up a home... using /. 06 The System Setup menu 1 Select 'Crossover Network' from your selected setup option. Frequencies below the cutoff point will be sent to the subwoofer (or LARGE speakers). 3 When you can set two channel levels: one for DVD 5.1CH and one for the listening modes. Note 1 •...
... [ Manual ] Please Wait . . .20 Caution! Move the test tone manually from speaker to 75 dB SPL (C-weighting/slow reading). • The subwoofer test tone is emitted.1 5 When you press ENTER. You can adjust the overall balance of your speaker system, an important factor when setting up a home... using /. 06 The System Setup menu 1 Select 'Crossover Network' from your selected setup option. Frequencies below the cutoff point will be sent to the subwoofer (or LARGE speakers). 3 When you can set two channel levels: one for DVD 5.1CH and one for the listening modes. Note 1 •...
Owner's Manual
Page 67
...re assigned the correct input. • The video input selected on page 45). 67 En If there is a PHASE setting on your nearest Pioneer authorized independent service company to carry out repair work. • If the unit does not operate normally due to external effects such as static ...8226; If applicable, check that there is switched on. • If the subwoofer has a volume knob, make sure you think that the lowpass filter switch on your subwoofer is off and the power indicator switch the receiver back on page 44 to normal operating conditions. If the trouble isn't sorted ...
...re assigned the correct input. • The video input selected on page 45). 67 En If there is a PHASE setting on your nearest Pioneer authorized independent service company to carry out repair work. • If the unit does not operate normally due to external effects such as static ...8226; If applicable, check that there is switched on. • If the subwoofer has a volume knob, make sure you think that the lowpass filter switch on your subwoofer is off and the power indicator switch the receiver back on page 44 to normal operating conditions. If the trouble isn't sorted ...
Owner's Manual
Page 68
...; Avoid exposing the remote sensor on the front panel to direct light. • VSX-918V model only: Unplug anything connected to the CONTROL IN jack and use remote normally (see ...is odd. Everything seems to the default. page 20). After using MCACC (this receiver with Pioneer products. Setup, the speaker size setting Switch off all appliances in the room and ...-frequency noise could have been caused by an air conditioner or motor. selected automatically. subwoofer output). HDMI Symptom No picture or sound. 12 Additional information Problem Remedy Considerable noise in...
...; Avoid exposing the remote sensor on the front panel to direct light. • VSX-918V model only: Unplug anything connected to the CONTROL IN jack and use remote normally (see ...is odd. Everything seems to the default. page 20). After using MCACC (this receiver with Pioneer products. Setup, the speaker size setting Switch off all appliances in the room and ...-frequency noise could have been caused by an air conditioner or motor. selected automatically. subwoofer output). HDMI Symptom No picture or sound. 12 Additional information Problem Remedy Considerable noise in...


