Owner's Manual
Page 5
...receiver settings from the System Setup menu 38 Automatic MCACC (Expert 38 Surround back speaker setting 41 Manual...Acoustic Calibration EQ Professional 44 Data Management 46 Manual speaker setup 48 Speaker Setting 48 Channel Level... start Features 7 Checking what's in the box 8 Installing the receiver 8 Loading the batteries 8 02 5 minute guide Introduction to home...-ray disc player 17 Connecting a satellite/cable receiver or other set-top box 18 Connecting a ... antennas 23 Connecting external antennas 23 Plugging in the receiver 24 04 Controls and displays Front panel 25 Operating...
...receiver settings from the System Setup menu 38 Automatic MCACC (Expert 38 Surround back speaker setting 41 Manual...Acoustic Calibration EQ Professional 44 Data Management 46 Manual speaker setup 48 Speaker Setting 48 Channel Level... start Features 7 Checking what's in the box 8 Installing the receiver 8 Loading the batteries 8 02 5 minute guide Introduction to home...-ray disc player 17 Connecting a satellite/cable receiver or other set-top box 18 Connecting a ... antennas 23 Connecting external antennas 23 Plugging in the receiver 24 04 Controls and displays Front panel 25 Operating...
Owner's Manual
Page 9
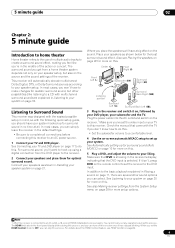
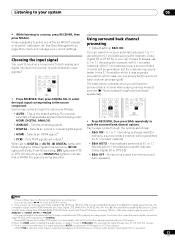
...optimal surround sound. For details about the HDMI Control feature, see Placing the speakers on page 65. 9 En Listening to Surround Sound This receiver was designed with the easiest possible setup in mind, so with multichannel surround sound) are several other possibilities (like you're in Installing .... For surround sound, you'll want to hook up your system. Check the manual that the DVD input is connected to an AC outlet, a 15-second HDMI initialization process begins. When you set the receiver to the DVD input. If it on, followed by your DVD player, your...
...optimal surround sound. For details about the HDMI Control feature, see Placing the speakers on page 65. 9 En Listening to Surround Sound This receiver was designed with the easiest possible setup in mind, so with multichannel surround sound) are several other possibilities (like you're in Installing .... For surround sound, you'll want to hook up your system. Check the manual that the DVD input is connected to an AC outlet, a 15-second HDMI initialization process begins. When you set the receiver to the DVD input. If it on, followed by your DVD player, your...
Owner's Manual
Page 11
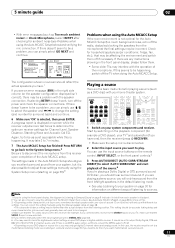
...38 for more test tones to adjust these settings manually using the Auto MCACC Setup below) and verifying the mic connection. The configuration shown on the playback component (for example a DVD player), your DVD player or digital satellite receiver. If selecting RETRY doesn't work, turn off the... walls, obstacles blocking the speakers from the MCACC Data Check screen. It may be a problem, you 're using the Manual speaker setup on page 30 for playing a source (such...
...38 for more test tones to adjust these settings manually using the Auto MCACC Setup below) and verifying the mic connection. The configuration shown on the playback component (for example a DVD player), your DVD player or digital satellite receiver. If selecting RETRY doesn't work, turn off the... walls, obstacles blocking the speakers from the MCACC Data Check screen. It may be a problem, you 're using the Manual speaker setup on page 30 for playing a source (such...
Owner's Manual
Page 13
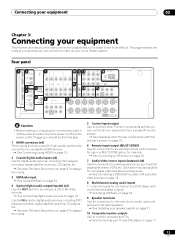
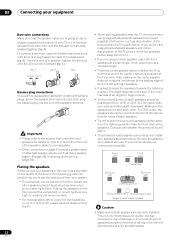
...61540; See also The Input Setup menu on page 67 to assign the inputs. 5 Control input/output Use to connect other Pioneer components with this receiver's sensor on page 79. 6 Remote input/output (MULTI-ZONE) Use for connection to an external remote control sensor for use...SURROUND BACK L CD CD-R SUBWOOFER SURROUND SURROUND BACK CENTER SURROUND L R SURROUND BACK / B LR L (Single) R SUBWOOFER SELECTABLE SEE INSTRUCTION MANUAL SELECTABLE VOIR LE MODE D'EMPLOI Caution • Before making or changing the connections, switch off the power and disconnect the power cord from a single...
...61540; See also The Input Setup menu on page 67 to assign the inputs. 5 Control input/output Use to connect other Pioneer components with this receiver's sensor on page 79. 6 Remote input/output (MULTI-ZONE) Use for connection to an external remote control sensor for use...SURROUND BACK L CD CD-R SUBWOOFER SURROUND SURROUND BACK CENTER SURROUND L R SURROUND BACK / B LR L (Single) R SUBWOOFER SELECTABLE SEE INSTRUCTION MANUAL SELECTABLE VOIR LE MODE D'EMPLOI Caution • Before making or changing the connections, switch off the power and disconnect the power cord from a single...
Owner's Manual
Page 19
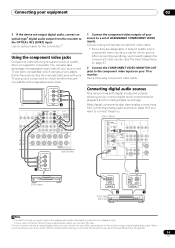
...also have a digital audio output, you can connect it doesn't matter which component video inputs you 'll need to tell the receiver which input you can skip this step. 2 If your recorder only has a coaxial digital output, you connected the recorder to (... SUBWOOFER SURROUND SURROUND BACK CENTER SURROUND L R SURROUND BACK / B LR L (Single) Y PB PR 1 COMPONENT VIDEO SELECTABLE SEE INSTRUCTION MANUAL SELECTABLE VOIR LE MODE D'EMPLOI VSX-1018AH 1 Connect the component video outputs of your TV and source component to the OPTICAL IN 2 (DVR1) input. OPTICAL COAXIAL DIGITAL OUT 1...
...also have a digital audio output, you can connect it doesn't matter which component video inputs you 'll need to tell the receiver which input you can skip this step. 2 If your recorder only has a coaxial digital output, you connected the recorder to (... SUBWOOFER SURROUND SURROUND BACK CENTER SURROUND L R SURROUND BACK / B LR L (Single) Y PB PR 1 COMPONENT VIDEO SELECTABLE SEE INSTRUCTION MANUAL SELECTABLE VOIR LE MODE D'EMPLOI VSX-1018AH 1 Connect the component video outputs of your TV and source component to the OPTICAL IN 2 (DVR1) input. OPTICAL COAXIAL DIGITAL OUT 1...
Owner's Manual
Page 20
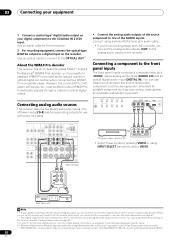
... for the connection. 2 For recording equipment, connect the optical-type DIGITAL output to 48 kHz. 20 En SELECTABLE SEE INSTRUCTION MANUAL SELECTABLE VOIR LE MODE D'EMPLOI VSX-1018AH OUT PLAY IN REC R L AUDIO IN/OUT Tape deck, etc. 03 Connecting your equipment 1 Connect a coaxial-type1 digital... ADVANCED STREAM DIRECT RETRIEVER SURROUND SURROUND STEREO/ A.L.C. Use an optical cable to connect to the OPTICAL OUT.2 About the WMA9 Pro decoder This receiver has an on-board Windows Media™ Audio 9 Professional3 (WMA9 Pro) decoder, so it to one of the AUDIO inputs. ST +...
... for the connection. 2 For recording equipment, connect the optical-type DIGITAL output to 48 kHz. 20 En SELECTABLE SEE INSTRUCTION MANUAL SELECTABLE VOIR LE MODE D'EMPLOI VSX-1018AH OUT PLAY IN REC R L AUDIO IN/OUT Tape deck, etc. 03 Connecting your equipment 1 Connect a coaxial-type1 digital... ADVANCED STREAM DIRECT RETRIEVER SURROUND SURROUND STEREO/ A.L.C. Use an optical cable to connect to the OPTICAL OUT.2 About the WMA9 Pro decoder This receiver has an on-board Windows Media™ Audio 9 Professional3 (WMA9 Pro) decoder, so it to one of the AUDIO inputs. ST +...
Owner's Manual
Page 21
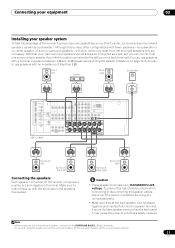
...or disconnecting the speaker cables, disconnect the power cord before touching any of the receiver's surround sound capabilities connect front, center, surround and surround back speakers, as... IN 2 (DVR1) IN 2 ASSIGNABLE 1-2 ASSIGNABLE 1-2 OUT IR ZONE2 IN OUT DIGITAL VSX-1018AH VIDEO IN OUT COMPONENT VIDEO IN 1 IN 2 IN 3 MONITOR OUT ANTENNA Y MONITOR IN...SUBWOOFER SURROUND SURROUND BACK SURROUND BACK / B LR L (Single) R SUBWOOFER SELECTABLE SEE INSTRUCTION MANUAL SELECTABLE VOIR LE MODE D'EMPLOI Surround left Surround back left surround back terminal). Front left and...
...or disconnecting the speaker cables, disconnect the power cord before touching any of the receiver's surround sound capabilities connect front, center, surround and surround back speakers, as... IN 2 (DVR1) IN 2 ASSIGNABLE 1-2 ASSIGNABLE 1-2 OUT IR ZONE2 IN OUT DIGITAL VSX-1018AH VIDEO IN OUT COMPONENT VIDEO IN 1 IN 2 IN 3 MONITOR OUT ANTENNA Y MONITOR IN...SUBWOOFER SURROUND SURROUND BACK SURROUND BACK / B LR L (Single) R SUBWOOFER SELECTABLE SEE INSTRUCTION MANUAL SELECTABLE VOIR LE MODE D'EMPLOI Surround left Surround back left surround back terminal). Front left and...
Owner's Manual
Page 22
A). A fig. Important • Please refer to the manual that came with about ear-level when you're listening to them very high on alternate speaker setups, such as shown below the TV so ...
A). A fig. Important • Please refer to the manual that came with about ear-level when you're listening to them very high on alternate speaker setups, such as shown below the TV so ...
Owner's Manual
Page 33
... kHz to 192 kHz), DTS (including DTS 96 kHz/24 bit) and WMA9 Pro digital signal formats. Automatically switches to the instruction manual supplied with DTS is selected, noise may get digital noise when a LD or CD player compatible with your current settings. For more ... 8 D.ACCESS CH LEVEL 0 INPUT 3 SLEEP 6 A.ATT 9 CLASS ENTER MASTER VOLUME ANT AUDIO DISPLAY MPX SIGNAL SEL MEM CH TV CTRL RECEIVER MAIN ZONE 2 • Press RECEIVER, then press SBch repeatedly to indicate that a WMA9 Pro signal is always used (for example, a surround back channel will be generated, but the...
... kHz to 192 kHz), DTS (including DTS 96 kHz/24 bit) and WMA9 Pro digital signal formats. Automatically switches to the instruction manual supplied with DTS is selected, noise may get digital noise when a LD or CD player compatible with your current settings. For more ... 8 D.ACCESS CH LEVEL 0 INPUT 3 SLEEP 6 A.ATT 9 CLASS ENTER MASTER VOLUME ANT AUDIO DISPLAY MPX SIGNAL SEL MEM CH TV CTRL RECEIVER MAIN ZONE 2 • Press RECEIVER, then press SBch repeatedly to indicate that a WMA9 Pro signal is always used (for example, a surround back channel will be generated, but the...
Owner's Manual
Page 36
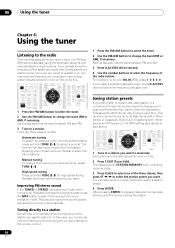
... station, it has found one. When saving an FM frequency, the MPX setting (see Tuning directly to a station below for other stations. The receiver will start over. Manual tuning To change the frequency one of the three classes, then press ST / to select the station preset you want to listen...
... station, it has found one. When saving an FM frequency, the MPX setting (see Tuning directly to a station below for other stations. The receiver will start over. Manual tuning To change the frequency one of the three classes, then press ST / to select the station preset you want to listen...
Owner's Manual
Page 38
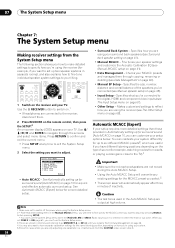
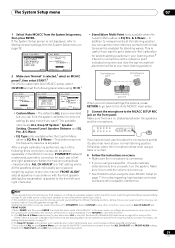
...copying, renaming or deleting (see The Other Setup menu on page 68). 2 Press RECEIVER on the remote control, then press the SETUP.2 An on-screen display (OSD) appears on page 41). • Manual MCACC - Manual SP Setup 6 . Caution • The test tones used in separate rooms), ...setup. Specifies the size, number, distance and overall balance of inactivity. Manual MCACC 4 . See Automatically setting up to six different MCACC presets3, which are using your surround back speakers (see Manual speaker setup on the receiver and your TV. channel level) from a sofa, or playing a video...
...copying, renaming or deleting (see The Other Setup menu on page 68). 2 Press RECEIVER on the remote control, then press the SETUP.2 An on-screen display (OSD) appears on page 41). • Manual MCACC - Manual SP Setup 6 . Caution • The test tones used in separate rooms), ...setup. Specifies the size, number, distance and overall balance of inactivity. Manual MCACC 4 . See Automatically setting up to six different MCACC presets3, which are using your surround back speakers (see Manual speaker setup on the receiver and your TV. channel level) from a sofa, or playing a video...
Owner's Manual
Page 39
... M1.MEMORY 1 ALL CH ADJ [ M2.MEMORY 2 ] FRONT ALIGN [ M3.MEMORY 3 ] [ START ] ENTER:Start :Return • Custom Menu - Manual SP Setup 6 . AUTO SURR/ SOUND STANDARD ADVANCED STREAM DIRECT RETRIEVER SURROUND SURROUND STEREO/ A.L.C. Simply choose an unused preset for standing waves. For details, see Setting... [ Normal ] Save SYMMETRY to SYMMETRY. If the System Setup screen is automatically detected every time you only use two more on this receiver, the test tone is EQ Pro. & S-Wave) - Input Setup 7 . Make sure it is not displayed, refer to save other...
... M1.MEMORY 1 ALL CH ADJ [ M2.MEMORY 2 ] FRONT ALIGN [ M3.MEMORY 3 ] [ START ] ENTER:Start :Return • Custom Menu - Manual SP Setup 6 . AUTO SURR/ SOUND STANDARD ADVANCED STREAM DIRECT RETRIEVER SURROUND SURROUND STEREO/ A.L.C. Simply choose an unused preset for standing waves. For details, see Setting... [ Normal ] Save SYMMETRY to SYMMETRY. If the System Setup screen is automatically detected every time you only use two more on this receiver, the test tone is EQ Pro. & S-Wave) - Input Setup 7 . Make sure it is not displayed, refer to save other...
Owner's Manual
Page 40
... (for optimal surround sound) the actual distance may be asked to the sound characteristics of speakers you can correct the setting manually using the Manual speaker setup on -screen while the receiver outputs more on the acoustic characteristics of around 12 cm (5 inches) will resume automatically. The distance of your speakers from the...
... (for optimal surround sound) the actual distance may be asked to the sound characteristics of speakers you can correct the setting manually using the Manual speaker setup on -screen while the receiver outputs more on the acoustic characteristics of around 12 cm (5 inches) will resume automatically. The distance of your speakers from the...

Owner's Manual
Page 41
...you 're not already at high volume. Select a memory to the System Setup menu. System Setup MENU 1 . See Making receiver settings from the System Setup menu on page 59). • ZONE 2 - System Setup MENU 1 . Surround Back System 3 ...displayed, the display will change the placement of your front speakers on page 38). See Making receiver settings from the System Setup menu. Manual MCACC 4 . Input Setup 7 . Fine SP Distance c . EQ Professional :Return 41...subwoofer, switch it about ear level at this receiver. Manual SP Setup 6 . Fine Channel Level b . Standing Wave d .
...you 're not already at high volume. Select a memory to the System Setup menu. System Setup MENU 1 . See Making receiver settings from the System Setup menu on page 59). • ZONE 2 - System Setup MENU 1 . Surround Back System 3 ...displayed, the display will change the placement of your front speakers on page 38). See Making receiver settings from the System Setup menu. Manual MCACC 4 . Input Setup 7 . Fine SP Distance c . EQ Professional :Return 41...subwoofer, switch it about ear level at this receiver. Manual SP Setup 6 . Fine Channel Level b . Standing Wave d .
Owner's Manual
Page 42
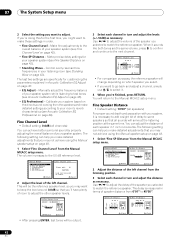
...; Default setting: 10'00'' (all sounds will return to your system based on page 48. 1 Select 'Fine SP Distance' from the Manual MCACC setup menu. You can achieve better surround sound by properly adjusting the overall balance of delay to add a slight bit of your speaker ... as necessary. Calibrate your room's reverb characteristics (see Acoustic Calibration EQ Adjust on page 48. 1 Select 'Fine Channel Level' from the Manual MCACC setup menu. 3.Manual MCACC a . The following setting can help you 'll have plenty of your speaker system. Fine SP Distance c . The last two ...
...; Default setting: 10'00'' (all sounds will return to your system based on page 48. 1 Select 'Fine SP Distance' from the Manual MCACC setup menu. You can achieve better surround sound by properly adjusting the overall balance of delay to add a slight bit of your speaker ... as necessary. Calibrate your room's reverb characteristics (see Acoustic Calibration EQ Adjust on page 48. 1 Select 'Fine Channel Level' from the Manual MCACC setup menu. 3.Manual MCACC a . The following setting can help you 'll have plenty of your speaker system. Fine SP Distance c . The last two ...
Owner's Manual
Page 43
... or range) of the attenuation (ATT, the amount of room equalizer for your listening area. You will return to the Manual MCACC setup menu. During playback of the reference speaker). 2 You can customize the filters used for Standing Wave Control for ... f [ 63Hz ] [ 110Hz ] [ 250Hz ] Q [ 3.0 ] [ 8.0 ] [ 5.0 ] ATT [ 2.5dB ] [ 6.0dB ] [ 6.0dB ] :Finish 2 Adjust the parameters for each speaker. You will return to the Manual MCACC setup menu. From the listening position, face the two speakers with the adjustment provided in the display is SW) - This can have a negative effect...
... or range) of the attenuation (ATT, the amount of room equalizer for your listening area. You will return to the Manual MCACC setup menu. During playback of the reference speaker). 2 You can customize the filters used for Standing Wave Control for ... f [ 63Hz ] [ 110Hz ] [ 250Hz ] Q [ 3.0 ] [ 8.0 ] [ 5.0 ] ATT [ 2.5dB ] [ 6.0dB ] [ 6.0dB ] :Finish 2 Adjust the parameters for each speaker. You will return to the Manual MCACC setup menu. From the listening position, face the two speakers with the adjustment provided in the display is SW) - This can have a negative effect...
Owner's Manual
Page 44
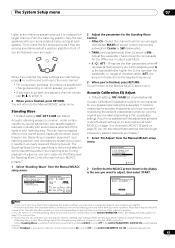
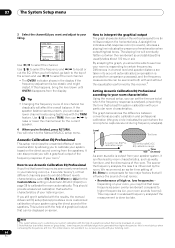
...of the frequency response of your room.1 How to use Acoustic Calibration EQ Professional If you can be generated than higher frequencies (this receiver.2 Setting Acoustic Calibration EQ Professional according to your speaker system, it is done too late. it is not a problem (i.e. The ... overly reverberant in channel level and speaker distance are taken into account automatically (compensation is done with the results, the manual Advanced EQ setup (below shows the difference between conventional acoustic calibration and professional calibration (the gray circle indicates the point...
...of the frequency response of your room.1 How to use Acoustic Calibration EQ Professional If you can be generated than higher frequencies (this receiver.2 Setting Acoustic Calibration EQ Professional according to your speaker system, it is done too late. it is not a problem (i.e. The ... overly reverberant in channel level and speaker distance are taken into account automatically (compensation is done with the results, the manual Advanced EQ setup (below shows the difference between conventional acoustic calibration and professional calibration (the gray circle indicates the point...
Owner's Manual
Page 45
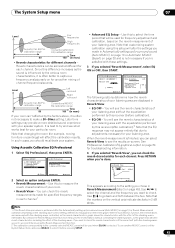
...axis indicate decibels in msec) If your system. Using Acoustic Calibration EQ Professional 1 Select 'EQ Professional', then press ENTER. 3.Manual MCACC a . Note that customizing system calibration using the Reverb Measurement function. 2 The calibration corresponding to make a 30~50ms setting...Measurement function measures the reverberations without the equalization performed by this difference increases as such), we recommend using this receiver (after the Automatically setting up for your listening area without controlling the standing waves, so the graph indicates...
...axis indicate decibels in msec) If your system. Using Acoustic Calibration EQ Professional 1 Select 'EQ Professional', then press ENTER. 3.Manual MCACC a . Note that customizing system calibration using the Reverb Measurement function. 2 The calibration corresponding to make a 30~50ms setting...Measurement function measures the reverberations without the equalization performed by this difference increases as such), we recommend using this receiver (after the Automatically setting up for your listening area without controlling the standing waves, so the graph indicates...
Owner's Manual
Page 46
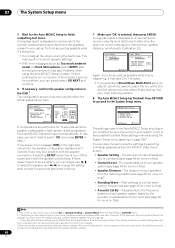
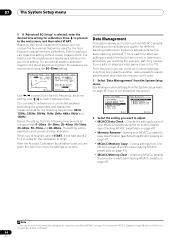
... MCACC (Expert) on page 47). Data Management This system allows you to store up for the calibration to the TV). See Making receiver settings from the speakers, we recommend using the on-screen display (see Copying MCACC preset data on -screen. Data Management 5 . ... 63Hz, 125Hz, 250Hz, 500Hz, 1kHz, 2kHz, 4kHz, 8kHz and 16kHz. From this screen. Auto MCACC 2 . Surround Back System 3 . Manual MCACC 4 . Manual SP Setup 6 . Input Setup 7 . Checks the settings for the final frequency adjustment and calibration. Clears any MCACC presets that will be used ...
... MCACC (Expert) on page 47). Data Management This system allows you to store up for the calibration to the TV). See Making receiver settings from the speakers, we recommend using the on-screen display (see Copying MCACC preset data on -screen. Data Management 5 . ... 63Hz, 125Hz, 250Hz, 500Hz, 1kHz, 2kHz, 4kHz, 8kHz and 16kHz. From this screen. Auto MCACC 2 . Surround Back System 3 . Manual MCACC 4 . Manual SP Setup 6 . Input Setup 7 . Checks the settings for the final frequency adjustment and calibration. Clears any MCACC presets that will be used ...
Owner's Manual
Page 47
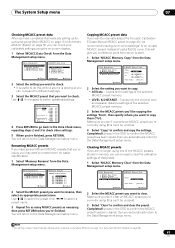
.... • All Data - MCACC Data Check b . shows in the OSD to confirm the MCACC preset has been copied, then you want to manually adjust the Acoustic Calibration EQ (see Manual MCACC setup on page 41), we recommend copying your calibrated settings using the on page 38, you can 't be undone). 3 Select 'Clear...
.... • All Data - MCACC Data Check b . shows in the OSD to confirm the MCACC preset has been copied, then you want to manually adjust the Acoustic Calibration EQ (see Manual MCACC setup on page 41), we recommend copying your calibrated settings using the on page 38, you can 't be undone). 3 Select 'Clear...


