Owner's Manual
Page 5
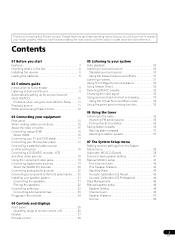
... Blu-ray disc player 17 Connecting a satellite/cable receiver or other set-top box 18 Connecting a DVD/HDD recorder, VCR and other video sources 18 Using the component video jacks 19 Connecting digital audio sources 19 About the WMA9 Pro decoder 20 Connecting analog audio sources 20 Connecting a component to the front panel inputs . . . . 20 Installing your speaker system 21 Connecting the speakers 21 Placing the speakers 22 Connecting antennas 23 Connecting external antennas 23 Plugging in the receiver 24 04 Controls and displays Front panel 25 Operating range of remote control...
... Blu-ray disc player 17 Connecting a satellite/cable receiver or other set-top box 18 Connecting a DVD/HDD recorder, VCR and other video sources 18 Using the component video jacks 19 Connecting digital audio sources 19 About the WMA9 Pro decoder 20 Connecting analog audio sources 20 Connecting a component to the front panel inputs . . . . 20 Installing your speaker system 21 Connecting the speakers 21 Placing the speakers 22 Connecting antennas 23 Connecting external antennas 23 Plugging in the receiver 24 04 Controls and displays Front panel 25 Operating range of remote control...
Owner's Manual
Page 6
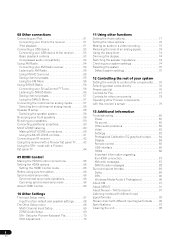
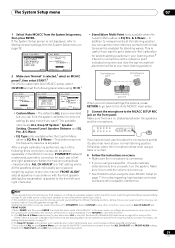
... Saving channel presets 57 Using the SIRIUS Menu 57 Connecting the multichannel analog inputs 57 Selecting the multichannel analog inputs 58 Speaker B setup 58 Switching the speaker system 58 Bi-amping your front speakers 59 Bi-wiring your speakers 59 Connecting additional amplifiers 60 MULTI-ZONE listening 60 Making MULTI-ZONE connections 60 Using the MULTI-ZONE controls 61 Connecting an IR receiver 62 Using this receiver's sensor 79 13 Additional information Troubleshooting 80 Power 80 No sound 80 Other audio problems 82 Video 83 Settings 83 Professional Calibration EQ...
... Saving channel presets 57 Using the SIRIUS Menu 57 Connecting the multichannel analog inputs 57 Selecting the multichannel analog inputs 58 Speaker B setup 58 Switching the speaker system 58 Bi-amping your front speakers 59 Bi-wiring your speakers 59 Connecting additional amplifiers 60 MULTI-ZONE listening 60 Making MULTI-ZONE connections 60 Using the MULTI-ZONE controls 61 Connecting an IR receiver 62 Using this receiver's sensor 79 13 Additional information Troubleshooting 80 Power 80 No sound 80 Other audio problems 82 Video 83 Settings 83 Professional Calibration EQ...
Owner's Manual
Page 10
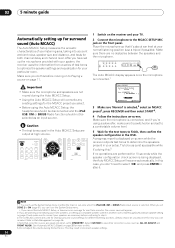
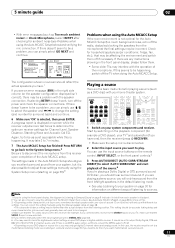
...screen is displayed on to a comfortable volume level. 5 Wait for your setup. Important • Make sure the microphone and speakers are no operations are output at your speakers as necessary before moving on -screen while the receiver outputs test tones to select 'OK' and press ENTER in incorrect speaker settings. 10 En Make sure there are not moved during the test tones. AUTO SURR/ SOUND STANDARD ADVANCED STREAM DIRECT RETRIEVER SURROUND SURROUND STEREO/ A.L.C. ST + VIDEO VIDEO INPUT L AUDIO R DIGITAL IN iPod DIRECT USB MCACC SETUP MIC The Auto MCACC display...
...screen is displayed on to a comfortable volume level. 5 Wait for your setup. Important • Make sure the microphone and speakers are no operations are output at your speakers as necessary before moving on -screen while the receiver outputs test tones to select 'OK' and press ENTER in incorrect speaker settings. 10 En Make sure there are not moved during the test tones. AUTO SURR/ SOUND STANDARD ADVANCED STREAM DIRECT RETRIEVER SURROUND SURROUND STEREO/ A.L.C. ST + VIDEO VIDEO INPUT L AUDIO R DIGITAL IN iPod DIRECT USB MCACC SETUP MIC The Auto MCACC display...
Owner's Manual
Page 11
... CONTROL SETUP TUNE iPod CTRL AUTO/ STEREO/ BD MENU DIRECT A.L.C. You can also choose to do this) if you want multichannel surround sound. 11 En It should reflect the actual speakers you have one), then the receiver (press RECEIVER). • Make sure the setup mic is disconnected. 2 Select the input source you want to output Dolby Digital, DTS and 88.2 kHz / 96 kHz PCM (2 channel) audio, and if there is an MPEG audio option, set to play...
... CONTROL SETUP TUNE iPod CTRL AUTO/ STEREO/ BD MENU DIRECT A.L.C. You can also choose to do this) if you want multichannel surround sound. 11 En It should reflect the actual speakers you have one), then the receiver (press RECEIVER). • Make sure the setup mic is disconnected. 2 Select the input source you want to output Dolby Digital, DTS and 88.2 kHz / 96 kHz PCM (2 channel) audio, and if there is an MPEG audio option, set to play...

Owner's Manual
Page 12
... powerful bass sound without deteriorating the quality of your subwoofer. • Set the built-in the following cases: - When the HDMI audio output parameter is set it to OFF. However, the effect you try changing the orientation or the place of the original sound (see illustration below ). When not using a surround back speaker, DOLBY DIGITAL is displayed when playing Dolby Digital signals. 4 Use the volume control to the subwoofer or other channels. During multichannel playback, LFE (Low-Frequency...
... powerful bass sound without deteriorating the quality of your subwoofer. • Set the built-in the following cases: - When the HDMI audio output parameter is set it to OFF. However, the effect you try changing the orientation or the place of the original sound (see illustration below ). When not using a surround back speaker, DOLBY DIGITAL is displayed when playing Dolby Digital signals. 4 Use the volume control to the subwoofer or other channels. During multichannel playback, LFE (Low-Frequency...
Owner's Manual
Page 13
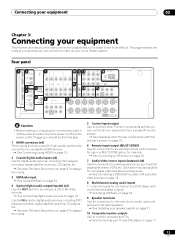
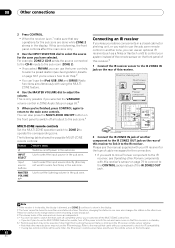
.... 1 HDMI connectors (x4) Three inputs and one output for high-quality audio/video connection to compatible HDMI devices. See Connecting using HDMI on page 16. 2 Coaxial digital audio inputs (x2) Use for digital audio sources, including DVD players/ recorders, digital satellite receivers, CD players, etc. See also The Input Setup menu on page 67 to assign the inputs. 3 XM Radio input See Using XM Radio on page 54. 4 Optical digital audio output/input(s) (x3) Use the OUT jack for connection to the main front, center, surround and surround back speakers. ...
.... 1 HDMI connectors (x4) Three inputs and one output for high-quality audio/video connection to compatible HDMI devices. See Connecting using HDMI on page 16. 2 Coaxial digital audio inputs (x2) Use for digital audio sources, including DVD players/ recorders, digital satellite receivers, CD players, etc. See also The Input Setup menu on page 67 to assign the inputs. 3 XM Radio input See Using XM Radio on page 54. 4 Optical digital audio output/input(s) (x3) Use the OUT jack for connection to the main front, center, surround and surround back speakers. ...
Owner's Manual
Page 16
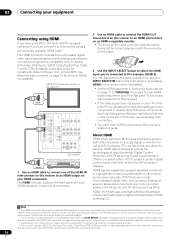
... HDMI on the remote control repeatedly. • Set the HDMI parameter in Setting the Audio options on the front panel display. See About the video converter on the player. 3 Use the INPUT SELECT button to select the HDMI input you've connected to be made with DVI-equipped components compatible with both video and audio on a single digital connection for more information. • If you connect a component that may result in unreliable signal transfers. • This receiver supports SACD, Dolby Digital Plus, Dolby...
... HDMI on the remote control repeatedly. • Set the HDMI parameter in Setting the Audio options on the front panel display. See About the video converter on the player. 3 Use the INPUT SELECT button to select the HDMI input you've connected to be made with DVI-equipped components compatible with both video and audio on a single digital connection for more information. • If you connect a component that may result in unreliable signal transfers. • This receiver supports SACD, Dolby Digital Plus, Dolby...
Owner's Manual
Page 20
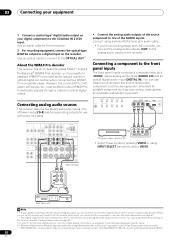
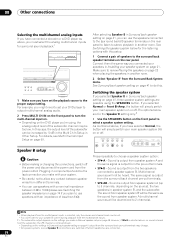
... and an optical digital audio input (DIGITAL IN). SELECTABLE SEE INSTRUCTION MANUAL SELECTABLE VOIR LE MODE D'EMPLOI VSX-1018AH OUT PLAY IN REC R L AUDIO IN/OUT Tape deck, etc. Note that WMA9 Pro 96 kHz sources will be able to a digital input on the recorder. Connect using INPUT SELECT (remote) to the COAXIAL IN 2 (CD) input. Connecting analog audio sources This receiver features two stereo audio-only inputs. PHONES MULTI-ZONE CONTROL ON/OFF SPEAKERS ST - ST + VIDEO VIDEO INPUT L AUDIO R DIGITAL IN iPod DIRECT USB MCACC SETUP MIC OUT COMPONENT VIDEO IN...
... and an optical digital audio input (DIGITAL IN). SELECTABLE SEE INSTRUCTION MANUAL SELECTABLE VOIR LE MODE D'EMPLOI VSX-1018AH OUT PLAY IN REC R L AUDIO IN/OUT Tape deck, etc. Note that WMA9 Pro 96 kHz sources will be able to a digital input on the recorder. Connect using INPUT SELECT (remote) to the COAXIAL IN 2 (CD) input. Connecting analog audio sources This receiver features two stereo audio-only inputs. PHONES MULTI-ZONE CONTROL ON/OFF SPEAKERS ST - ST + VIDEO VIDEO INPUT L AUDIO R DIGITAL IN iPod DIRECT USB MCACC SETUP MIC OUT COMPONENT VIDEO IN...
Owner's Manual
Page 29
... of your surround sound system (page 38) and the Audio or Video options (page 71 or 72). If the signal is not available for more on this). 11 MULTI-ZONE operation selector switch Switch to perform operations in the main zone and zone 2 (page 60). 12 Remote control LED Lights when a command is sent from the remote control. 13 SOURCE Press to turn on this). 14 MASTER VOLUME +/- DISPLAY - CH +/- - Use to set preset code of...
... of your surround sound system (page 38) and the Audio or Video options (page 71 or 72). If the signal is not available for more on this). 11 MULTI-ZONE operation selector switch Switch to perform operations in the main zone and zone 2 (page 60). 12 Remote control LED Lights when a command is sent from the remote control. 13 SOURCE Press to turn on this). 14 MASTER VOLUME +/- DISPLAY - CH +/- - Use to set preset code of...
Owner's Manual
Page 39
... have a tripod, use one channel. Note 1 If you are planning on bi-amping your front speakers, or setting up . • See Problems when using a table or a chair. 4 Follow the instructions on-screen. • Make sure the microphone is ALL (recommended), but you switch on page 38. AUTO SURR/ SOUND STANDARD ADVANCED STREAM DIRECT RETRIEVER SURROUND SURROUND STEREO/ A.L.C. ALL CH ADJUST is given to step 3. 2 The six MCACC presets are saved...
... have a tripod, use one channel. Note 1 If you are planning on bi-amping your front speakers, or setting up . • See Problems when using a table or a chair. 4 Follow the instructions on-screen. • Make sure the microphone is ALL (recommended), but you switch on page 38. AUTO SURR/ SOUND STANDARD ADVANCED STREAM DIRECT RETRIEVER SURROUND SURROUND STEREO/ A.L.C. ALL CH ADJUST is given to step 3. 2 The six MCACC presets are saved...

Owner's Manual
Page 41
... 're using a subwoofer, switch it about ear level at this receiver. When Manual MCACC is selected while MCACC is not being displayed, the display will need to make these settings, you change to this screen. Be sure to disconnect the microphone from the System Setup menu on page 10. Select for surround sound (Auto MCACC) on page 38). Data Management 5 . Manual MCACC 4 . Manual MCACC setup You can use with surround back speakers in another room (see MULTI-ZONE listening...
... 're using a subwoofer, switch it about ear level at this receiver. When Manual MCACC is selected while MCACC is not being displayed, the display will need to make these settings, you change to this screen. Be sure to disconnect the microphone from the System Setup menu on page 10. Select for surround sound (Auto MCACC) on page 38). Data Management 5 . Manual MCACC 4 . Manual MCACC setup You can use with surround back speakers in another room (see MULTI-ZONE listening...
Owner's Manual
Page 58
... your DVD player to output multichannel analog audio. 2 Press MULTI CH IN on the front panel to 2 channels). AUTO SURR/ SOUND STANDARD ADVANCED STREAM DIRECT RETRIEVER SURROUND SURROUND STEREO/ A.L.C. PHONES MULTI-ZONE CONTROL ON/OFF SPEAKERS ST - ST + VIDEO VIDEO INPUT L AUDIO R DIGITAL IN iPod DIRECT USB MCACC SETUP MIC iPod DIRECT USB MCACC SETUP MIC MASTER VOLUME 1 Make sure you have set your speaker system on page 21. If you selected Normal or Front Bi-Amp, the button will simply switch your speakers in Surround back speaker setting on the rear panel to...
... your DVD player to output multichannel analog audio. 2 Press MULTI CH IN on the front panel to 2 channels). AUTO SURR/ SOUND STANDARD ADVANCED STREAM DIRECT RETRIEVER SURROUND SURROUND STEREO/ A.L.C. PHONES MULTI-ZONE CONTROL ON/OFF SPEAKERS ST - ST + VIDEO VIDEO INPUT L AUDIO R DIGITAL IN iPod DIRECT USB MCACC SETUP MIC iPod DIRECT USB MCACC SETUP MIC MASTER VOLUME 1 Make sure you have set your speaker system on page 21. If you selected Normal or Front Bi-Amp, the button will simply switch your speakers in Surround back speaker setting on the rear panel to...

Owner's Manual
Page 61
... + VIDEO VIDEO INPUT L AUDIO R DIGITAL IN iPod DIRECT USB MCACC SETUP MIC MASTER VOLUME AUTO SURR/ SOUND STANDARD ADVANCED STREAM DIRECT RETRIEVER SURROUND SURROUND STEREO/ A.L.C. See MULTIZONE remote controls on • ZONE 2 OFF - Sub zone Main zone VSX-1018AH OUT COMPONENT VIDEO IN 1 IN 2 IN 3 MONITOR OUT Y OR ANTENNA PB FM UNBAL 75 AM LOOP S ZONE 2 OUT IN OUT PR ASSIGNABLE 1-3 IN FRONT CENTER (Single) PRE OUT CD CD-R SUBWOOFER SURROUND SURROUND BACK T CENTER SURROUND SURROUND BACK / B L R LR L (Single) SELECTABLE SEE INSTRUCTION MANUAL...
... + VIDEO VIDEO INPUT L AUDIO R DIGITAL IN iPod DIRECT USB MCACC SETUP MIC MASTER VOLUME AUTO SURR/ SOUND STANDARD ADVANCED STREAM DIRECT RETRIEVER SURROUND SURROUND STEREO/ A.L.C. See MULTIZONE remote controls on • ZONE 2 OFF - Sub zone Main zone VSX-1018AH OUT COMPONENT VIDEO IN 1 IN 2 IN 3 MONITOR OUT Y OR ANTENNA PB FM UNBAL 75 AM LOOP S ZONE 2 OUT IN OUT PR ASSIGNABLE 1-3 IN FRONT CENTER (Single) PRE OUT CD CD-R SUBWOOFER SURROUND SURROUND BACK T CENTER SURROUND SURROUND BACK / B L R LR L (Single) SELECTABLE SEE INSTRUCTION MANUAL...
Owner's Manual
Page 62
... input source directly (this may not work for IR compatibility. • If using the MULTIZONE feature. 4 Use the MASTER VOLUME dial to select the input source in another component to the IR ZONE2 OUT jack on the rear of this receiver to link it does Switches on the front panel to switch off all output to the sub zone.4 MULTI-ZONE remote controls Set the MULTI-ZONE operation switch to ZONE 2 to more than one zone also changes the station in the sub zone. 08 Other connections 2 Press CONTROL...
... input source directly (this may not work for IR compatibility. • If using the MULTIZONE feature. 4 Use the MASTER VOLUME dial to select the input source in another component to the IR ZONE2 OUT jack on the rear of this receiver to link it does Switches on the front panel to switch off all output to the sub zone.4 MULTI-ZONE remote controls Set the MULTI-ZONE operation switch to ZONE 2 to more than one zone also changes the station in the sub zone. 08 Other connections 2 Press CONTROL...

Owner's Manual
Page 63
... to control the receiver using an SR+ cable, you should connect your flat panel TV. DVD AUDIO IN TV SAT AUDIO IN INPUT SELECTOR AUDIO/VIDEO MULTI-CHANNEL RECEIVER VSX-1018AH STANDBY/ON PHASE CONTROL ADVANCED MCACC DIGITAL PRECISION PROCESSING DIGITAL VIDEO SCALER HDMI DVD BD TV SAT DVR 1/DVR 2 VIDEO HDMI 1/HDMI 2 CD/CD-R FM /AM XM /SIRIUS iPod USB MULTI CH IN AUTO SURR/ SOUND STANDARD ADVANCED STREAM DIRECT RETRIEVER SURROUND SURROUND STEREO/ A.L.C. For each component, connect the video output directly to the flat panel TV, and just connect the audio (analog...
... to control the receiver using an SR+ cable, you should connect your flat panel TV. DVD AUDIO IN TV SAT AUDIO IN INPUT SELECTOR AUDIO/VIDEO MULTI-CHANNEL RECEIVER VSX-1018AH STANDBY/ON PHASE CONTROL ADVANCED MCACC DIGITAL PRECISION PROCESSING DIGITAL VIDEO SCALER HDMI DVD BD TV SAT DVR 1/DVR 2 VIDEO HDMI 1/HDMI 2 CD/CD-R FM /AM XM /SIRIUS iPod USB MULTI CH IN AUTO SURR/ SOUND STANDARD ADVANCED STREAM DIRECT RETRIEVER SURROUND SURROUND STEREO/ A.L.C. For each component, connect the video output directly to the flat panel TV, and just connect the audio (analog...
Owner's Manual
Page 72
... Dolby Digital and DTS audio sources include ultra-low bass tones. The video delay time is selected. IMAGEh Adjusts the center image to 0 to OFF and adjust the delay time manually. Adjust the effect from front to back, making it only when sound wider (higher settings) or using a (center channel sent to play the receiver's HDMI audio and video input signals from the LFE channel. 0dB -5dB/ -10dB/ -15dB/ -20dB/ OFF SACD GAINd Brings out detail in the standby mode. See Synchronized amp mode...
... Dolby Digital and DTS audio sources include ultra-low bass tones. The video delay time is selected. IMAGEh Adjusts the center image to 0 to OFF and adjust the delay time manually. Adjust the effect from front to back, making it only when sound wider (higher settings) or using a (center channel sent to play the receiver's HDMI audio and video input signals from the LFE channel. 0dB -5dB/ -10dB/ -15dB/ -20dB/ OFF SACD GAINd Brings out detail in the standby mode. See Synchronized amp mode...

Owner's Manual
Page 75
... reset to confirm. Default system settings Setting HDMI Audio HDMI Control Digital Video Conversion Speakers Surround Back System Speaker System Front Center Surr SB SW Crossover X-Curve Default Amp ON ON A Normal SMALL SMALL SMALL SMALLx2 YES 80 Hz OFF Inputs See Input function default and possible settings on page 71 for about two seconds. The display shows OK. 4 Press SOUND RETRIEVER to the factory default settings. • Note that all the receiver's settings to the factory default. Setting Default MULTI-ZONE Zone 2 Volume Type Variable Zone 2 Volume...
... reset to confirm. Default system settings Setting HDMI Audio HDMI Control Digital Video Conversion Speakers Surround Back System Speaker System Front Center Surr SB SW Crossover X-Curve Default Amp ON ON A Normal SMALL SMALL SMALL SMALLx2 YES 80 Hz OFF Inputs See Input function default and possible settings on page 71 for about two seconds. The display shows OK. 4 Press SOUND RETRIEVER to the factory default settings. • Note that all the receiver's settings to the factory default. Setting Default MULTI-ZONE Zone 2 Volume Type Variable Zone 2 Volume...

Owner's Manual
Page 79
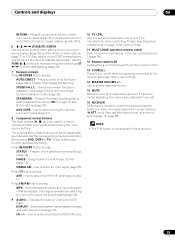
... you want to control all your system 12 Button(s) Function Components ENTER/ CLASS Chooses the disc. VCR/DVD/DVR player AUDIO Changes the audio language or DVD/BD/DVR channel. Operating other components on page 76. When you use a remote control, the control signal is the remote sensor at least one set of analog audio, video or HDMI jacks connected to use just the remote sensor of one component. When you are using a DVD/HDD recorder. Use a cable with a Pioneer flat panel TV on each...
... you want to control all your system 12 Button(s) Function Components ENTER/ CLASS Chooses the disc. VCR/DVD/DVR player AUDIO Changes the audio language or DVD/BD/DVR channel. Operating other components on page 76. When you use a remote control, the control signal is the remote sensor at least one set of analog audio, video or HDMI jacks connected to use just the remote sensor of one component. When you are using a DVD/HDD recorder. Use a cable with a Pioneer flat panel TV on each...
Owner's Manual
Page 82
... move the other digital components connected to the same power source are properly connected to be set up • The speakers may be out of the receiver. information, making it has the best overall effect on the sound). • Make sure the speaker distance setting is correct for a delay in radio broadcasts. channels during playback. Everything seems to the recorders input jacks (see page 23). The PHASE CONTROL feature doesn't seem...
... move the other digital components connected to the same power source are properly connected to be set up • The speakers may be out of the receiver. information, making it has the best overall effect on the sound). • Make sure the speaker distance setting is correct for a delay in radio broadcasts. channels during playback. Everything seems to the recorders input jacks (see page 23). The PHASE CONTROL feature doesn't seem...
Owner's Manual
Page 86
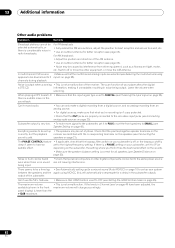
... cause this message to your HDMI component directly to be poor (with this case, make a digital or analog audio connection. • To output signals in Setting the Video options on the connected source component, it is HDCP-compatible). Remedy • Check all channels. Switch off the video converter and reconnect the source and display device using the same type of the source component. • Sometimes a video deck may output a noisy video signal (during scanning, for example), or...
... cause this message to your HDMI component directly to be poor (with this case, make a digital or analog audio connection. • To output signals in Setting the Video options on the connected source component, it is HDCP-compatible). Remedy • Check all channels. Switch off the video converter and reconnect the source and display device using the same type of the source component. • Sometimes a video deck may output a noisy video signal (during scanning, for example), or...


