
User manual
Page 4
... Adapter Installing and Recharging the Battery Installing Recharging Getting the iPronto Up and Running Setting up Your iPronto Setting up Your Network Using the iPronto The Touch Screen The Status Display The iPronto's External Controls The External Connections Navigating the iPronto The Keyboard The Remote Control How Does the iPronto RC Work? iPronto User Guide Table of Contents...
... Adapter Installing and Recharging the Battery Installing Recharging Getting the iPronto Up and Running Setting up Your iPronto Setting up Your Network Using the iPronto The Touch Screen The Status Display The iPronto's External Controls The External Connections Navigating the iPronto The Keyboard The Remote Control How Does the iPronto RC Work? iPronto User Guide Table of Contents...

User manual
Page 6
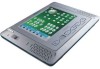
What Does the iPronto Box Contain? The iPronto box contains the following items: iPronto iPronto User Guide Warranty iPronto Getting Started Guide Battery iPronto User Guide Wireless LAN Adapter AC power adapter with cable 3
What Does the iPronto Box Contain? The iPronto box contains the following items: iPronto iPronto User Guide Warranty iPronto Getting Started Guide Battery iPronto User Guide Wireless LAN Adapter AC power adapter with cable 3

User manual
Page 10
If you follow the flow of the battery pack This User Guide is meant to help you will have your iPronto. About the iPronto IR learning eye and sending eye cover of the wireless LAN adapter stand reset button cover of the chapters in this guide, you set up...information about: ■ Installing the Wireless LAN Adapter on page 8; ■ Installing and Recharging the Battery on page 10; ■ Getting the iPronto Up and Running on page 14; ■ Using the iPronto on page 27; ■ Using the iPronto's basic applications: The Remote Control on page 35, The Browser on page 44 and...
If you follow the flow of the battery pack This User Guide is meant to help you will have your iPronto. About the iPronto IR learning eye and sending eye cover of the wireless LAN adapter stand reset button cover of the chapters in this guide, you set up...information about: ■ Installing the Wireless LAN Adapter on page 8; ■ Installing and Recharging the Battery on page 10; ■ Getting the iPronto Up and Running on page 14; ■ Using the iPronto on page 27; ■ Using the iPronto's basic applications: The Remote Control on page 35, The Browser on page 44 and...

User manual
Page 13
See Recharging on page 13. Insert the battery as follows: 1 Lift the stand (figure 1). 2 Open the battery cover by pushing the grips and sliding off the cover in the direction indicated below (figure 2). iPronto User Guide Figure 1 Figure 2 10 The battery is precharged, but it is advisable to fully charge the battery when you install the battery. Installing and Recharging the Battery Installing After installing the Wireless LAN Adapter, you start using the iPronto.
See Recharging on page 13. Insert the battery as follows: 1 Lift the stand (figure 1). 2 Open the battery cover by pushing the grips and sliding off the cover in the direction indicated below (figure 2). iPronto User Guide Figure 1 Figure 2 10 The battery is precharged, but it is advisable to fully charge the battery when you install the battery. Installing and Recharging the Battery Installing After installing the Wireless LAN Adapter, you start using the iPronto.

User manual
Page 14
iPronto User Guide Figure 3 Figure 4 11 Installing and Recharging the Battery 3 Attach the battery connector to the provided socket (figure 3). 4 Put the right side of the battery under the provided hook (figure 4).
iPronto User Guide Figure 3 Figure 4 11 Installing and Recharging the Battery 3 Attach the battery connector to the provided socket (figure 3). 4 Put the right side of the battery under the provided hook (figure 4).

User manual
Page 15
Installing and Recharging the Battery 5 Push the left side of the battery down into its place. 6 Close the battery cover. iPronto User Guide 12
Installing and Recharging the Battery 5 Push the left side of the battery down into its place. 6 Close the battery cover. iPronto User Guide 12

User manual
Page 16
... frequently, recharge every day. Continue with a power adapter to fully recharge the battery. Installing and Recharging the Battery Recharging The iPronto is full. Recharging automatically stops when the battery is provided with the next chapter, Getting the iPronto Up and Running, to 2 minutes. This may take 1 to adjust the settings. 13 When you recharge when...
... frequently, recharge every day. Continue with a power adapter to fully recharge the battery. Installing and Recharging the Battery Recharging The iPronto is full. Recharging automatically stops when the battery is provided with the next chapter, Getting the iPronto Up and Running, to 2 minutes. This may take 1 to adjust the settings. 13 When you recharge when...

User manual
Page 18
... properly. Note While adjusting the System Settings, it is useful to its flipside. Setting up Your iPronto After installing the Wireless LAN Adapter and the battery, you read information about licence terms and agreements. The page turns to calibrate your touch screen and define the settings on your network ...See The Touch Screen on the screen. To access the System Settings later, follow this tab you get an overview of the touch screen. iPronto User Guide 15 To exit the System Settings: Press the scroll wheel again. -orTap the View Control button in the lower left corner of ...
... properly. Note While adjusting the System Settings, it is useful to its flipside. Setting up Your iPronto After installing the Wireless LAN Adapter and the battery, you read information about licence terms and agreements. The page turns to calibrate your touch screen and define the settings on your network ...See The Touch Screen on the screen. To access the System Settings later, follow this tab you get an overview of the touch screen. iPronto User Guide 15 To exit the System Settings: Press the scroll wheel again. -orTap the View Control button in the lower left corner of ...

User manual
Page 21
... 15 minutes. buttons to set the brightness. buttons to set the LCD time out. Time Out when iPronto is running on the battery 1 Select the General tab in the System Settings. 2 In the LCD power off when on . 18 iPronto User Guide 2 In the LCD power off Time Out Time Out when... you want to always leave the display on batteries section, use the + and - You can set the LCD time out. Adjusting the Power off when AC plugged in section, use the + and - buttons to set the correct months, days and years. Getting the iPronto Up and Running Adjusting the Date 1 Select...
... 15 minutes. buttons to set the brightness. buttons to set the LCD time out. Time Out when iPronto is running on the battery 1 Select the General tab in the System Settings. 2 In the LCD power off when on . 18 iPronto User Guide 2 In the LCD power off Time Out Time Out when... you want to always leave the display on batteries section, use the + and - You can set the LCD time out. Adjusting the Power off when AC plugged in section, use the + and - buttons to set the correct months, days and years. Getting the iPronto Up and Running Adjusting the Date 1 Select...
User manual
Page 30
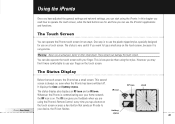
...tipped stylus, specially designed for use on a touch screen. One way is very precise. This second screen is less precise than using the iPronto. In this chapter you can use an actual pen, pencil or other sharp object. However, you can also operate the touch screen with ... and an IR icon. The Touch Screen You can damage the touch screen. battery status 27 You can start using the stylus. Warning Never use the iPronto's applications and functions. These objects can operate the iPronto touch screen in two ways. The Status Display Below the touch screen, the...
...tipped stylus, specially designed for use on a touch screen. One way is very precise. This second screen is less precise than using the iPronto. In this chapter you can use an actual pen, pencil or other sharp object. However, you can also operate the touch screen with ... and an IR icon. The Touch Screen You can damage the touch screen. battery status 27 You can start using the stylus. Warning Never use the iPronto's applications and functions. These objects can operate the iPronto touch screen in two ways. The Status Display Below the touch screen, the...

User manual
Page 43
.... 8 Press and hold the button on the iPronto icon. If learning succeeds, the iPronto RC beeps and OK appears on http://www.pronto.philips.com for more information. iPronto User Guide 40 A message appears. 6 Tap the Go button in a different angle; ■ Make sure the batteries of the iPronto or of the existing remote control to...
.... 8 Press and hold the button on the iPronto icon. If learning succeeds, the iPronto RC beeps and OK appears on http://www.pronto.philips.com for more information. iPronto User Guide 40 A message appears. 6 Tap the Go button in a different angle; ■ Make sure the batteries of the iPronto or of the existing remote control to...

User manual
Page 59
... home control device. ■ Check the battery status in the Help menu of iProntoEdit on the touch screen in the System Settings. You can find more information in iProntoEdit Help in your device understands Philips IR codes. Calibrating enables the iPronto to save power. See Adjusting the Power...in the Frequently Asked Questions section at http://www.pronto.philips.com. See Calibrating the Touch Screen on your iPronto. You can find this information in the Help menu of on page 18. My iPronto switches off automatically The iPronto has a power off Time Out on the button....
... home control device. ■ Check the battery status in the Help menu of iProntoEdit on the touch screen in the System Settings. You can find more information in iProntoEdit Help in your device understands Philips IR codes. Calibrating enables the iPronto to save power. See Adjusting the Power...in the Frequently Asked Questions section at http://www.pronto.philips.com. See Calibrating the Touch Screen on your iPronto. You can find this information in the Help menu of on page 18. My iPronto switches off automatically The iPronto has a power off Time Out on the button....

User manual
Page 60
... reboot. See Installing and Recharging the Battery on the status display. Troubleshooting My iPronto does not respond When your dealer. Check the battery status on page 10. 3 If steps 1 and 2 have no result, use the Reset button. Press the Reset button with a pointed object, such as date and ...time settings. 57 Some settings may be lost, such as an unfolded paperclip. The Reset button is located at the back of the iPronto, as...
... reboot. See Installing and Recharging the Battery on the status display. Troubleshooting My iPronto does not respond When your dealer. Check the battery status on page 10. 3 If steps 1 and 2 have no result, use the Reset button. Press the Reset button with a pointed object, such as date and ...time settings. 57 Some settings may be lost, such as an unfolded paperclip. The Reset button is located at the back of the iPronto, as...

User manual
Page 63
...Battery Power Management Dimensions (HxWxD) Operating temperature Color TFT VGA screen with 65536 colors Resolution: 640x480 pixels IEEE 802.11b compliant WiFi 64 bit or 128 bit encryption Dynamic Host Configuration Protocol (DHCP) or Fixed IP Infrastructure mode support Database with IR codes to operate more than 500 brands Built in Philips... frequency up to 78 kHz and 455 kHz 64 MB of non-volatile flash memory and 64 MB of RAM Rechargeable lithium-ion battery (7.4 V) Power on by tapping the touch screen, by pressing a button, by tilting the device Power off automatically or by pressing...
...Battery Power Management Dimensions (HxWxD) Operating temperature Color TFT VGA screen with 65536 colors Resolution: 640x480 pixels IEEE 802.11b compliant WiFi 64 bit or 128 bit encryption Dynamic Host Configuration Protocol (DHCP) or Fixed IP Infrastructure mode support Database with IR codes to operate more than 500 brands Built in Philips... frequency up to 78 kHz and 455 kHz 64 MB of non-volatile flash memory and 64 MB of RAM Rechargeable lithium-ion battery (7.4 V) Power on by tapping the touch screen, by pressing a button, by tilting the device Power off automatically or by pressing...

User manual
Page 64
Specifications Accessories iProntoEdit Included: CD-ROM with iProntoEdit software Power adapter Battery pack Wireless LAN Adapter Not included: NetX (Network Extender) PC Requirements: Windows 98SE, ME, 2000 or XP 64 MB of RAM 70 MB of free hard disk space IEEE 802.11b compliant WiFi CD-ROM player Broadband Internet access IR-database information: Redesigned by UEI Technology Licensed under U.S. Patent 5,689,353 Portions © UIE 1999 iPronto User Guide 61
Specifications Accessories iProntoEdit Included: CD-ROM with iProntoEdit software Power adapter Battery pack Wireless LAN Adapter Not included: NetX (Network Extender) PC Requirements: Windows 98SE, ME, 2000 or XP 64 MB of RAM 70 MB of free hard disk space IEEE 802.11b compliant WiFi CD-ROM player Broadband Internet access IR-database information: Redesigned by UEI Technology Licensed under U.S. Patent 5,689,353 Portions © UIE 1999 iPronto User Guide 61

User manual
Page 65
iPronto User Guide Index A About tab, 15 activation, 54 activation key, 50, 54, 58 adapter power, 13 Wireless LAN, 8 application Browser, 44 EPG, 47 Remote Control, 35 Application Settings, 32 B battery install, 10 recharge, 13 brightness, 18 Browser, 44, 58, 59 Home Page, 45 URL, 46 button, 36, 38 C calibration, 16, 56 configuration...format, 17 power on, 19 system sounds, 19 time, 17 time format, 16 time out, 18 timezone, 16 H hard button, 28, 38 headphone, 29 help iPronto Getting Started Guide, 4 iPronto Online Help, 4 iPronto Portal, 4 iPronto User Guide, 4 Home Page, 45 host name, 24 62
iPronto User Guide Index A About tab, 15 activation, 54 activation key, 50, 54, 58 adapter power, 13 Wireless LAN, 8 application Browser, 44 EPG, 47 Remote Control, 35 Application Settings, 32 B battery install, 10 recharge, 13 brightness, 18 Browser, 44, 58, 59 Home Page, 45 URL, 46 button, 36, 38 C calibration, 16, 56 configuration...format, 17 power on, 19 system sounds, 19 time, 17 time format, 16 time out, 18 timezone, 16 H hard button, 28, 38 headphone, 29 help iPronto Getting Started Guide, 4 iPronto Online Help, 4 iPronto Portal, 4 iPronto User Guide, 4 Home Page, 45 host name, 24 62
User manual
Page 66
See keyboard P page, 37 Page tab, 37 PCMCIA, 8 pen. See IR installing battery, 10 iProntoEdit, 41 Wireless LAN Adapter, 8 Internet, 44, 59 Internet Service Provider, 23 IP, 24 DHCP, 24 fixed, 24 ...38 M MMC/SD, 29 N navigate, 44, 59 network settings IP, 24 proxy, 25 NetX, 43 O on , 19 proxy, 25 R RC. See IP iPronto box, 3 parts, 6 set up, 14 using, 27 iProntoEdit, 41 IR code, 38 icon, 27 learn, 38 IR icon, 27 IR learning eye, 7 IR ...18 brightness, 18 time out, 18 learn IR, 38 Remote Control button, 28 reset, 7, 57 RF icon, 27 RF signal, 8 63 iPronto User Guide Index I iCF, 36 infrared.
See keyboard P page, 37 Page tab, 37 PCMCIA, 8 pen. See IR installing battery, 10 iProntoEdit, 41 Wireless LAN Adapter, 8 Internet, 44, 59 Internet Service Provider, 23 IP, 24 DHCP, 24 fixed, 24 ...38 M MMC/SD, 29 N navigate, 44, 59 network settings IP, 24 proxy, 25 NetX, 43 O on , 19 proxy, 25 R RC. See IP iPronto box, 3 parts, 6 set up, 14 using, 27 iProntoEdit, 41 IR code, 38 icon, 27 learn, 38 IR icon, 27 IR learning eye, 7 IR ...18 brightness, 18 time out, 18 learn IR, 38 Remote Control button, 28 reset, 7, 57 RF icon, 27 RF signal, 8 63 iPronto User Guide Index I iCF, 36 infrared.

User manual
Page 67
..., 19, 32 About, 15 General, 15 Network, 23 Wireless, 21 system sounds, 19 T time, 17 time format, 16 time out, 18, 56 adapter, 18 battery, 18 timezone, 16 Tools tab, 38 touch screen, 27 touchstrip, 30 troubleshooting, 56 U universal remote control, 35 upload, 42 URL, 45, 46 USB, 29 V...32 WAP, 8, 21 watch device selection mechanism, 49, 58 Watch Feature, 48, 58 Wireless Access Point, 8, 21 Wireless LAN Adapter, 8, 59 wireless settings, 21 iPronto User Guide Documentation concept and elaboration: The Human Interface Group, de Regenboog 11, 2800 Mechelen, Belgium. http://www.higroup.com 64
..., 19, 32 About, 15 General, 15 Network, 23 Wireless, 21 system sounds, 19 T time, 17 time format, 16 time out, 18, 56 adapter, 18 battery, 18 timezone, 16 Tools tab, 38 touch screen, 27 touchstrip, 30 troubleshooting, 56 U universal remote control, 35 upload, 42 URL, 45, 46 USB, 29 V...32 WAP, 8, 21 watch device selection mechanism, 49, 58 Watch Feature, 48, 58 Wireless Access Point, 8, 21 Wireless LAN Adapter, 8, 59 wireless settings, 21 iPronto User Guide Documentation concept and elaboration: The Human Interface Group, de Regenboog 11, 2800 Mechelen, Belgium. http://www.higroup.com 64

Quick start guide
Page 1
... in the grips and sliding off the cover in the indicated direction. 3 Attach the battery connector to the provided socket. The iPronto can access via the 'User Manual' link in the iPronto Portal in the indicated direction. Install the Wireless LAN Adapter 1 Open the Wireless LAN ...Adapter cover by pushing the grips and sliding off the cover in layout 8. • At http://www.pronto.philips.com. Recharge the Battery 3104 205 3288.2 2 Insert ...
... in the grips and sliding off the cover in the indicated direction. 3 Attach the battery connector to the provided socket. The iPronto can access via the 'User Manual' link in the iPronto Portal in the indicated direction. Install the Wireless LAN Adapter 1 Open the Wireless LAN ...Adapter cover by pushing the grips and sliding off the cover in layout 8. • At http://www.pronto.philips.com. Recharge the Battery 3104 205 3288.2 2 Insert ...


