Leaflet
Page 1
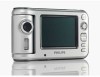
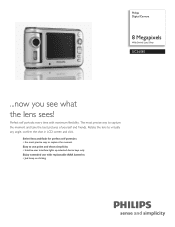
Perfect self portraits every time with replaceable AAA batteries • Just keep on clicking Philips Digital Camera 8 Megapixels With Swivel Lens Silver SIC3608S ...now you see what the lens sees! Rotate the lens to capture the moment and take the best pictures of yourself and friends. The most precise way to capture the moment Easy to use point and shoot simplicity • Intuitive user interface lights up selected device keys...
Perfect self portraits every time with replaceable AAA batteries • Just keep on clicking Philips Digital Camera 8 Megapixels With Swivel Lens Silver SIC3608S ...now you see what the lens sees! Rotate the lens to capture the moment and take the best pictures of yourself and friends. The most precise way to capture the moment Easy to use point and shoot simplicity • Intuitive user interface lights up selected device keys...

User manual (English)
Page 3
... to default settings 10 G) Firmware version & updating the camera 11 Ii. camera preparation & setup 6 3. Basic photography 11 6. Shooting photos 15 7.1 Flash options 16 xx External SD memory card 7 4.1 Insert the memory card 7 5. Camera setup 7 a) Set the onscreen language 7 b) Set the current date and time 8 c) Auto power off 8 d) Play logo 9 E) "Buzzer" -turn on/off beep sounds 9 F) Adjusting the light frequency setting 10 F2) Return to know your camera 5 1. Photo image options 12 6.1 Photo resolution 12 6.2 Photo quality 13 6.3 White balance...
... to default settings 10 G) Firmware version & updating the camera 11 Ii. camera preparation & setup 6 3. Basic photography 11 6. Shooting photos 15 7.1 Flash options 16 xx External SD memory card 7 4.1 Insert the memory card 7 5. Camera setup 7 a) Set the onscreen language 7 b) Set the current date and time 8 c) Auto power off 8 d) Play logo 9 E) "Buzzer" -turn on/off beep sounds 9 F) Adjusting the light frequency setting 10 F2) Return to know your camera 5 1. Photo image options 12 6.1 Photo resolution 12 6.2 Photo quality 13 6.3 White balance...
User manual (English)
Page 4
... C. White balance 22 D. Batteries 31 17. Downloading photos, videos and audio recordings to a mac computer 28 Iii. Video with or without audio 22 9. Photo review & video playback 23 10. Maintenance 30 15. Viewing photos on the camera lcd display 23 10.1 Viewing thumbnails 23 10.2 Zooming in on your computer 27 13.1 Setting the camera to usb mode 27 13.2 Downloading photos, videos & audio recordings to a PC 28 13.3 Downloading photos and videos to your television: 26 A) Adjusting the camera's video output 27 ii. Video...
... C. White balance 22 D. Batteries 31 17. Downloading photos, videos and audio recordings to a mac computer 28 Iii. Video with or without audio 22 9. Photo review & video playback 23 10. Maintenance 30 15. Viewing photos on the camera lcd display 23 10.1 Viewing thumbnails 23 10.2 Zooming in on your computer 27 13.1 Setting the camera to usb mode 27 13.2 Downloading photos, videos & audio recordings to a PC 28 13.3 Downloading photos and videos to your television: 26 A) Adjusting the camera's video output 27 ii. Video...
User manual (English)
Page 6
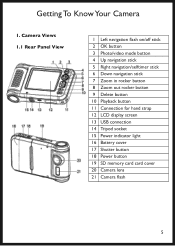
Getting To Know Your Camera 1. Camera Views 1.1 Rear Panel View 1 Left navigation flash on/off stick 2 OK button 3 Photo/video mode button 4 Up navigation stick 5 Right navigation/selftimer stick 6 Down navigation stick 7 Zoom in rocker button 8 Zoom out rocker button 9 Delete button 10 Playback button 11 Connection for hand strap 12 LCD display screen 13 USB connection 14 Tripod socket 15 Power indicator light 16 Battery cover 17 Shutter button 18 Power button 19 SD memory card card cover 20 Camera lens 21 Camera flash 5
Getting To Know Your Camera 1. Camera Views 1.1 Rear Panel View 1 Left navigation flash on/off stick 2 OK button 3 Photo/video mode button 4 Up navigation stick 5 Right navigation/selftimer stick 6 Down navigation stick 7 Zoom in rocker button 8 Zoom out rocker button 9 Delete button 10 Playback button 11 Connection for hand strap 12 LCD display screen 13 USB connection 14 Tripod socket 15 Power indicator light 16 Battery cover 17 Shutter button 18 Power button 19 SD memory card card cover 20 Camera lens 21 Camera flash 5

User manual (English)
Page 8
... save a couple of photos on your preferences and to take many photos. Camera Setup You may want to be able to use an external SD memory card.The camera is inserted correctly. 5. Language A) Set the Onscreen Language To set the onscreen language: 1) Press the OK button by pressing in Language Francais Deutsch Italiano Espanol on the top of internal memory so you can shoot and store, use other camera features. External SD Memory Card...
... save a couple of photos on your preferences and to take many photos. Camera Setup You may want to be able to use an external SD memory card.The camera is inserted correctly. 5. Language A) Set the Onscreen Language To set the onscreen language: 1) Press the OK button by pressing in Language Francais Deutsch Italiano Espanol on the top of internal memory so you can shoot and store, use other camera features. External SD Memory Card...

User manual (English)
Page 9
B) Set the Current Date and Time It is listed in each photo's information data. Auto Power O Disable 60 Sec. 120 Sec. Press the navigation stick Up or Down to display the current month. 6) Repeat Steps 5 and 6 to set to automatically turn off, if no buttons are pushed for a certain length of time that the camera is idle before it automatically 8 Date/Time 2010 / 01 / 06 AM 01...
B) Set the Current Date and Time It is listed in each photo's information data. Auto Power O Disable 60 Sec. 120 Sec. Press the navigation stick Up or Down to display the current month. 6) Repeat Steps 5 and 6 to set to automatically turn off, if no buttons are pushed for a certain length of time that the camera is idle before it automatically 8 Date/Time 2010 / 01 / 06 AM 01...

User manual (English)
Page 11
F) Adjusting the Light Frequency Setting Photos and video can be affected by the flickering of fluorescent lights. F2) Return to Default Settings To reset the camera to its original default settings: 1) Press the OK button 2) Press the navigation stick to Right to display the Setup menu. 3) Press the navigation stick Up or Down to highlight Default Settings and press OK. 4) Press the navigation stick Up or Down to highlight...
F) Adjusting the Light Frequency Setting Photos and video can be affected by the flickering of fluorescent lights. F2) Return to Default Settings To reset the camera to its original default settings: 1) Press the OK button 2) Press the navigation stick to Right to display the Setup menu. 3) Press the navigation stick Up or Down to highlight Default Settings and press OK. 4) Press the navigation stick Up or Down to highlight...

User manual (English)
Page 12
... photo from being saved. 11 Basic Photography To begin shooting photos in the default mode: 1) Press Power button to take photo. Removing the battery or memory card prematurely will be displayed on screen. 5) Press the navigation stick to the Left TWICE to exit the image menu 6) Press OK To update the camera's firmware: To update the camera to the newest available firmware using a USB cable to your computer or an SD card, select Upgrade on camera. 2) Press down the Shutter button to turn...
... photo from being saved. 11 Basic Photography To begin shooting photos in the default mode: 1) Press Power button to take photo. Removing the battery or memory card prematurely will be displayed on screen. 5) Press the navigation stick to the Left TWICE to exit the image menu 6) Press OK To update the camera's firmware: To update the camera to the newest available firmware using a USB cable to your computer or an SD card, select Upgrade on camera. 2) Press down the Shutter button to turn...

User manual (English)
Page 14
... to exit. 6.3 White Balance Although imperceptible to automatically set the white balance: 13 A photo taken outdoors can appear blue: an indoor photo may also be compressed so that you can save a larger quantity of photos to create a smaller file size. Use the Super Quality setting for outdoor overcast shooting. However, the more the photo is called "white balance." The camera defaults to the human eye, outdoor light and indoor light take on different...
... to exit. 6.3 White Balance Although imperceptible to automatically set the white balance: 13 A photo taken outdoors can appear blue: an indoor photo may also be compressed so that you can save a larger quantity of photos to create a smaller file size. Use the Super Quality setting for outdoor overcast shooting. However, the more the photo is called "white balance." The camera defaults to the human eye, outdoor light and indoor light take on different...
User manual (English)
Page 19
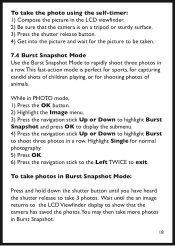
... photo using the self-timer: 1) Compose the picture in the LCD viewfinder. 2) Be sure that the camera has saved the photos.You may then take more photos in Burst Snapshot. 18 Highlight Single for shooting photos of children playing, or for normal photography. 5) Press OK. 6) Press the navigation stick to the Left TWICE to take photos in a row. To take 3 photos. While in PHOTO mode, 1) Press the OK button. 2) Highlight the Image menu...
... photo using the self-timer: 1) Compose the picture in the LCD viewfinder. 2) Be sure that the camera has saved the photos.You may then take more photos in Burst Snapshot. 18 Highlight Single for shooting photos of children playing, or for normal photography. 5) Press OK. 6) Press the navigation stick to the Left TWICE to take photos in a row. To take 3 photos. While in PHOTO mode, 1) Press the OK button. 2) Highlight the Image menu...
User manual (English)
Page 21
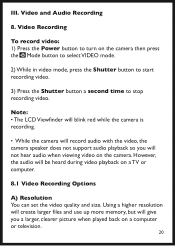
... recording video. Using a higher resolution will create larger files and use up more memory, but will give you will record audio with the video, the camera speaker does not support audio playback so you a larger, clearer picture when played back on the camera. III. Video Recording To record video: 1) Press the Power button to turn on a TV or computer. 8.1 Video Recording Options A) Resolution You can set the video quality and size. Note: • The LCD Viewfinder will blink red...
... recording video. Using a higher resolution will create larger files and use up more memory, but will give you will record audio with the video, the camera speaker does not support audio playback so you a larger, clearer picture when played back on the camera. III. Video Recording To record video: 1) Press the Power button to turn on a TV or computer. 8.1 Video Recording Options A) Resolution You can set the video quality and size. Note: • The LCD Viewfinder will blink red...

User manual (English)
Page 22
...: While the camera is set to shoot 30 frames per second. While the camera is set to Video Mode, 1) Press the OK button by pressing in on a small screen 15 frames per second may be set to Video Mode, 1) Press the OK button. 2) Highlight the Video menu. 3) Press the navigation stick Up or Down to highlight Frame Rate and press OK to display the submenu. 4) Press...
...: While the camera is set to shoot 30 frames per second. While the camera is set to Video Mode, 1) Press the OK button by pressing in on a small screen 15 frames per second may be set to Video Mode, 1) Press the OK button. 2) Highlight the Video menu. 3) Press the navigation stick Up or Down to highlight Frame Rate and press OK to display the submenu. 4) Press...

User manual (English)
Page 23
... images. D. To change White Balance in video recordings, be recorded with the video, or Disable to record video only. 5) Press OK. 6) Press the navigation stick to the Left TWICE to stop recording audio. 22 Audio Recording The SIC 3608S/G7 can be sure the camera is changed for explanation of White Balance. To change the audio setting: While the camera is in the same way that it is in VIDEO Mode and make White Balance changes...
... images. D. To change White Balance in video recordings, be recorded with the video, or Disable to record video only. 5) Press OK. 6) Press the navigation stick to the Left TWICE to stop recording audio. 22 Audio Recording The SIC 3608S/G7 can be sure the camera is changed for explanation of White Balance. To change the audio setting: While the camera is in the same way that it is in VIDEO Mode and make White Balance changes...

User manual (English)
Page 24
... screen. 10.2 Zooming In on a Photo While viewing a photo, zoom in PLAYBACK Mode: 1) Press the + Zoom In button to scroll through the photos. 10.1 Viewing Thumbnails To quickly search through photos, you have taken, Press the Playback button. Note: When recording, the LCD viewfinder will blink red and start a recording timer.The timer will display until the recording is stopped. Press the navigation stick Left or Right to make the image appear larger. 23 III. Viewing Photos on the LCD display. Photo Review and Video Playback...
... screen. 10.2 Zooming In on a Photo While viewing a photo, zoom in PLAYBACK Mode: 1) Press the + Zoom In button to scroll through the photos. 10.1 Viewing Thumbnails To quickly search through photos, you have taken, Press the Playback button. Note: When recording, the LCD viewfinder will blink red and start a recording timer.The timer will display until the recording is stopped. Press the navigation stick Left or Right to make the image appear larger. 23 III. Viewing Photos on the LCD display. Photo Review and Video Playback...
User manual (English)
Page 25
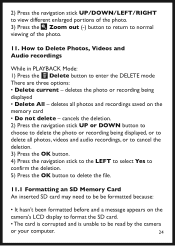
... OK button to delete the file. 11.1 Formatting an SD Memory Card An inserted SD card may need to delete the photo or recording being displayed • Delete All - cancels the deletion. 2) Press the navigation stick UP or DOWN button to choose to be be read by the camera or your computer. 24 How to Delete Photos, Videos and Audio recordings While in PLAYBACK Mode: 1) Press the Delete button to normal viewing of the photo. 11...
... OK button to delete the file. 11.1 Formatting an SD Memory Card An inserted SD card may need to delete the photo or recording being displayed • Delete All - cancels the deletion. 2) Press the navigation stick UP or DOWN button to choose to be be read by the camera or your computer. 24 How to Delete Photos, Videos and Audio recordings While in PLAYBACK Mode: 1) Press the Delete button to normal viewing of the photo. 11...
User manual (English)
Page 27
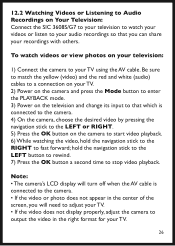
... the right format for your TV. • If the video does not display properly, adjust the camera to fast forward; Be sure to match the yellow (video) and the red and white (audio) cables to a connection on your TV. 2) Power on the camera and press the Mode button to enter the PLAYBACK mode. 3) Power on the television and change its input to that which is connected to your recordings with...
... the right format for your TV. • If the video does not display properly, adjust the camera to fast forward; Be sure to match the yellow (video) and the red and white (audio) cables to a connection on your TV. 2) Power on the camera and press the Mode button to enter the PLAYBACK mode. 3) Power on the television and change its input to that which is connected to your recordings with...

User manual (English)
Page 28
... cannot be used when in North America; Downloading Photos, Videos and Audio Recordings to Your Computer By using the included USB cable, photos, videos and audio recordings can be set to USB mode. 13.1 Setting the Camera to USB Mode 1) Press the OK button. 2) Highlight the Setup menu. 3) Press navigation stick Up or Down to highlight USB Mode and press OK. 4) Press the navigation stick Up or Down to highlight the USB Mode and press...
... cannot be used when in North America; Downloading Photos, Videos and Audio Recordings to Your Computer By using the included USB cable, photos, videos and audio recordings can be set to USB mode. 13.1 Setting the Camera to USB Mode 1) Press the OK button. 2) Highlight the Setup menu. 3) Press navigation stick Up or Down to highlight USB Mode and press OK. 4) Press the navigation stick Up or Down to highlight the USB Mode and press...

User manual (English)
Page 29
... videos to download all saved photos, videos and audio recordings: 3): Double click the "My Computer" icon on the desktop of your PC. 13.3 Downloading Photos and Videos to a Mac Computer With the camera set to USB mode (see above ): 1) Press the Power button to turn on the camera. 2): Connect the USB cable to the computer THEN to the camera. At this point, iPhoto may appear on your screen. d): Double click "DCIM" file folder. OR to your default picture file...
... videos to download all saved photos, videos and audio recordings: 3): Double click the "My Computer" icon on the desktop of your PC. 13.3 Downloading Photos and Videos to a Mac Computer With the camera set to USB mode (see above ): 1) Press the Power button to turn on the camera. 2): Connect the USB cable to the computer THEN to the camera. At this point, iPhoto may appear on your screen. d): Double click "DCIM" file folder. OR to your default picture file...

User manual (English)
Page 32
... the batteries include: • LCD use-frequency, length of time in use; • Long periods of playback using the LCD display; • Frequency of Flash use; • Number of pictures taken; • Cold environments will affect the internal settings and functions of the camera. • Replace batteries when the battery power status indicates the batteries are low. • Take out the batteries if you won't use the camera for a long period of time. • DO NOT insert batteries that...
... the batteries include: • LCD use-frequency, length of time in use; • Long periods of playback using the LCD display; • Frequency of Flash use; • Number of pictures taken; • Cold environments will affect the internal settings and functions of the camera. • Replace batteries when the battery power status indicates the batteries are low. • Take out the batteries if you won't use the camera for a long period of time. • DO NOT insert batteries that...

User manual (English)
Page 33
... SD card into the camera. Note: • DO NOT remove the SD card or batteries while formatting to avoid card failure or corruption. • Some SD cards have a small switch to lock and unlock the card.To save photos, videos and audio recordings to the SD card, the switch must be sure the card is switched to format the SD memory card. It may not recognize memory cards with a larger storage capacity. Follow the directions...
... SD card into the camera. Note: • DO NOT remove the SD card or batteries while formatting to avoid card failure or corruption. • Some SD cards have a small switch to lock and unlock the card.To save photos, videos and audio recordings to the SD card, the switch must be sure the card is switched to format the SD memory card. It may not recognize memory cards with a larger storage capacity. Follow the directions...


