User manual
Page 3
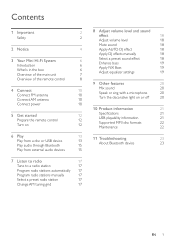
... unit 7 Overview of the remote control 8 4 Connect 10 Connect FM antenna 10 Connect AM antenna 10 Connect power 10 5 Get started 12 Prepare the remote control 12 Turn on 12 6 Play 13 Play from a disc or USB device 13 Play audio through Bluetooth 15 Play from external audio devices 15 7 Listen to radio 17 Tune to a radio station 17 Program radio stations automatically 17 Program radio stations manually 17 Select a preset radio station 17 Change AM tuning grid 17 8 Adjust volume level and sound effect 18 Adjust volume level 18 Mute sound 18 Apply AUTO...
... unit 7 Overview of the remote control 8 4 Connect 10 Connect FM antenna 10 Connect AM antenna 10 Connect power 10 5 Get started 12 Prepare the remote control 12 Turn on 12 6 Play 13 Play from a disc or USB device 13 Play audio through Bluetooth 15 Play from external audio devices 15 7 Listen to radio 17 Tune to a radio station 17 Program radio stations automatically 17 Program radio stations manually 17 Select a preset radio station 17 Change AM tuning grid 17 8 Adjust volume level and sound effect 18 Adjust volume level 18 Mute sound 18 Apply AUTO...
User manual
Page 4
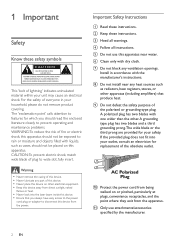
... the third prong are provided for replacement of lightning' indicates uninsulated material within your safety. Warning •• Never remove the casing of fire or electric shock, this apparatus should not be exposed to wide slot, fully insert. j Protect the power cord from the apparatus. g Do not block any part of the polarized or grounding-type plug.
... the third prong are provided for replacement of lightning' indicates uninsulated material within your safety. Warning •• Never remove the casing of fire or electric shock, this apparatus should not be exposed to wide slot, fully insert. j Protect the power cord from the apparatus. g Do not block any part of the polarized or grounding-type plug.

User manual
Page 6
...: • Relocate the receiving antenna. • Increase the separation between the device (excluding its handset) and users. 2 Notice Any changes or modifications made to this device that are designed to provide reasonable protection against harmful interference in a residential installation.This equipment generates, uses, and can radiate radio frequency energy and, if not installed and used for rechargeable batteries. This equipment has been...
...: • Relocate the receiving antenna. • Increase the separation between the device (excluding its handset) and users. 2 Notice Any changes or modifications made to this device that are designed to provide reasonable protection against harmful interference in a residential installation.This equipment generates, uses, and can radiate radio frequency energy and, if not installed and used for rechargeable batteries. This equipment has been...
User manual
Page 7
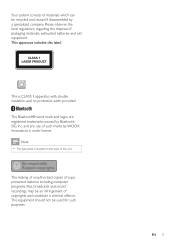
...specialized company. Please observe the local regulations regarding the disposal of copyprotected material, including computer programs, files, broadcasts and sound recordings, may be used for such purposes. This equipment should not be an infringement of copyrights and constitute a ...unit. The Bluetooth® word mark and logos are registered trademarks owned by Bluetooth SIG, Inc. EN 5 Note •• The type plate is CLASS II apparatus with double insulation, and no protective earth provided. The making of unauthorized copies of packaging materials, exhausted batteries...
...specialized company. Please observe the local regulations regarding the disposal of copyprotected material, including computer programs, files, broadcasts and sound recordings, may be used for such purposes. This equipment should not be an infringement of copyrights and constitute a ...unit. The Bluetooth® word mark and logos are registered trademarks owned by Bluetooth SIG, Inc. EN 5 Note •• The type plate is CLASS II apparatus with double insulation, and no protective earth provided. The making of unauthorized copies of packaging materials, exhausted batteries...
User manual
Page 8
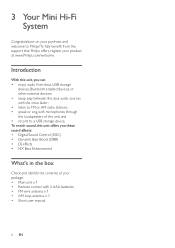
...; Main unit x 1 • Remote control with microphones through the loudspeakers of the unit; To fully benefit from discs, USB storage devices, Bluetooth enabled devices, or other external devices; • swap play between the dual audio sources with the cross fader; • listen to FM or AM radio stations; • speak or sing with 2 AAA batteries • FM wire antenna x 1 • AM loop antenna x 1 • Short user manual 6 EN 3 Your Mini Hi...
...; Main unit x 1 • Remote control with microphones through the loudspeakers of the unit; To fully benefit from discs, USB storage devices, Bluetooth enabled devices, or other external devices; • swap play between the dual audio sources with the cross fader; • listen to FM or AM radio stations; • speak or sing with 2 AAA batteries • FM wire antenna x 1 • AM loop antenna x 1 • Short user manual 6 EN 3 Your Mini Hi...
User manual
Page 9
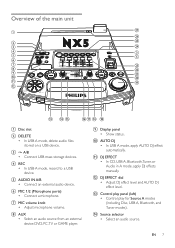
...,Tuner, or Audio in A mode, apply DJ effects manually. d REC • In USB A mode, record to a USB device. g MIC volume knob • Adjust microphone volume. j AUTO DJ • In USB A mode, apply AUTO DJ effect automatically. n Source selector • Select an audio source. c A/B • Connect USB mass storage devices. e AUDIO IN A/B • Connect an external audio device. h AUX • Select an audio source from an external device: DVD, PC,TV or GAME player. m Control play panel (left) • Control play for Source A modes (including Disc, USB A, Bluetooth, and Tuner modes...
...,Tuner, or Audio in A mode, apply DJ effects manually. d REC • In USB A mode, record to a USB device. g MIC volume knob • Adjust microphone volume. j AUTO DJ • In USB A mode, apply AUTO DJ effect automatically. n Source selector • Select an audio source. c A/B • Connect USB mass storage devices. e AUDIO IN A/B • Connect an external audio device. h AUX • Select an audio source from an external device: DVD, PC,TV or GAME player. m Control play panel (left) • Control play for Source A modes (including Disc, USB A, Bluetooth, and Tuner modes...
User manual
Page 10
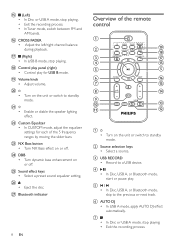
... Bluetooth mode, skip to a USB device. r Control play panel (right) • Control play . s Volume knob • Adjust volume. u • Enable or diable the speaker lighting effect. y Sound effect keys • Select a preset sound equalizer setting. t • Turn on or off . x DBB • Turn dynamic bass enhancement on the unit or switch to standby mode. c USB RECORD • Record to the previous or next track. p CROSS FADER • Adjust the left/right channel balance during playback. d • In Disc, USB A, or Bluetooth mode, start...
... Bluetooth mode, skip to a USB device. r Control play panel (right) • Control play . s Volume knob • Adjust volume. u • Enable or diable the speaker lighting effect. y Sound effect keys • Select a preset sound equalizer setting. t • Turn on or off . x DBB • Turn dynamic bass enhancement on the unit or switch to standby mode. c USB RECORD • Record to the previous or next track. p CROSS FADER • Adjust the left/right channel balance during playback. d • In Disc, USB A, or Bluetooth mode, start...
User manual
Page 11
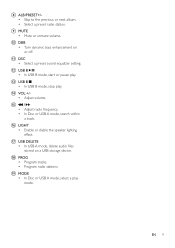
... or diable the speaker lighting effect. r PROG • Program tracks. • Program radio stations. o • • / Adjust radio frequency. q USB DELETE • In USB A mode, delete audio files stored on or off. n VOL +/• Adjust volume. j DBB • Turn dynamic bass enhancement on a USB storage device. m USB B • In USB B mode, stop play . l USB B • In USB B mode, start or pause play . EN 9 s MODE • In Disc or USB A mode, select a play mode. k DSC • Select a preset sound equalizer setting. In Disc or USB A mode, search within...
... or diable the speaker lighting effect. r PROG • Program tracks. • Program radio stations. o • • / Adjust radio frequency. q USB DELETE • In USB A mode, delete audio files stored on or off. n VOL +/• Adjust volume. j DBB • Turn dynamic bass enhancement on a USB storage device. m USB B • In USB B mode, stop play . l USB B • In USB B mode, start or pause play . EN 9 s MODE • In Disc or USB A mode, select a play mode. k DSC • Select a preset sound equalizer setting. In Disc or USB A mode, search within...

User manual
Page 14
... indicated. 3 Close the battery compartment. 5 Get started Caution •• Use of controls or adjustments or performance of properly. If you contact Philips, you will be disposed of procedures other than herein may result in this apparatus.The model number and serial number are on the display panel turns off. 12 EN Always follow the instructions in hazardous radiation exposure or other unsafe operation. Switch to standby mode...
... indicated. 3 Close the battery compartment. 5 Get started Caution •• Use of controls or adjustments or performance of properly. If you contact Philips, you will be disposed of procedures other than herein may result in this apparatus.The model number and serial number are on the display panel turns off. 12 EN Always follow the instructions in hazardous radiation exposure or other unsafe operation. Switch to standby mode...
User manual
Page 15
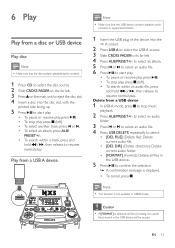
... message is not available in the USB device will be erased. to select an audio folder. 3 Press or to select an audio file. 4 Press USB DELETE repeatedly to select: • [DEL FILE] (Delete file): Delete current audio file. • [DEL DIR] (Delete directory): Delete current audio folder. • [FORMAT] (Format): Delete all files (including non-audio files) stored in USB B mode. 6 Play Play from a disc or USB device Play disc Note •• Make sure that the USB device contains playable audio contents in the USB device.. 5 Press to stop music playback. 2 Press ALB/PRESET...
... message is not available in the USB device will be erased. to select an audio folder. 3 Press or to select an audio file. 4 Press USB DELETE repeatedly to select: • [DEL FILE] (Delete file): Delete current audio file. • [DEL DIR] (Delete directory): Delete current audio folder. • [FORMAT] (Format): Delete all files (including non-audio files) stored in USB B mode. 6 Play Play from a disc or USB device Play disc Note •• Make sure that the USB device contains playable audio contents in the USB device.. 5 Press to stop music playback. 2 Press ALB/PRESET...
User manual
Page 16
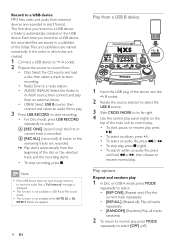
... a USB B device 1 Insert the USB plug of the main unit to control play 1 In Disc or USB A mode, press MODE repeatedly to start , pause, or resume play panel (right) on the USB device. Each time you record to a USB device, a folder is not available when AUTO DJ or DJ EFFECT effects are created. 1 Connect a USB device to A socket. 2 Prepare the source to record from. • Disc: Select the CD source and load a disc, then select a track to start recording. • Radio...
... a USB B device 1 Insert the USB plug of the main unit to control play 1 In Disc or USB A mode, press MODE repeatedly to start , pause, or resume play panel (right) on the USB device. Each time you record to a USB device, a folder is not available when AUTO DJ or DJ EFFECT effects are created. 1 Connect a USB device to A socket. 2 Prepare the source to record from. • Disc: Select the CD source and load a disc, then select a track to start recording. • Radio...
User manual
Page 17
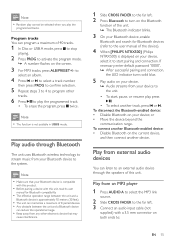
... . 3 Connect an audio input cable (not supplied) with this unit, read its user manual for Bluetooth devices (refer to the user manual of this product. •• Before pairing a device with a 3.5 mm connector on the Bluetooth function of 40 tracks. 1 In Disc or USB A mode, press to stop playing. 2 Press PROG to start , pause, or resume play the programmed tracks. or • Move the device beyond the communication range. Play audio through the speakers of the device). 4 When [PHILIPS NTRX500] (Philips NTRX500) is compatible...
... . 3 Connect an audio input cable (not supplied) with this unit, read its user manual for Bluetooth devices (refer to the user manual of this product. •• Before pairing a device with a 3.5 mm connector on the Bluetooth function of 40 tracks. 1 In Disc or USB A mode, press to stop playing. 2 Press PROG to start , pause, or resume play the programmed tracks. or • Move the device beyond the communication range. Play audio through the speakers of the device). 4 When [PHILIPS NTRX500] (Philips NTRX500) is compatible...
User manual
Page 18
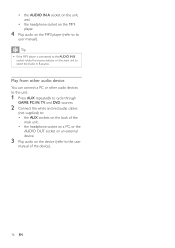
... B socket, rotate the source selector on the main unit to its user manual). • the AUDIO IN A socket on the unit, and • the headphone socket on the MP3 player. 4 Play audio on the MP3 player (refer to select the Audio In B source. Play from other audio device You can connect a PC or other audio devices to this unit. 1 Press AUX repeatedly to cycle through GAME, PC...
... B socket, rotate the source selector on the main unit to its user manual). • the AUDIO IN A socket on the unit, and • the headphone socket on the MP3 player. 4 Play audio on the MP3 player (refer to select the Audio In B source. Play from other audio device You can connect a PC or other audio devices to this unit. 1 Press AUX repeatedly to cycle through GAME, PC...
User manual
Page 20
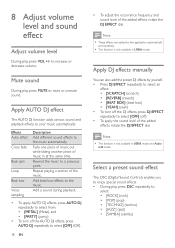
... music in USB A mode. Mute sound During play , press DSC repeatedly to mute or unmute sound. Add a sound during playback. • To apply AUTO DJ effects, press AUTO DJ repeatedly to select from: • [METAL] (Metal), and • [PARTY] (party) • To turn off ). • To apply the sound level of the added effects, rotate the DJ EFFECT dial. Select a preset sound effect The DSC (Digital Sound Control...
... music in USB A mode. Mute sound During play , press DSC repeatedly to mute or unmute sound. Add a sound during playback. • To apply AUTO DJ effects, press AUTO DJ repeatedly to select from: • [METAL] (Metal), and • [PARTY] (party) • To turn off ). • To apply the sound level of the added effects, rotate the DJ EFFECT dial. Select a preset sound effect The DSC (Digital Sound Control...
User manual
Page 21
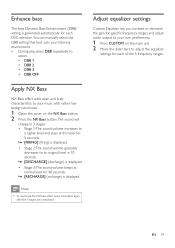
... for specific frequency ranges, and adjust audio output to your music with rather low background noise. 1 Open the cover on the main unit. 2 Move the slider bars to its original level in 3 stages: • Stage 1:The sound volume increases to a higher level and stays at this level for 5 seconds. »» [FIRING] (firing) is displayed. • Stage 2:The sound volume gradually decreases to adjust the equalizer settings...
... for specific frequency ranges, and adjust audio output to your music with rather low background noise. 1 Open the cover on the main unit. 2 Move the slider bars to its original level in 3 stages: • Stage 1:The sound volume increases to a higher level and stays at this level for 5 seconds. »» [FIRING] (firing) is displayed. • Stage 2:The sound volume gradually decreases to adjust the equalizer settings...
User manual
Page 22
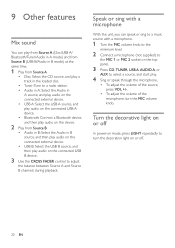
... power-on mode, press LIGHT repeatedly to adjust the balance between Source A and Source B channels during playback. 9 Other features Mix sound You can speak or sing to a music source with a microphone. 1 Turn the MIC volume knob to the minimum level. 2 Connect a microphone (not supplied) to the MIC 1 or MIC 2 socket on the top panel. 3 Press CD, TUNER, USB A, AUDIO A, or AUX to select a source, and start play audio on the connected USB B device. 3 Use the CROSS FADER control...
... power-on mode, press LIGHT repeatedly to adjust the balance between Source A and Source B channels during playback. 9 Other features Mix sound You can speak or sing to a music source with a microphone. 1 Turn the MIC volume knob to the minimum level. 2 Connect a microphone (not supplied) to the MIC 1 or MIC 2 socket on the top panel. 3 Press CD, TUNER, USB A, AUDIO A, or AUX to select a source, and start play audio on the connected USB B device. 3 Use the CROSS FADER control...
User manual
Page 23
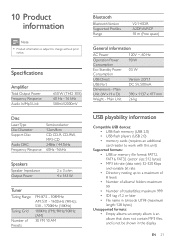
... ~, 60 Hz 90 W 0.5 W Version 2.0/1.1 DC 5V, 500mA 390 x 1137 x 477 mm 26 kg USB playability information Compatible USB devices: • USB flash memory (USB 2.0) • USB flash players (USB 2.0) • memory cards (requires an additional card reader to work with this unit) Supported formats: • USB or memory file format FAT12, FAT16, FAT32 (sector size: 512 bytes) • MP3 bit rate (data rate): 32-320 Kbps and variable bit rate • Directory nesting...
... ~, 60 Hz 90 W 0.5 W Version 2.0/1.1 DC 5V, 500mA 390 x 1137 x 477 mm 26 kg USB playability information Compatible USB devices: • USB flash memory (USB 2.0) • USB flash players (USB 2.0) • memory cards (requires an additional card reader to work with this unit) Supported formats: • USB or memory file format FAT12, FAT16, FAT32 (sector size: 512 bytes) • MP3 bit rate (data rate): 32-320 Kbps and variable bit rate • Directory nesting...
User manual
Page 25
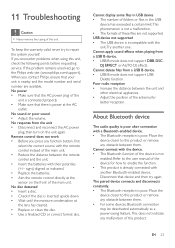
... unit. 11 Troubleshooting Caution •• Never remove the casing of this product or remove any function button, first select the correct source with their polarities (+/- Cannot delete files from a USB B device. •• USB B mode does not support USB Delete function. No sound or poor sound •• Adjust the volume. USB device not supported •• The USB device is power at the lens has cleared. •• Replace or clean the disc. •• Use...
... unit. 11 Troubleshooting Caution •• Never remove the casing of this product or remove any function button, first select the correct source with their polarities (+/- Cannot delete files from a USB B device. •• USB B mode does not support USB Delete function. No sound or poor sound •• Adjust the volume. USB device not supported •• The USB device is power at the lens has cleared. •• Replace or clean the disc. •• Use...
Leaflet
Page 2
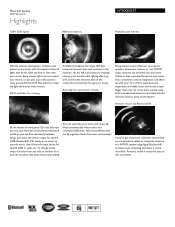
..., flash and flow in or tuner) to start the music, then choose the input device for automatic mixing Bring massive sound wherever you need it sound incredible. Mini Hi-Fi System 650W Bluetooth Highlights 260K LED lights NX bass button NTRX500/37 Handles and wheels Add the ultimate atmosphere, ambiance and passion to any home thanks to their optimized footprints and clutter free, convenient controls integration...
..., flash and flow in or tuner) to start the music, then choose the input device for automatic mixing Bring massive sound wherever you need it sound incredible. Mini Hi-Fi System 650W Bluetooth Highlights 260K LED lights NX bass button NTRX500/37 Handles and wheels Add the ultimate atmosphere, ambiance and passion to any home thanks to their optimized footprints and clutter free, convenient controls integration...
Leaflet
Page 3
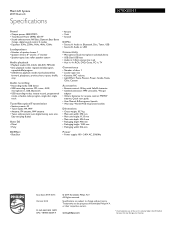
... • Station presets: 40 • Tuner bands: FM, MW • Antenna: FM antenna, MW antenna • Tuner enhancement: auto digital tuning, auto scan, Easy set in , TV Convenience • Number of discs: 1 • Loader type: slot • Karaoke: MIC volume • Light Effect: Peace, Passion, Power, Samba, Fiesta, Cielo, Custom Accessories • Remote control: 28-key with 2xAAA batteries • Cables/Connection: MP3 Link cable, *Flat pin adaptor • Others: batteries for remote control, FM/MW antenna, Quick start guide • User Manual: B-Portuguese...
... • Station presets: 40 • Tuner bands: FM, MW • Antenna: FM antenna, MW antenna • Tuner enhancement: auto digital tuning, auto scan, Easy set in , TV Convenience • Number of discs: 1 • Loader type: slot • Karaoke: MIC volume • Light Effect: Peace, Passion, Power, Samba, Fiesta, Cielo, Custom Accessories • Remote control: 28-key with 2xAAA batteries • Cables/Connection: MP3 Link cable, *Flat pin adaptor • Others: batteries for remote control, FM/MW antenna, Quick start guide • User Manual: B-Portuguese...


