Leaflet
Page 2
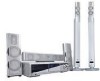
... that offers ultra high quality music reproduction. Philips Class D Amplifiers™ provide dramatically enhanced sound... Super Audio CD Multi-channel SACD is excellent. DVD home theater system with Omni-directional Neodymium Ribbon Tweeter. Dipoles that radiate..., FM/ MW Antenna, Quick Use Guide, Remote Control, User Manual, Warranty certificate, Audio Cable, CVBS video cable • Included batteries...Enjoy unparalleled, natural and crystal-clear sound quality with Neodymium Ribbon Tweeters MX5900SA/37 Specifications Product highlights Picture/Display • Aspect ratio: 4:3, ...
... that offers ultra high quality music reproduction. Philips Class D Amplifiers™ provide dramatically enhanced sound... Super Audio CD Multi-channel SACD is excellent. DVD home theater system with Omni-directional Neodymium Ribbon Tweeter. Dipoles that radiate..., FM/ MW Antenna, Quick Use Guide, Remote Control, User Manual, Warranty certificate, Audio Cable, CVBS video cable • Included batteries...Enjoy unparalleled, natural and crystal-clear sound quality with Neodymium Ribbon Tweeters MX5900SA/37 Specifications Product highlights Picture/Display • Aspect ratio: 4:3, ...

User manual
Page 9
English Tuner Operations Tuning to radio stations 41 Presetting radio stations 41 Using the Plug and Play 41 Automatic presetting 42 Manual presetting 42 Selecting a preset radio station 42 Deleting a preset radio station 42 Timer Operations Setting the timer 43 Activating/Deactivating the ...off 46 Switching to active mode 46 Switching to Eco Power standby mode ... 46 Switching to standby mode (view clock) . 46 Dimming system's display screen 46 Recording to an external device 46 Using the remote to operate your television 46 Specifications 47 Troubleshooting 48-49 Glossary 50-51...
English Tuner Operations Tuning to radio stations 41 Presetting radio stations 41 Using the Plug and Play 41 Automatic presetting 42 Manual presetting 42 Selecting a preset radio station 42 Deleting a preset radio station 42 Timer Operations Setting the timer 43 Activating/Deactivating the ...off 46 Switching to active mode 46 Switching to Eco Power standby mode ... 46 Switching to standby mode (view clock) . 46 Dimming system's display screen 46 Recording to an external device 46 Using the remote to operate your television 46 Specifications 47 Troubleshooting 48-49 Glossary 50-51...

User manual
Page 12
... the jacks and speaker cables. Do not connect more than the speakers supplied. Do not connect speakers with subwoofer stand (left) SPEAKER SYSTEMS (4Ω) SURROUND CENTER FRONT SUB-WOOFER L L AM R R FM ANTENNA C AUDIO VIDEO DIGITAL AUX TV LINE OUT Pr SL... DIGITAL IN Y S-VIDEO P-SCAN ON OFF ~ AC MAINS Surround speaker (right) Surround speaker (left) Connect the supplied speaker systems using the supplied speaker cables by matching the colors of this manual. Speakers / Subwoofer Front Left (FL) (L) Front Right (FR) (R) Center (C) Surround Left (SL) Surround Right (SR) ...
... the jacks and speaker cables. Do not connect more than the speakers supplied. Do not connect speakers with subwoofer stand (left) SPEAKER SYSTEMS (4Ω) SURROUND CENTER FRONT SUB-WOOFER L L AM R R FM ANTENNA C AUDIO VIDEO DIGITAL AUX TV LINE OUT Pr SL... DIGITAL IN Y S-VIDEO P-SCAN ON OFF ~ AC MAINS Surround speaker (right) Surround speaker (left) Connect the supplied speaker systems using the supplied speaker cables by matching the colors of this manual. Speakers / Subwoofer Front Left (FL) (L) Front Right (FR) (R) Center (C) Surround Left (SL) Surround Right (SR) ...

User manual
Page 18
...- Switches between DISC 1~5 (only on the remote to select the desired seating position. (see page 20) $ VOLUME (VOL +-) - TUNER: starts *automatic/ manual preset programming. (see pages 41-42) 8 PROG (PROGRAM) - DISC: stops playback or clears a program. (see page 25) - DISC: *searches backward... CHANGER STANDBY- Switches to standby mode. (see page 41) Ç STOP - Point the remote control towards this sensor. 5 Speaker display panel 6 System display panel 7 TUNING - DISC: starts programming. (see pages 20, 43) - TUNER: *enters Plug & Play mode and/or starts preset radio station...
...- Switches between DISC 1~5 (only on the remote to select the desired seating position. (see page 20) $ VOLUME (VOL +-) - TUNER: starts *automatic/ manual preset programming. (see pages 41-42) 8 PROG (PROGRAM) - DISC: stops playback or clears a program. (see page 25) - DISC: *searches backward... CHANGER STANDBY- Switches to standby mode. (see page 41) Ç STOP - Point the remote control towards this sensor. 5 Speaker display panel 6 System display panel 7 TUNING - DISC: starts programming. (see pages 20, 43) - TUNER: *enters Plug & Play mode and/or starts preset radio station...
User manual
Page 21
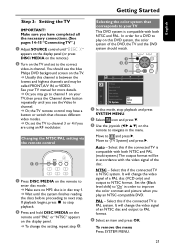
... until "PAL" or "NTSC" appears on this if the connected TV is compatible with the video signal of the disc. Select this DVD system, the color system of an NTSC disc and output to your TV manual for a DVD to the correct video-in channel. If playback begins, press Ç to {TV...stop playback. 2 Press and hold DISC/ MEDIA on the remote until you see the blue Philips DVD background screen on the remote to channel 3 or 4 if you are using an RF modulator. Select this channel is NTSC system. Auto - It will be called FRONT,A/V IN, or VIDEO. Select this if the connected...
... until "PAL" or "NTSC" appears on this if the connected TV is compatible with the video signal of the disc. Select this DVD system, the color system of an NTSC disc and output to your TV manual for a DVD to the correct video-in channel. If playback begins, press Ç to {TV...stop playback. 2 Press and hold DISC/ MEDIA on the remote until you see the blue Philips DVD background screen on the remote to channel 3 or 4 if you are using an RF modulator. Select this channel is NTSC system. Auto - It will be called FRONT,A/V IN, or VIDEO. Select this if the connected...

User manual
Page 42
...stored in one . 42 Deleting a preset radio station q Press and hold PROGRAM (or PROG on the front panel for preset tuning, make sure the system is selected, automatic preset will begin . q If you use S / T on the front panel) until "PRESET DELETED" appears. ➜ The ...numbers will appear. DISC/ TV/AV MEDIA TUNER AUX/DI 1 2 3 4 5 6 7 8 9 SURR. 0 VOL SOUND SYSTEM MENU DISC MENU DVD system's display panel 1 FM TUNER 2 P01 FM 98:00 Manual presetting You can start the automatic presetting from preset (1) and all your favorite radio stations. 1 In tuner mode, press...
...stored in one . 42 Deleting a preset radio station q Press and hold PROGRAM (or PROG on the front panel for preset tuning, make sure the system is selected, automatic preset will begin . q If you use S / T on the front panel) until "PRESET DELETED" appears. ➜ The ...numbers will appear. DISC/ TV/AV MEDIA TUNER AUX/DI 1 2 3 4 5 6 7 8 9 SURR. 0 VOL SOUND SYSTEM MENU DISC MENU DVD system's display panel 1 FM TUNER 2 P01 FM 98:00 Manual presetting You can start the automatic presetting from preset (1) and all your favorite radio stations. 1 In tuner mode, press...

User manual
Page 46
Helpful Hints: - All the sound control features are available for details. Switching to the owner's manual of brightness for the display screen. Refer to standby mode (view clock) q Press and hold STANDBY ON (B). ➜ The clock appears. ➜ ... (See page 17 "Connections-optional".) 2 Select the source to record from your television 1 2 DISC/ TV/AV MEDIA TUNER AUX/DI 1 2 3 4 5 6 7 8 9 SURR. 0 VOL SOUND SYSTEM MENU DISC MENU SEATING ZOOM PREV NEXT OK STOP PLAY/PAUSE DISC SKIP REPEAT REPEAT PROGRAM A-B VOICE MUTE DIM SLEEP SUBW TV VOL 4 3 1 Press TV...
Helpful Hints: - All the sound control features are available for details. Switching to the owner's manual of brightness for the display screen. Refer to standby mode (view clock) q Press and hold STANDBY ON (B). ➜ The clock appears. ➜ ... (See page 17 "Connections-optional".) 2 Select the source to record from your television 1 2 DISC/ TV/AV MEDIA TUNER AUX/DI 1 2 3 4 5 6 7 8 9 SURR. 0 VOL SOUND SYSTEM MENU DISC MENU SEATING ZOOM PREV NEXT OK STOP PLAY/PAUSE DISC SKIP REPEAT REPEAT PROGRAM A-B VOICE MUTE DIM SLEEP SUBW TV VOL 4 3 1 Press TV...
User manual
Page 48
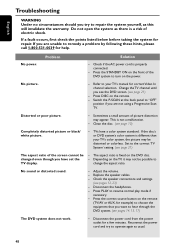
... ON on the remote (TV/AV or AUX, for help. This is different than your TV's manual for correct Video In channel selection. Clean the disc. (see pages 12, 23) - Set to the correct 'TV System' setting. (see page 21) - Adjust the volume. - Distorted or poor picture. - English ... If you are not using a Progressive Scan TV. Sometimes a small amount of the screen cannot be distorted or colorless. If the disc's or DVD system's color system is not a malfunction. - Press the correct source button on the front of electric shock. No picture. - Switch the P-SCAN at the back panel...
... ON on the remote (TV/AV or AUX, for help. This is different than your TV's manual for correct Video In channel selection. Clean the disc. (see pages 12, 23) - Set to the correct 'TV System' setting. (see page 21) - Adjust the volume. - Distorted or poor picture. - English ... If you are not using a Progressive Scan TV. Sometimes a small amount of the screen cannot be distorted or colorless. If the disc's or DVD system's color system is not a malfunction. - Press the correct source button on the front of electric shock. No picture. - Switch the P-SCAN at the back panel...
User manual
Page 52
...or part replacement because of misuse, accident, unauthorized repair or other cause not within the control of Philips. • reception problems caused by signal conditions or cable or antenna systems outside the unit. • a product that requires modification or adaptation to enable it to operate in...for a particular purpose. MAKE SURE YOU KEEP... A sales receipt or other document showing proof of purchase to return your owner's manual for the original warranty period.When the warranty on the product expires, the warranty on the product. MODEL SERIAL This warranty gives you...
...or part replacement because of misuse, accident, unauthorized repair or other cause not within the control of Philips. • reception problems caused by signal conditions or cable or antenna systems outside the unit. • a product that requires modification or adaptation to enable it to operate in...for a particular purpose. MAKE SURE YOU KEEP... A sales receipt or other document showing proof of purchase to return your owner's manual for the original warranty period.When the warranty on the product expires, the warranty on the product. MODEL SERIAL This warranty gives you...


