Leaflet
Page 1
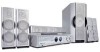
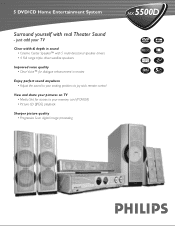
just add your memory card (PCMCIA) • Picture CD (JPEG) playback Sharper picture quality • Progressive Scan digital image processing MX 5500D 5 DVD/CD Home Entertainment System Surround yourself with 5 multi-directional speaker drivers • 4 Full range triple driver satellite speakers Improved voice quality • Clear Voice™ ...
just add your memory card (PCMCIA) • Picture CD (JPEG) playback Sharper picture quality • Progressive Scan digital image processing MX 5500D 5 DVD/CD Home Entertainment System Surround yourself with 5 multi-directional speaker drivers • 4 Full range triple driver satellite speakers Improved voice quality • Clear Voice™ ...

Leaflet
Page 2
...; User friendly On Screen Display • Eco power standby mode ( digital : 1 x optical • Audio output: - 5 DVD/CD Home Entertainment System standard product information MX 5500D dvd • 5 Disc Changer • Plays CD, CD-RW, MP3-CD*,VCD, DVD, DVD+R/RW, Picture CD (Kodak, JPEG) • Parental control • Play modes (repeat/program) • Progressive...
...; User friendly On Screen Display • Eco power standby mode ( digital : 1 x optical • Audio output: - 5 DVD/CD Home Entertainment System standard product information MX 5500D dvd • 5 Disc Changer • Plays CD, CD-RW, MP3-CD*,VCD, DVD, DVD+R/RW, Picture CD (Kodak, JPEG) • Parental control • Play modes (repeat/program) • Progressive...
User manual
Page 1
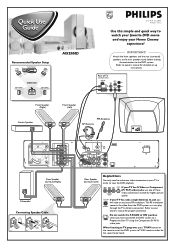
...your TV has only a single Antenna In jack, you have connected the DVD system to a Progressive Scan TV using the Component (Pr Pb Y) video jacks. If your owner's manual for proper connection. Recommended Speaker Setup MX5500D 12nc: 3139 115 22081 Printed in order for the sound to be heard.... Attach the front speakers and the rear (surround) speakers to the mini speaker stands before making the connections to owner's manual for detailed set the DVD system to TV/AV...
...your TV has only a single Antenna In jack, you have connected the DVD system to a Progressive Scan TV using the Component (Pr Pb Y) video jacks. If your owner's manual for proper connection. Recommended Speaker Setup MX5500D 12nc: 3139 115 22081 Printed in order for the sound to be heard.... Attach the front speakers and the rear (surround) speakers to the mini speaker stands before making the connections to owner's manual for detailed set the DVD system to TV/AV...

User manual
Page 2
...... Do not use channel 3 or 4 on the TV and select the correct Video In mode. ALL 1 Helpful Hints If a DVD does not play properly, please contact Philips at 1-800-531-0039. (Not all the cables supplied are required to complete. Make sure the disc label is between the lowest...FRONT, A/V IN, or VIDEO. See your TV remote control may go to confirm. Playing a disc 1 Press DISC/MEDIA on ! Or, you see the blue Philips DVD background screen on this channel is facing up. Or, use 3 4 1 2 buttons on the remote to make the necessary selection, then press OK to channel ...
...... Do not use channel 3 or 4 on the TV and select the correct Video In mode. ALL 1 Helpful Hints If a DVD does not play properly, please contact Philips at 1-800-531-0039. (Not all the cables supplied are required to complete. Make sure the disc label is between the lowest...FRONT, A/V IN, or VIDEO. See your TV remote control may go to confirm. Playing a disc 1 Press DISC/MEDIA on ! Or, you see the blue Philips DVD background screen on this channel is facing up. Or, use 3 4 1 2 buttons on the remote to make the necessary selection, then press OK to channel ...
User manual
Page 5
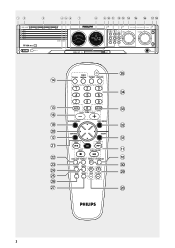
... 3 DISC 4 DISC 5 5 DISC CHANGER STANDBY- ON iR SENSOR MEDIA SLOT LE R-R HT SU 8 90 CENTRE FT DISC RIG DVD R-L SU SUB PLAY• PAUSE STOP SEATING SOURCE SEARCH SURROUND PROG TUNING CLOCK•TIMER DVD VIDEO DIGITAL SURROUND SYSTEM VOLUME TREBLE BASS EJECT $ # ^ ( ) @ ¡ DISC/ TV/AV MEDIA TUNER AUX/DI 1 2 3 4 5 6 7 8 9 SURR...
... 3 DISC 4 DISC 5 5 DISC CHANGER STANDBY- ON iR SENSOR MEDIA SLOT LE R-R HT SU 8 90 CENTRE FT DISC RIG DVD R-L SU SUB PLAY• PAUSE STOP SEATING SOURCE SEARCH SURROUND PROG TUNING CLOCK•TIMER DVD VIDEO DIGITAL SURROUND SYSTEM VOLUME TREBLE BASS EJECT $ # ^ ( ) @ ¡ DISC/ TV/AV MEDIA TUNER AUX/DI 1 2 3 4 5 6 7 8 9 SURR...

User manual
Page 10
... Connections (optional) Connecting a VCR or Cable/Satellite Box ........ 16 Viewing and listening to the playback .......... 16 Using the VCR for recording DVDs 16 Connecting digital audio equipment 17 Listening to the playback 17 Recording (digital 17 Functional Overview Main unit and remote control 18-19 Control buttons... disc (Kodak, JPEG 28 Program MP3 disc 28 Media Slot Operations About media slot 29 Playing JPEG pictures from memory card ......... 29 DVD Menu Options Using the menu bar 30 Using the Setup Menu 31 Setting the TV shape 31 Setting the video output 32 Screen saver ...
... Connections (optional) Connecting a VCR or Cable/Satellite Box ........ 16 Viewing and listening to the playback .......... 16 Using the VCR for recording DVDs 16 Connecting digital audio equipment 17 Listening to the playback 17 Recording (digital 17 Functional Overview Main unit and remote control 18-19 Control buttons... disc (Kodak, JPEG 28 Program MP3 disc 28 Media Slot Operations About media slot 29 Playing JPEG pictures from memory card ......... 29 DVD Menu Options Using the menu bar 30 Using the Setup Menu 31 Setting the TV shape 31 Setting the video output 32 Screen saver ...
User manual
Page 12
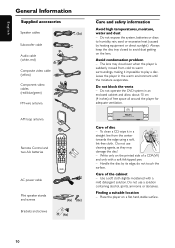
Avoid condensation problem - Do not operate the DVD system in the warm environment until the moisture evaporates. Place the player on the printed side of a CDR(W) and only with a mild detergent solution. Do ... an enclosed cabinet and allow about 10 cm (4 inches) of free space all around the player for adequate ventilation. 10 cm (4 inches) 10 cm (4 inches) PHILIPS DVD Home Cinema System 10 cm (4 inches) Care of the cabinet - Finding a suitable location - English General Information Supplied accessories Speaker cables (5x) Subwoofer cable Audio cable...
Avoid condensation problem - Do not operate the DVD system in the warm environment until the moisture evaporates. Place the player on the printed side of a CDR(W) and only with a mild detergent solution. Do ... an enclosed cabinet and allow about 10 cm (4 inches) of free space all around the player for adequate ventilation. 10 cm (4 inches) 10 cm (4 inches) PHILIPS DVD Home Cinema System 10 cm (4 inches) Care of the cabinet - Finding a suitable location - English General Information Supplied accessories Speaker cables (5x) Subwoofer cable Audio cable...

User manual
Page 13
... person to attach the brackets to your TV. - Then mount a screw (not supplied) on the floor near the TV. Allow adequate ventilation around the DVD system. 11 You should be hung and hook the speaker securely onto the mounted screw. To avoid magnetic interference, do it by yourself to avoid.... 1 Place the front left and right speakers at equal distances from the listening position. 2 Place the center speaker above the TV or the DVD system so that the center channel's sound is localized. 3 Place the surround speakers at normal listening ear level facing each other or mounted on ...
... person to attach the brackets to your TV. - Then mount a screw (not supplied) on the floor near the TV. Allow adequate ventilation around the DVD system. 11 You should be hung and hook the speaker securely onto the mounted screw. To avoid magnetic interference, do it by yourself to avoid.... 1 Place the front left and right speakers at equal distances from the listening position. 2 Place the center speaker above the TV or the DVD system so that the center channel's sound is localized. 3 Place the surround speakers at normal listening ear level facing each other or mounted on ...

User manual
Page 14
...to the corresponding Component video input jacks (or labeled as A/V In, Video In, Composite or Baseband) on the TV. 3 If you power up the DVD system. Connections Step 3: Connecting TV English AUDIO OUT COMPONENT VIDEO IN S-VIDEO IN Pr/Cr VIDEO IN Pb/Cb Y AUDIO OUT COMPONENT VIDEO IN S-... OUT CVBS SR L Pb SUB R DIGITAL IN Y S-VIDEO P-SCAN ON OFF 2 3 IMPORTANT! - The progressive scan video quality is only possible through this DVD system, use the audio cables (white/red) to connect TV IN (L/R) jacks to the corresponding AUDIO OUT jacks on the TV. 2 To hear the TV...
...to the corresponding Component video input jacks (or labeled as A/V In, Video In, Composite or Baseband) on the TV. 3 If you power up the DVD system. Connections Step 3: Connecting TV English AUDIO OUT COMPONENT VIDEO IN S-VIDEO IN Pr/Cr VIDEO IN Pb/Cb Y AUDIO OUT COMPONENT VIDEO IN S-... OUT CVBS SR L Pb SUB R DIGITAL IN Y S-VIDEO P-SCAN ON OFF 2 3 IMPORTANT! - The progressive scan video quality is only possible through this DVD system, use the audio cables (white/red) to connect TV IN (L/R) jacks to the corresponding AUDIO OUT jacks on the TV. 2 To hear the TV...

User manual
Page 15
... In,) you will need an RF modulator in order to 'S-Video,' see page 32. IMPORTANT! - If the picture is set to view the DVD playback on RF modulator availability and operations. Make sure it is distorted, check the Video Output setting. WOOFER SURROUND CENTER FRONT SPEAKER SYSTEMS SUBWOOFER SURROUND...See your TV's RF jack. 3 Set the P-SCAN switch to your electronics retailer or contact Philips for details on the TV. Using an accessory RF modulator 1 Use the composite video cable (yellow) to connect the DVD system's CVBS jack to the video input jack on the TV. 3 Set the P-SCAN switch ...
... In,) you will need an RF modulator in order to 'S-Video,' see page 32. IMPORTANT! - If the picture is set to view the DVD playback on RF modulator availability and operations. Make sure it is distorted, check the Video Output setting. WOOFER SURROUND CENTER FRONT SPEAKER SYSTEMS SUBWOOFER SURROUND...See your TV's RF jack. 3 Set the P-SCAN switch to your electronics retailer or contact Philips for details on the TV. Using an accessory RF modulator 1 Use the composite video cable (yellow) to connect the DVD system's CVBS jack to the video input jack on the TV. 3 Set the P-SCAN switch ...

User manual
Page 17
... Ç to the power outlet. PRESS PLAY HANGER MEDIA SLOT LE R-R HT SU CENTRE FT DISC RIG DVD R-L SU SUB PLAY• PAUSE STOP SEATING SOURCE SEARCH SURROUND PROG TUNING CLOCK•TIMER DVD VIDEO DIGITAL SURROUND SYSTEM VOLUME TREBLE BASS EJECT Connections 15 English Step 6: Connecting the power cord AM FM... exit (see page 37 "Tuner Operations".) PLAY • PAUSE AUTO INSTALL - Press ÉÅ on . PRESS PLAY" may appear on the display panel. On the DVD system, "AUTO INSTALL -
... Ç to the power outlet. PRESS PLAY HANGER MEDIA SLOT LE R-R HT SU CENTRE FT DISC RIG DVD R-L SU SUB PLAY• PAUSE STOP SEATING SOURCE SEARCH SURROUND PROG TUNING CLOCK•TIMER DVD VIDEO DIGITAL SURROUND SYSTEM VOLUME TREBLE BASS EJECT Connections 15 English Step 6: Connecting the power cord AM FM... exit (see page 37 "Tuner Operations".) PLAY • PAUSE AUTO INSTALL - Press ÉÅ on . PRESS PLAY" may appear on the display panel. On the DVD system, "AUTO INSTALL -
User manual
Page 18
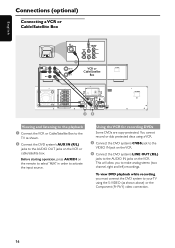
... Pb Y) video connection. 16 You cannot record or dub protected discs using the S-VIDEO (as shown. 2 Connect the DVD system's AUX IN (R/L) jacks to the AUDIO IN jacks on the VCR. To view DVD playback while recording, you to activate the input source. Before starting operation, press AUX/DI on the VCR... or cable/satellite box. This will allow you must connect the DVD system to your TV using a VCR. 3 Connect the DVD system's CVBS jack to the VIDEO IN jack on the VCR. 4 Connect the DVD system's LINE OUT (R/L) jacks to the AUDIO OUT jacks on the remote to select...
... Pb Y) video connection. 16 You cannot record or dub protected discs using the S-VIDEO (as shown. 2 Connect the DVD system's AUX IN (R/L) jacks to the AUDIO IN jacks on the VCR. To view DVD playback while recording, you to activate the input source. Before starting operation, press AUX/DI on the VCR... or cable/satellite box. This will allow you must connect the DVD system to your TV using a VCR. 3 Connect the DVD system's CVBS jack to the VIDEO IN jack on the VCR. 4 Connect the DVD system's LINE OUT (R/L) jacks to the AUDIO OUT jacks on the remote to select...

User manual
Page 19
... copy-protected. Recording (digital) 2 Connect the DVD system's DIGITAL OUT jack to the DIGITAL IN jack on the remote to select "DI" in order to activate the input source. You cannot record ... digital recording device. - Always refer to the owner's manual of the other equipment for example) CD Recorder ~ AC MAINS Listening to the playback 1 Connect the DVD system's DIGITAL IN jack to the audio connection. (See page 33 "Setting the digital output".) Notes: - Before starting operation, press AUX/DI on a digital recording...
... copy-protected. Recording (digital) 2 Connect the DVD system's DIGITAL OUT jack to the DIGITAL IN jack on the remote to select "DI" in order to activate the input source. You cannot record ... digital recording device. - Always refer to the owner's manual of the other equipment for example) CD Recorder ~ AC MAINS Listening to the playback 1 Connect the DVD system's DIGITAL IN jack to the audio connection. (See page 33 "Setting the digital output".) Notes: - Before starting operation, press AUX/DI on a digital recording...
User manual
Page 21
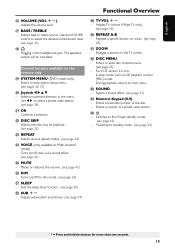
...available on /off the dim mode. (see page 25) £ REPEAT - Confirms a selection. ™ DISC SKIP - Turns on the remote only ( SYSTEM MENU (DVD mode only) - Enters a track/title number of a preset radio station. fiB - Plugging in the menu. - Use 1 2 to standby mode. (see page 42...to select a preset radio station. (see page 26) ⁄ ZOOM - Use the VOLUME control to main menu. ‹ SOUND - Adjusts TV volume (Philips TV only.) (see page 40) • SUB +- For VCD version 2.0 only; Selects movement direction in the headphones jack. Sets the sleep timer function....
...available on /off the dim mode. (see page 25) £ REPEAT - Confirms a selection. ™ DISC SKIP - Turns on the remote only ( SYSTEM MENU (DVD mode only) - Enters a track/title number of a preset radio station. fiB - Plugging in the menu. - Use 1 2 to standby mode. (see page 42...to select a preset radio station. (see page 26) ⁄ ZOOM - Use the VOLUME control to main menu. ‹ SOUND - Adjusts TV volume (Philips TV only.) (see page 40) • SUB +- For VCD version 2.0 only; Selects movement direction in the headphones jack. Sets the sleep timer function....
User manual
Page 22
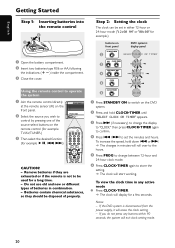
...," then press CLOCK•TIMER again to confirm. 4 Press S / T to operate the system 1 Aim the remote control directly at the remote sensor (iR) on the DVD system. 2 Press and hold down S or T. ➜ The changes in combination. - Notes: - Do not use old and new or different types of properly. Step ...2: Setting the clock The clock can be used for a few seconds. If the DVD system is not to switch on the front panel. 2 Select the source you do not press any active mode G Press CLOCK•TIMER. ➜ ...
...," then press CLOCK•TIMER again to confirm. 4 Press S / T to operate the system 1 Aim the remote control directly at the remote sensor (iR) on the DVD system. 2 Press and hold down S or T. ➜ The changes in combination. - Notes: - Do not use old and new or different types of properly. Step ...2: Setting the clock The clock can be used for a few seconds. If the DVD system is not to switch on the front panel. 2 Select the source you do not press any active mode G Press CLOCK•TIMER. ➜ ...

User manual
Page 23
... NTSC/PAL setting via the remote control 1, 2 DISC/ TV/AV MEDIA TUNER AUX/DI 1 2 3 4 5 6 1 Press DISC/MEDIA on the TV. ➜ Usually this DVD system, the color system of the disc. Selecting the color system that chooses different video modes. ➜ Or, set to channel 3 or 4 if you are...Select this if the connected TV is compatible with both NTSC and PAL. See your TV manual for a DVD to NTSC format. In order for more details. ➜ Or, you see the blue Philips DVD background screen on the remote to enter disc mode. ➜ Make sure no MP3 or picture (Kodak,...
... NTSC/PAL setting via the remote control 1, 2 DISC/ TV/AV MEDIA TUNER AUX/DI 1 2 3 4 5 6 1 Press DISC/MEDIA on the TV. ➜ Usually this DVD system, the color system of the disc. Selecting the color system that chooses different video modes. ➜ Or, set to channel 3 or 4 if you are...Select this if the connected TV is compatible with both NTSC and PAL. See your TV manual for a DVD to NTSC format. In order for more details. ➜ Or, you see the blue Philips DVD background screen on the remote to enter disc mode. ➜ Make sure no MP3 or picture (Kodak,...

User manual
Page 25
...4 Select a language and press OK. 5 Use the joystick (1 2 3 4) on or off the sound output. Move to and press 2. Except the DVD system's menu language, it will be automatically generated. 6 Use 3 4 to suit your surroundings and setup. To remove the menu Press SYSTEM MENU. 23 English... Getting Started Setting the speakers' channels You can select your preferred language settings so that this DVD system will automatically switch to the language for you whenever you optimize the sound according to your surround sound needs. These adjustments ...
...4 Select a language and press OK. 5 Use the joystick (1 2 3 4) on or off the sound output. Move to and press 2. Except the DVD system's menu language, it will be automatically generated. 6 Use 3 4 to suit your surroundings and setup. To remove the menu Press SYSTEM MENU. 23 English... Getting Started Setting the speakers' channels You can select your preferred language settings so that this DVD system will automatically switch to the language for you whenever you optimize the sound according to your surround sound needs. These adjustments ...
User manual
Page 26
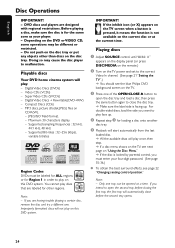
... disc tray or put any objects other than discs on the DVD or VIDEO CD, some operations may cause the disc player to the correct Video In channel. (See page 21 "Setting the TV".) ➜ You should see the blue Philips DVD background screen on "Using the Disc Menu." ➜ If the ...disc is facing up . 4 Repeat step 3 for other regions. Playable discs Your DVD home cinema system will play once, then stop. ➜ If a disc menu shows on...
... disc tray or put any objects other than discs on the DVD or VIDEO CD, some operations may cause the disc player to the correct Video In channel. (See page 21 "Setting the TV".) ➜ You should see the blue Philips DVD background screen on "Using the Disc Menu." ➜ If the ...disc is facing up . 4 Repeat step 3 for other regions. Playable discs Your DVD home cinema system will play once, then stop. ➜ If a disc menu shows on...

User manual
Page 27
To access or remove the menu G Press DISC MENU on front panel DVD system's display panel 1 STANDBY- Stopping playback G Press Ç. To cancel the resume mode G In stop mode and when the disc has not been ejected, press &#... G Press OPEN•CLOSE 0 buttons of the inactive disc trays. G During playback, pressing DISC MENU will appear on ). Resuming playback from the last stopped point (DVD/VCD) G In stop mode, press Ç again. For VCD with Playback Control (PBC) feature (version 2.0 only) G In stop . Use the Joystick (1 2 34) to highlight your...
To access or remove the menu G Press DISC MENU on front panel DVD system's display panel 1 STANDBY- Stopping playback G Press Ç. To cancel the resume mode G In stop mode and when the disc has not been ejected, press &#... G Press OPEN•CLOSE 0 buttons of the inactive disc trays. G During playback, pressing DISC MENU will appear on ). Resuming playback from the last stopped point (DVD/VCD) G In stop mode, press Ç again. For VCD with Playback Control (PBC) feature (version 2.0 only) G In stop . Use the Joystick (1 2 34) to highlight your...

User manual
Page 28
... 99 tracks can be played. Up to end the section. ➜ The section A and B can play might not work correctly with some DVDs. - REPEAT TRACK/TITLE - to select : REPEAT CHAPTER (DVD) - For VCD, if the PBC mode is switched on, repeat play mode G While playing a disc, press REPEAT to repeat playback of...
... 99 tracks can be played. Up to end the section. ➜ The section A and B can play might not work correctly with some DVDs. - REPEAT TRACK/TITLE - to select : REPEAT CHAPTER (DVD) - For VCD, if the PBC mode is switched on, repeat play mode G While playing a disc, press REPEAT to repeat playback of...


