Leaflet
Page 1
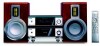
..., you can now feast your senses on perfect sound Enrich your movie experience • Play DVD, DivX®, (S)VCD, MP3-CD, WMA-CD, CD(RW) & Picture CD • 12-bit/108MHz video processing for sharp, natural images • Progressive Scan component ... • 2x50W RMS and 2x100W music power Design that blends into your interior • High-end component design with stand • Aluminum die cast cabinet Philips DVD Micro Theater MCD708 Rich movie and excellent sound experience A high quality component system flaunts a stylish and stunning design.
..., you can now feast your senses on perfect sound Enrich your movie experience • Play DVD, DivX®, (S)VCD, MP3-CD, WMA-CD, CD(RW) & Picture CD • 12-bit/108MHz video processing for sharp, natural images • Progressive Scan component ... • 2x50W RMS and 2x100W music power Design that blends into your interior • High-end component design with stand • Aluminum die cast cabinet Philips DVD Micro Theater MCD708 Rich movie and excellent sound experience A high quality component system flaunts a stylish and stunning design.
Leaflet
Page 2
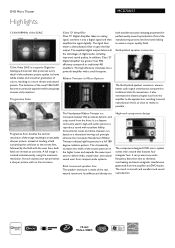
... better audio signal transmission compared to traditional AB amplifiers. Its stiffness and density are High-end component design The component-designed DVD micro system comes with a stand that preserves every detail of the authentic picture quality. It can prevent any audio frequency ... sound reproduction. The Neodymium Ribbon Tweeter is a monopole tweeter that 's as close to reproduce sound with a small footprint. DVD Micro Theater Highlights MCD708/37 12-bit/108MHz video DAC 12-bit Video DAC is a superior Digital-toAnalogue-Converter that features four triangular feet. Progressive...
... better audio signal transmission compared to traditional AB amplifiers. Its stiffness and density are High-end component design The component-designed DVD micro system comes with a stand that preserves every detail of the authentic picture quality. It can prevent any audio frequency ... sound reproduction. The Neodymium Ribbon Tweeter is a monopole tweeter that 's as close to reproduce sound with a small footprint. DVD Micro Theater Highlights MCD708/37 12-bit/108MHz video DAC 12-bit Video DAC is a superior Digital-toAnalogue-Converter that features four triangular feet. Progressive...
Leaflet
Page 3
...09585 11452 4 © 2009 Koninklijke Philips Electronics N.V. Specifications are the property of Koninklijke Philips Electronics N.V. www.philips.com Trademarks are subject to change without notice. All Rights reserved. or their respective owners. DVD Micro Theater Specifications MCD708/37 Sound • Output Power:... Real rosewood enclosure, Gold-plate speaker connectors, Speaker grilles detachable Video Playback • Playback Media: DivX, DVD+RW, DVD-Video, Picture CD, Video CD/SVCD • Disc Playback Modes: A-B Repeat, Angle, PBC, Slow Motion, Zoom, Parental...
...09585 11452 4 © 2009 Koninklijke Philips Electronics N.V. Specifications are the property of Koninklijke Philips Electronics N.V. www.philips.com Trademarks are subject to change without notice. All Rights reserved. or their respective owners. DVD Micro Theater Specifications MCD708/37 Sound • Output Power:... Real rosewood enclosure, Gold-plate speaker connectors, Speaker grilles detachable Video Playback • Playback Media: DivX, DVD+RW, DVD-Video, Picture CD, Video CD/SVCD • Disc Playback Modes: A-B Repeat, Angle, PBC, Slow Motion, Zoom, Parental...
User manual
Page 7
...TV 12~14 Step 5: Connecting FM/AM antennas 14 Step 6: Connecting the power cord 15 Additional: Connecting additional equipment15 Functional Overview DVD player and power amplifier 16 Remote control 17~18 Getting Started Step 1: Inserting batteries into the Remote Control 19 Using the Remote ...playback (not for Picture CD) Special disc features 26 Playing a Title (DVD) Camera Angle (DVD) Changing the Audio Language (for DVD recorded with multiple languages) Changing the Audio Channel (for VCD only) Subtitles (DVD) Playing MP3/WMA/JPEG Picture disc 26 Playing MP3/WMA disc 26 General...
...TV 12~14 Step 5: Connecting FM/AM antennas 14 Step 6: Connecting the power cord 15 Additional: Connecting additional equipment15 Functional Overview DVD player and power amplifier 16 Remote control 17~18 Getting Started Step 1: Inserting batteries into the Remote Control 19 Using the Remote ...playback (not for Picture CD) Special disc features 26 Playing a Title (DVD) Camera Angle (DVD) Changing the Audio Language (for DVD recorded with multiple languages) Changing the Audio Channel (for VCD only) Subtitles (DVD) Playing MP3/WMA/JPEG Picture disc 26 Playing MP3/WMA disc 26 General...
User manual
Page 9
...instruction booklet and a Quick Start Guide If any item is damaged or missing, contact your children cannot watch a DVD that you set a ratings level so that your retailer or Philips. Installation ● Place the player on /off automatically at a preset time. Sleep/Wake-up Timer Enables ...the system to the DVD micro theatre. AM loop antenna - Stand for film based sources. Additional Component Connections Lets you...
...instruction booklet and a Quick Start Guide If any item is damaged or missing, contact your children cannot watch a DVD that you set a ratings level so that your retailer or Philips. Installation ● Place the player on /off automatically at a preset time. Sleep/Wake-up Timer Enables ...the system to the DVD micro theatre. AM loop antenna - Stand for film based sources. Additional Component Connections Lets you...
User manual
Page 11
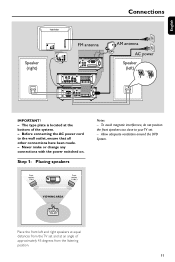
Never make or change any connections with the power switched on. Allow adequate ventilation around the DVD System. Before connecting the AC power cord to your TV set and at an angle of the system. - The type plate is located at equal ...
Never make or change any connections with the power switched on. Allow adequate ventilation around the DVD System. Before connecting the AC power cord to your TV set and at an angle of the system. - The type plate is located at equal ...

User manual
Page 12
... Video jack 2 1 LINE OUT 1 2 SUB WOOFER Notes: - Improper connections may damage the system due to any one pair of this DVD system, use the supplied speakers. - Do not connect speakers with the supplied flat control cable. 1 Use the composite video connectors (yellow)... of the supplied audio and composite video cables (2-in1) to connect the DVD system's VIDEO OUT jack to the SPECIFICATIONS section of +/- Ensure that the speaker cables are correctly connected. Step 4: Connecting TV IMPORTANT! - ...
... Video jack 2 1 LINE OUT 1 2 SUB WOOFER Notes: - Improper connections may damage the system due to any one pair of this DVD system, use the supplied speakers. - Do not connect speakers with the supplied flat control cable. 1 Use the composite video connectors (yellow)... of the supplied audio and composite video cables (2-in1) to connect the DVD system's VIDEO OUT jack to the SPECIFICATIONS section of +/- Ensure that the speaker cables are correctly connected. Step 4: Connecting TV IMPORTANT! - ...
User manual
Page 13
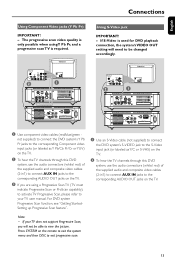
...Video jacks (Y Pb Pr) IMPORTANT! - The progressive scan video quality is only possible when usingY Pb Pr, and a progressive scan TV is used for DVD playback connection, the system's VIDEO OUT setting will not be changed accordingly. 2 1 LINE OUT 2 1 LINE OUT SUB WOOFER SUB WOOFER 1 Use component ...video cables (red/blue/green - not supplied) to connect the DVD system's Y Pb Pr jacks to the corresponding Component video input jacks (or labeled as Y/C or S-VHS) on the TV. Press SYSTEM on the remote...
...Video jacks (Y Pb Pr) IMPORTANT! - The progressive scan video quality is only possible when usingY Pb Pr, and a progressive scan TV is used for DVD playback connection, the system's VIDEO OUT setting will not be changed accordingly. 2 1 LINE OUT 2 1 LINE OUT SUB WOOFER SUB WOOFER 1 Use component ...video cables (red/blue/green - not supplied) to connect the DVD system's Y Pb Pr jacks to the corresponding Component video input jacks (or labeled as Y/C or S-VHS) on the TV. Press SYSTEM on the remote...
User manual
Page 14
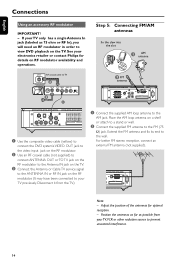
...fix the claw into the slot 1 AM antenna 2 FM antenna SUB WOOFER LINE OUT 1 Use the composite video cable (yellow) to connect the DVD system's VIDEO OUT jack to the video input jack on the RF modulator. 2 Use an RF coaxial cable (not supplied) to connect ANTENNA ...not supplied). Note: - If your TV,VCR or other radiation source to view DVD playback on RF modulator availability and operations. Extend the FM antenna and fix its end to your electronics retailer or contact Philips for optimal reception. - See your TV previously. English Connections Using an accessory RF ...
...fix the claw into the slot 1 AM antenna 2 FM antenna SUB WOOFER LINE OUT 1 Use the composite video cable (yellow) to connect the DVD system's VIDEO OUT jack to the video input jack on the RF modulator. 2 Use an RF coaxial cable (not supplied) to connect ANTENNA ...not supplied). Note: - If your TV,VCR or other radiation source to view DVD playback on RF modulator availability and operations. Extend the FM antenna and fix its end to your electronics retailer or contact Philips for optimal reception. - See your TV previously. English Connections Using an accessory RF ...
User manual
Page 15
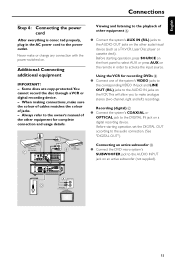
... Recording (digital) C ● Connect the system's COAXIAL or OPTICAL jack to the AUDIO OUT jacks on the other equipment for recording DVDs B ● Connect one of jacks. - Before star ting operation, set the DIGITAL OUT according to the audio connection. (See "DIGITAL... OUT".) Connecting an active subwoofer D ● Connect the DVD micro system's SUBWOOFER jack to the power outlet. Additional: Connecting additional equipment IMPORTANT! - SUB WOOFER D AUDIO INPUT A AUDIO OUT L R Television...
... Recording (digital) C ● Connect the system's COAXIAL or OPTICAL jack to the AUDIO OUT jacks on the other equipment for recording DVDs B ● Connect one of jacks. - Before star ting operation, set the DIGITAL OUT according to the audio connection. (See "DIGITAL... OUT".) Connecting an active subwoofer D ● Connect the DVD micro system's SUBWOOFER jack to the power outlet. Additional: Connecting additional equipment IMPORTANT! - SUB WOOFER D AUDIO INPUT A AUDIO OUT L R Television...
User manual
Page 16
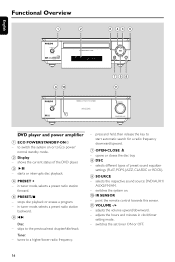
...clock/timer setting mode. - adjusts the hours and minutes in tuner mode, selects a preset radio station backward. 6 ¡/™ Disc: - Tuner: - DVD player and power amplifier 1 ECO POWER/STANDBY-ON y - opens or closes the disc tray. 8 DSC - VOLUME -/+ - skips to a higher/lower radio...IR SENSOR - in tuner mode, selects a preset radio station forward. 5 PRESET-/9 - selects different types of the DVD player. 3 ÉÅ - selects the respective sound source: DVD/AUX1/ AUX2/FM/AM. - switches the system on or to start automatic search for a radio frequency downward/upward....
...clock/timer setting mode. - adjusts the hours and minutes in tuner mode, selects a preset radio station backward. 6 ¡/™ Disc: - Tuner: - DVD player and power amplifier 1 ECO POWER/STANDBY-ON y - opens or closes the disc tray. 8 DSC - VOLUME -/+ - skips to a higher/lower radio...IR SENSOR - in tuner mode, selects a preset radio station forward. 5 PRESET-/9 - selects different types of the DVD player. 3 ÉÅ - selects the respective sound source: DVD/AUX1/ AUX2/FM/AM. - switches the system on or to start automatic search for a radio frequency downward/upward....
User manual
Page 17
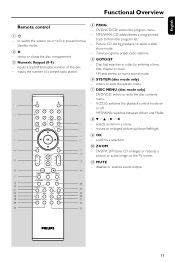
... º ⁄ 4 PROG - Disc: fast searches in a menu. - MP3/WMA: switches between Album and Filelist. 84 / 3 / 2 / 1 - inputs the number of the disc. - DVD/VCD: enters or exits the disc contents menu. - confirms a selection. 0 ZOOM - MUTE - opens or closes the disc compartment 3 Numeric Keypad.... ! moves an enlarged picture up/down/left/right. 9 OK - MP3/WMA-CD: adds/deletes a programmed track to select a slide show mode. - DVD/VCD/Picture CD: enlarges or reduces a picture or active image on or off . - FM: sets stereo or mono sound mode. 6 SYSTEM (disc mode only...
... º ⁄ 4 PROG - Disc: fast searches in a menu. - MP3/WMA: switches between Album and Filelist. 84 / 3 / 2 / 1 - inputs the number of the disc. - DVD/VCD: enters or exits the disc contents menu. - confirms a selection. 0 ZOOM - MUTE - opens or closes the disc compartment 3 Numeric Keypad.... ! moves an enlarged picture up/down/left/right. 9 OK - MP3/WMA-CD: adds/deletes a programmed track to select a slide show mode. - DVD/VCD/Picture CD: enlarges or reduces a picture or active image on or off . - FM: sets stereo or mono sound mode. 6 SYSTEM (disc mode only...

User manual
Page 18
...a program. & DISC/TUNER/AUX - sets the sleep timer function (auto off). ( CLOCK Standby mode - adjusts volume level for a DivX/VCD/SVCD/DVD. • DBB - searches backward/forward in clock/timer setting mode. - Tuner: selects a preset radio station. % ÉÅ - displays the ...on TV screen during playback ≤ AUDIO for this version) - sets the system clock. displays the system clock. 18 Eco power mode - selects a DVD camera angle. £ DISPLAY - displays information on the system automatically. for a disc. ≥ SLOW - selects an audio language. ∞ A-B...
...a program. & DISC/TUNER/AUX - sets the sleep timer function (auto off). ( CLOCK Standby mode - adjusts volume level for a DivX/VCD/SVCD/DVD. • DBB - searches backward/forward in clock/timer setting mode. - Tuner: selects a preset radio station. % ÉÅ - displays the ...on TV screen during playback ≤ AUDIO for this version) - sets the system clock. displays the system clock. 18 Eco power mode - selects a DVD camera angle. £ DISPLAY - displays information on the system automatically. for a disc. ≥ SLOW - selects an audio language. ∞ A-B...
User manual
Page 19
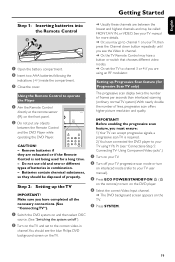
... to the correct video-in combination. - Before enabling the progressive scan feature, you are using Y Pb Pr (see the blue Philips DVD background screen on the TV. ➜ Usually these channels are exhausted or if the Remote Control is required. 2) You have a ... progressive scan offers higher picture resolution and quality. Batteries contain chemical substances, so they are between the Remote Control and the DVD Player while operating the DVD Player. Setting up the TV IMPORTANT! Make sure you have completed all the necessary connections. (See "Connecting TV"). 1 Switch ...
... to the correct video-in combination. - Before enabling the progressive scan feature, you are using Y Pb Pr (see the blue Philips DVD background screen on the TV. ➜ Usually these channels are exhausted or if the Remote Control is required. 2) You have a ... progressive scan offers higher picture resolution and quality. Batteries contain chemical substances, so they are between the Remote Control and the DVD Player while operating the DVD Player. Setting up the TV IMPORTANT! Make sure you have completed all the necessary connections. (See "Connecting TV"). 1 Switch ...
User manual
Page 20
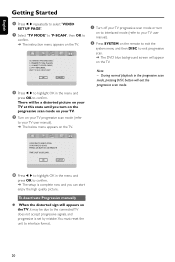
... (refer to your TV user manual). 2 Press SYSTEM on the remote to exit the system menu and then DISC to exit progressive scan. ➜ The DVD blue background screen will appear on the TV. 8 Press 1 2 to highlight OK in the menu and press OK to confirm. ➜ The setup is set...
... (refer to your TV user manual). 2 Press SYSTEM on the remote to exit the system menu and then DISC to exit progressive scan. ➜ The DVD blue background screen will appear on the TV. 8 Press 1 2 to highlight OK in the menu and press OK to confirm. ➜ The setup is set...
User manual
Page 21
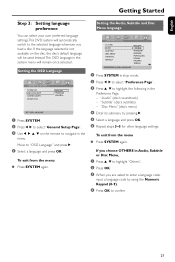
... (0-9). 4 Press OK to highlight the following in the menu. English Getting Started Step 3: Setting language preference You can select your own preferred language settings.This DVD system will remain once selected. Setting the Audio, Subtitle and Disc Menu language Setting the OSD Language 1 Press SYSTEM. 2 Press 1 2 to navigate in the Preference...
... (0-9). 4 Press OK to highlight the following in the menu. English Getting Started Step 3: Setting language preference You can select your own preferred language settings.This DVD system will remain once selected. Setting the Audio, Subtitle and Disc Menu language Setting the OSD Language 1 Press SYSTEM. 2 Press 1 2 to navigate in the Preference...
User manual
Page 23
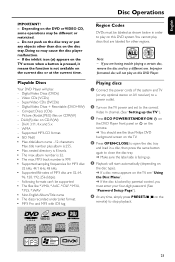
...Video CDs (VCDs) - Super Video CDs (SVCDs) - title number plus album is 999. • Supported sampling frequencies for other regions. Playable Discs Your DVD Player will not play on the remote) to play on the disc tray. DivX(R) disc on CDR(W) - Improper formatted disc will play discs that are... "Setting up . 5 Playback will start automatically (depending on the disc type). ➜ If a disc menu appears on the TV, see the blue Philips DVD background screen on the TV. 4 Press OPEN•CLOSE to open the disc tray and load in order to stop playback. 23 nested directory is...
...Video CDs (VCDs) - Super Video CDs (SVCDs) - title number plus album is 999. • Supported sampling frequencies for other regions. Playable Discs Your DVD Player will not play on the remote) to play on the disc tray. DivX(R) disc on CDR(W) - Improper formatted disc will play discs that are... "Setting up . 5 Playback will start automatically (depending on the disc type). ➜ If a disc menu appears on the TV, see the blue Philips DVD background screen on the TV. 4 Press OPEN•CLOSE to open the disc tray and load in order to stop playback. 23 nested directory is...
User manual
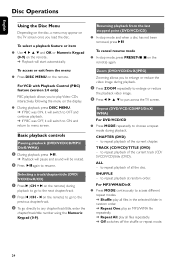
Page 24
... ● Press MODE continuously to resume. Resuming playback from the menu ● Press DISC MENU on the remote) again. Basic playback controls Pausing playback (DVD/VCD/CD/MP3/ DivX/WMA) 1 During playback, press ÉÅ. ➜ Playback will pause and sound will be muted. 2 Press ÉÅ... playback. ➜ If PBC was OFF, it will switch to ON and return to repeat playback of the current chapter. Selecting a track/chapter/title (DVD/ VCD/DivX/CD) 1 Press ™ (CH + ™ on the remote) during playback. to any chapter/track/title, enter the chapter/track/...
... ● Press MODE continuously to resume. Resuming playback from the menu ● Press DISC MENU on the remote) again. Basic playback controls Pausing playback (DVD/VCD/CD/MP3/ DivX/WMA) 1 During playback, press ÉÅ. ➜ Playback will pause and sound will be muted. 2 Press ÉÅ... playback. ➜ If PBC was OFF, it will switch to ON and return to repeat playback of the current chapter. Selecting a track/chapter/title (DVD/ VCD/DivX/CD) 1 Press ™ (CH + ™ on the remote) during playback. to any chapter/track/title, enter the chapter/track/...
User manual
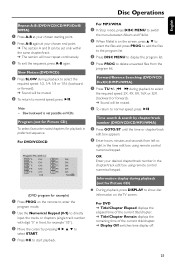
Page 25
... Press PROG on VCDs. Information display during playback (not for playback in preferred sequence. Slow backward is on the TV screen. Forward/Reverse Searching (DVD/VCD/ DivX/CD/MP3/WMA) 1 Press TU during playback to select the required speed: 1/2, 1/4, 1/8 or 1/16 (backward or forward). ➜...by pressing 1 2 3 4 to select START. 4 Press OK to delete unwanted files from left to normal speed, press ÉÅ. For DVD ➜ Title/Chapter Elapsed: displays the elapsed time of the current title/chapter. ➜ Title/Chapter Remain: displays the remaining time of the ...
... Press PROG on VCDs. Information display during playback (not for playback in preferred sequence. Slow backward is on the TV screen. Forward/Reverse Searching (DVD/VCD/ DivX/CD/MP3/WMA) 1 Press TU during playback to select the required speed: 1/2, 1/4, 1/8 or 1/16 (backward or forward). ➜...by pressing 1 2 3 4 to select START. 4 Press OK to delete unwanted files from left to normal speed, press ÉÅ. For DVD ➜ Title/Chapter Elapsed: displays the elapsed time of the current title/chapter. ➜ Title/Chapter Remain: displays the remaining time of the ...
User manual
Page 26
...number of songs compiled onto the disc . The disc reading time may exceed 10 seconds due to select different subtitle languages. Camera Angle (DVD) ● Press ANGLE repeatedly to switch between Album and Filelist. 26 Changing the Audio Language (for details about Windows Media Player and... up the TV"). 3 Press 3 4 or use Windows Media Player 10 (or later) for CD burning/conversion.Visit www.microsoft.com for DVD recorded with multiple languages) ● Press AUDIO repeatedly to select different audio languages. You have to turn on the remote to select different desired...
...number of songs compiled onto the disc . The disc reading time may exceed 10 seconds due to select different subtitle languages. Camera Angle (DVD) ● Press ANGLE repeatedly to switch between Album and Filelist. 26 Changing the Audio Language (for details about Windows Media Player and... up the TV"). 3 Press 3 4 or use Windows Media Player 10 (or later) for CD burning/conversion.Visit www.microsoft.com for DVD recorded with multiple languages) ● Press AUDIO repeatedly to select different audio languages. You have to turn on the remote to select different desired...


