Leaflet
Page 1
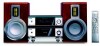
Philips DVD Micro Theater MCD708 Rich movie and excellent sound experience A high quality component system flaunts a stylish and stunning design. With DVD playability, you can now feast your senses on perfect sound Enrich your movie experience • Play DVD, DivX®, (S)VCD, MP3-CD, WMA-CD, CD(RW) & Picture CD • 12-bit/108MHz video processing...
Philips DVD Micro Theater MCD708 Rich movie and excellent sound experience A high quality component system flaunts a stylish and stunning design. With DVD playability, you can now feast your senses on perfect sound Enrich your movie experience • Play DVD, DivX®, (S)VCD, MP3-CD, WMA-CD, CD(RW) & Picture CD • 12-bit/108MHz video processing...
Leaflet
Page 2
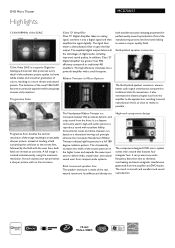
...reproduce sound with a stand that features four triangular feet. It is a feature commonly used in a noticeably sharper picture. DVD Micro Theater Highlights MCD708/37 12-bit/108MHz video DAC 12-bit Video DAC is a superior Digital-toAnalogue-Converter that preserves every detail of the .... This dramatically increases the width of the sound spectrum in Micro System both fields are High-end component design The component-designed DVD micro system comes with excellent fidelity. Progressive Scan Class 'D' Amplifier Class 'D' Digital Amplifier takes an analog signal, converts it into...
...reproduce sound with a stand that features four triangular feet. It is a feature commonly used in a noticeably sharper picture. DVD Micro Theater Highlights MCD708/37 12-bit/108MHz video DAC 12-bit Video DAC is a superior Digital-toAnalogue-Converter that preserves every detail of the .... This dramatically increases the width of the sound spectrum in Micro System both fields are High-end component design The component-designed DVD micro system comes with excellent fidelity. Progressive Scan Class 'D' Amplifier Class 'D' Digital Amplifier takes an analog signal, converts it into...
Leaflet
Page 3
...kg • Issue date 2009-07-17 Version: 3.0.6 12 NC: 9073 100 13442 UPC: 6 09585 11452 4 © 2009 Koninklijke Philips Electronics N.V. Analog: Component Y Pb Pr (cinch), Composite CVBS (yellow cinch), S-Video (on Hosiden) • Aux in: 2x(L/R)/... (W x H x D): 160 x 275 x 225 mm • Packaging dimensions (W x H x D): 525 x 330 x 375 mm • Weight incl. DVD Micro Theater Specifications MCD708/37 Sound • Output Power: 2x50W RMS / 100watts total power • Sound Enhancement: Class "D" Digital Amplifier, Digital Sound Control 4 modes, Dynamic Bass Boost, ...
...kg • Issue date 2009-07-17 Version: 3.0.6 12 NC: 9073 100 13442 UPC: 6 09585 11452 4 © 2009 Koninklijke Philips Electronics N.V. Analog: Component Y Pb Pr (cinch), Composite CVBS (yellow cinch), S-Video (on Hosiden) • Aux in: 2x(L/R)/... (W x H x D): 160 x 275 x 225 mm • Packaging dimensions (W x H x D): 525 x 330 x 375 mm • Weight incl. DVD Micro Theater Specifications MCD708/37 Sound • Output Power: 2x50W RMS / 100watts total power • Sound Enhancement: Class "D" Digital Amplifier, Digital Sound Control 4 modes, Dynamic Bass Boost, ...
User manual
Page 7
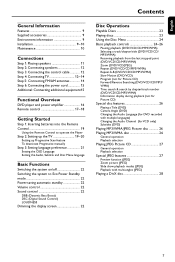
...TV 12~14 Step 5: Connecting FM/AM antennas 14 Step 6: Connecting the power cord 15 Additional: Connecting additional equipment15 Functional Overview DVD player and power amplifier 16 Remote control 17~18 Getting Started Step 1: Inserting batteries into the Remote Control 19 Using the Remote ...playback (not for Picture CD) Special disc features 26 Playing a Title (DVD) Camera Angle (DVD) Changing the Audio Language (for DVD recorded with multiple languages) Changing the Audio Channel (for VCD only) Subtitles (DVD) Playing MP3/WMA/JPEG Picture disc 26 Playing MP3/WMA disc 26 General...
...TV 12~14 Step 5: Connecting FM/AM antennas 14 Step 6: Connecting the power cord 15 Additional: Connecting additional equipment15 Functional Overview DVD player and power amplifier 16 Remote control 17~18 Getting Started Step 1: Inserting batteries into the Remote Control 19 Using the Remote ...playback (not for Picture CD) Special disc features 26 Playing a Title (DVD) Camera Angle (DVD) Changing the Audio Language (for DVD recorded with multiple languages) Changing the Audio Channel (for VCD only) Subtitles (DVD) Playing MP3/WMA/JPEG Picture disc 26 Playing MP3/WMA disc 26 General...
User manual
Page 9
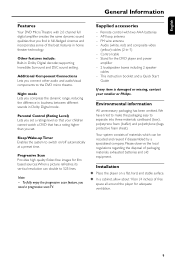
..., suppor ting Incredible Surround and DSC sound setting. Stand for film based sources. Your system consists of materials which can double to the DVD micro theatre. Parental Control (Rating Level) Lets you set . Note: - This instruction booklet and a Quick Start Guide If any item...Place the player on /off automatically at a preset time. Additional Component Connections Lets you set a ratings level so that your retailer or Philips. Remote control with 2.0 channel full digital amplifier creates the same dynamic sound qualities that has a rating higher than you connect other audio ...
..., suppor ting Incredible Surround and DSC sound setting. Stand for film based sources. Your system consists of materials which can double to the DVD micro theatre. Parental Control (Rating Level) Lets you set . Note: - This instruction booklet and a Quick Start Guide If any item...Place the player on /off automatically at a preset time. Additional Component Connections Lets you set a ratings level so that your retailer or Philips. Remote control with 2.0 channel full digital amplifier creates the same dynamic sound qualities that has a rating higher than you connect other audio ...
User manual
Page 11
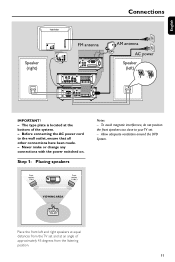
... the front left and right speakers at equal distances from the TV set . - Step 1: Placing speakers Front speaker ( left ) 1 2 IMPORTANT! - Allow adequate ventilation around the DVD System. The type plate is located at an angle of the system. - Never make or change any connections with the power switched on. English Connections...
... the front left and right speakers at equal distances from the TV set . - Step 1: Placing speakers Front speaker ( left ) 1 2 IMPORTANT! - Allow adequate ventilation around the DVD System. The type plate is located at an angle of the system. - Never make or change any connections with the power switched on. English Connections...

User manual
Page 12
...pair of the power amplifier with an impedance lower than one video connection from the following options, depending on the capabilities of this DVD system, use the supplied speakers. - Ensure that the speaker cables are correctly connected. Do not connect speakers with the supplied flat ... 1 LINE OUT 1 2 SUB WOOFER Notes: - Step 4: Connecting TV IMPORTANT! - You only need to the TV. 12 speaker jacks. - Connect the DVD system directly to make one speaker to the corresponding AUDIO OUT jacks on the TV. 2 To hear the TV channels through this manual. English Connections...
...pair of the power amplifier with an impedance lower than one video connection from the following options, depending on the capabilities of this DVD system, use the supplied speakers. - Ensure that the speaker cables are correctly connected. Do not connect speakers with the supplied flat ... 1 LINE OUT 1 2 SUB WOOFER Notes: - Step 4: Connecting TV IMPORTANT! - You only need to the TV. 12 speaker jacks. - Connect the DVD system directly to make one speaker to the corresponding AUDIO OUT jacks on the TV. 2 To hear the TV channels through this manual. English Connections...
User manual
Page 13
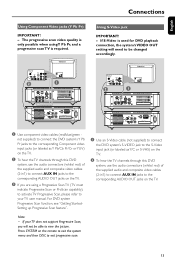
...be changed accordingly. 2 1 LINE OUT 2 1 LINE OUT SUB WOOFER SUB WOOFER 1 Use component video cables (red/blue/green - not supplied) to connect the DVD system's Y Pb Pr jacks to the corresponding Component video input jacks (or labeled as Y/C or S-VHS) on the TV. 2 To hear the TV channels ...through this DVD system, use the audio connectors (white/ red) of the supplied audio and composite video cables (2-in1) to connect AUX IN jacks to exit progressive scan...
...be changed accordingly. 2 1 LINE OUT 2 1 LINE OUT SUB WOOFER SUB WOOFER 1 Use component video cables (red/blue/green - not supplied) to connect the DVD system's Y Pb Pr jacks to the corresponding Component video input jacks (or labeled as Y/C or S-VHS) on the TV. 2 To hear the TV channels ...through this DVD system, use the audio connectors (white/ red) of the supplied audio and composite video cables (2-in1) to connect AUX IN jacks to exit progressive scan...
User manual
Page 14
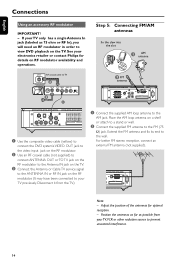
See your electronics retailer or contact Philips for optimal reception. - Place the AM loop antenna on RF modulator availability and operations. Note: - Position the antennas as far as 75 ohm or RF In), you will need an RF modulator in order to view DVD playback on the RF modulator. (It may have been.../AM antennas fix the claw into the slot 1 AM antenna 2 FM antenna SUB WOOFER LINE OUT 1 Use the composite video cable (yellow) to connect the DVD system's VIDEO OUT jack to the video input jack on the RF modulator. 2 Use an RF coaxial cable (not supplied) to connect ANTENNA OUT or...
See your electronics retailer or contact Philips for optimal reception. - Place the AM loop antenna on RF modulator availability and operations. Note: - Position the antennas as far as 75 ohm or RF In), you will need an RF modulator in order to view DVD playback on the RF modulator. (It may have been.../AM antennas fix the claw into the slot 1 AM antenna 2 FM antenna SUB WOOFER LINE OUT 1 Use the composite video cable (yellow) to connect the DVD system's VIDEO OUT jack to the video input jack on the RF modulator. 2 Use an RF coaxial cable (not supplied) to connect ANTENNA OUT or...
User manual
Page 15
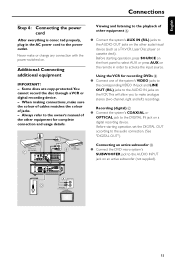
...Disc player or cassette deck). When making connections, make analogue stereo (two channel, right and left) recordings. Using the VCR for recording DVDs B ● Connect one of the system's VIDEO jacks to the corresponding VIDEO IN jack and LINE OUT (R/L) jacks to the AUDIO ... star ting operation, set the DIGITAL OUT according to the audio connection. (See "DIGITAL OUT".) Connecting an active subwoofer D ● Connect the DVD micro system's SUBWOOFER jack to the power outlet. SUB WOOFER D AUDIO INPUT A AUDIO OUT L R Television 15 English Connections Step 6: Connecting the...
...Disc player or cassette deck). When making connections, make analogue stereo (two channel, right and left) recordings. Using the VCR for recording DVDs B ● Connect one of the system's VIDEO jacks to the corresponding VIDEO IN jack and LINE OUT (R/L) jacks to the AUDIO ... star ting operation, set the DIGITAL OUT according to the audio connection. (See "DIGITAL OUT".) Connecting an active subwoofer D ● Connect the DVD micro system's SUBWOOFER jack to the power outlet. SUB WOOFER D AUDIO INPUT A AUDIO OUT L R Television 15 English Connections Step 6: Connecting the...
User manual
Page 16
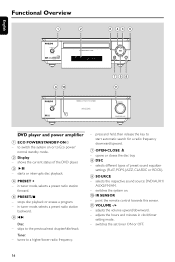
..., CLASSIC or ROCK). 9 SOURCE - tunes to start automatic search for a radio frequency downward/upward. 7 OPEN•CLOSE ç - selects different types of the DVD player. 3 ÉÅ - in tuner mode, selects a preset radio station forward. 5 PRESET-/9 - press and hold, then release the key to a higher/lower...opens or closes the disc tray. 8 DSC - point the remote control towards this sensor. ! selects the respective sound source: DVD/AUX1/ AUX2/FM/AM. - Tuner: - skips to Eco power/ normal standby mode. 2 Display - starts or interrupts disc playback. 4 PRESET + -
..., CLASSIC or ROCK). 9 SOURCE - tunes to start automatic search for a radio frequency downward/upward. 7 OPEN•CLOSE ç - selects different types of the DVD player. 3 ÉÅ - in tuner mode, selects a preset radio station forward. 5 PRESET-/9 - press and hold, then release the key to a higher/lower...opens or closes the disc tray. 8 DSC - point the remote control towards this sensor. ! selects the respective sound source: DVD/AUX1/ AUX2/FM/AM. - Tuner: - skips to Eco power/ normal standby mode. 2 Display - starts or interrupts disc playback. 4 PRESET + -
User manual
Page 17
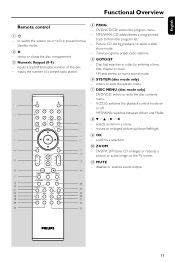
...- confirms a selection. 0 ZOOM - Picture CD: during playback, to Eco power/normal standby mode. 20 - FM: sets stereo or mono sound mode. 6 SYSTEM (disc mode only) - DVD/VCD: enters or exits the disc contents menu. - MP3/WMA: switches between Album and Filelist. 84 / 3 / 2 / 1 - MP3/WMA-CD: adds/deletes a programmed track to/.../Picture CD: enlarges or reduces a picture or active image on or off . - disables or enables sound output. 17 DVD/VCD/CD: enters the program menu. - enters or exits the system menu. 7 DISC MENU (disc mode only) - inputs a track/title/chapter number of a ...
...- confirms a selection. 0 ZOOM - Picture CD: during playback, to Eco power/normal standby mode. 20 - FM: sets stereo or mono sound mode. 6 SYSTEM (disc mode only) - DVD/VCD: enters or exits the disc contents menu. - MP3/WMA: switches between Album and Filelist. 84 / 3 / 2 / 1 - MP3/WMA-CD: adds/deletes a programmed track to/.../Picture CD: enlarges or reduces a picture or active image on or off . - disables or enables sound output. 17 DVD/VCD/CD: enters the program menu. - enters or exits the system menu. 7 DISC MENU (disc mode only) - inputs a track/title/chapter number of a ...

User manual
Page 18
.../TUNER/AUX - displays the system clock. 18 Eco power mode - selects different levels of a specific section on the system automatically. selects a DVD camera angle. £ DISPLAY - Functional Overview English @ TU Tuner - searches backward/forward in clock/timer setting mode. - switches the set ...timer ON or OFF. $ CH - Disc: skips to switch between AM and FM - selects the respective sound source for DVD - sets the system clock. selects an audio language. ∞ A-B - repeats playback of brightness for this version) - Disc - sets the...
.../TUNER/AUX - displays the system clock. 18 Eco power mode - selects different levels of a specific section on the system automatically. selects a DVD camera angle. £ DISPLAY - Functional Overview English @ TU Tuner - searches backward/forward in clock/timer setting mode. - switches the set ...timer ON or OFF. $ CH - Disc: skips to switch between AM and FM - selects the respective sound source for DVD - sets the system clock. selects an audio language. ∞ A-B - repeats playback of brightness for this version) - Disc - sets the...
User manual
Page 19
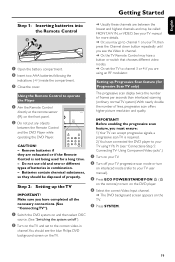
...the TV and set the TV to channel 3 or 4 if you are exhausted or if the Remote Control is required. 2) You have connected the DVD player to your TV user manual). 3 Press ECO POWER/STANDBY-ON B (B on the remote) to operate the Player 1 Aim the Remote Control ... turn on the TV. ➜ Usually these channels are between the Remote Control and the DVD Player while operating the DVD Player. Batteries contain chemical substances, so they are using Y Pb Pr (see the blue Philips DVD background screen on interlaced mode (refer to the correct video-in combination. - CAUTION! - ...
...the TV and set the TV to channel 3 or 4 if you are exhausted or if the Remote Control is required. 2) You have connected the DVD player to your TV user manual). 3 Press ECO POWER/STANDBY-ON B (B on the remote) to operate the Player 1 Aim the Remote Control ... turn on the TV. ➜ Usually these channels are between the Remote Control and the DVD Player while operating the DVD Player. Batteries contain chemical substances, so they are using Y Pb Pr (see the blue Philips DVD background screen on interlaced mode (refer to the correct video-in combination. - CAUTION! - ...
User manual
Page 20
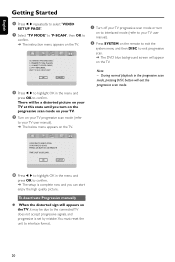
... picture on your TV user manual). 2 Press SYSTEM on the remote to exit the system menu and then DISC to exit progressive scan. ➜ The DVD blue background screen will appear on the TV. There will be due to interlace format. 20 Note: -
... picture on your TV user manual). 2 Press SYSTEM on the remote to exit the system menu and then DISC to exit progressive scan. ➜ The DVD blue background screen will appear on the TV. There will be due to interlace format. 20 Note: -
User manual
Page 21
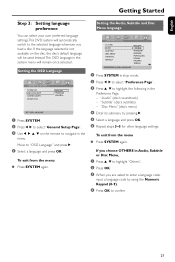
... and press OK. 6 Repeat steps 3~5 for other language settings. English Getting Started Step 3: Setting language preference You can select your own preferred language settings.This DVD system will remain once selected.
... and press OK. 6 Repeat steps 3~5 for other language settings. English Getting Started Step 3: Setting language preference You can select your own preferred language settings.This DVD system will remain once selected.
User manual
Page 23
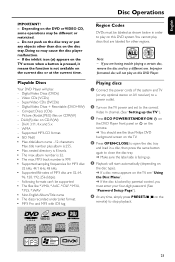
...; Make sure the label side is facing up the TV"). 3 Press ECO POWER/STANDBY-ON B on the DVD Player front panel or B on the remote. ➜ You should see the blue Philips DVD background screen on the TV. 4 Press OPEN•CLOSE to open the disc tray and load in order to...DivX(R) disc on the current disc or at the current time. DivX 3.11, 4.x and 5.x - title number plus album is not available on CD-R(W): - Region Codes DVDs must enter your four-digit password. (See "Password Setup Page"). 6 At any time, simply press PRESET-/9 (9 on CDR(W) - Picture (Kodak, JPEG) files on the...
...; Make sure the label side is facing up the TV"). 3 Press ECO POWER/STANDBY-ON B on the DVD Player front panel or B on the remote. ➜ You should see the blue Philips DVD background screen on the TV. 4 Press OPEN•CLOSE to open the disc tray and load in order to...DivX(R) disc on the current disc or at the current time. DivX 3.11, 4.x and 5.x - title number plus album is not available on CD-R(W): - Region Codes DVDs must enter your four-digit password. (See "Password Setup Page"). 6 At any time, simply press PRESET-/9 (9 on CDR(W) - Picture (Kodak, JPEG) files on the...
User manual
Page 24
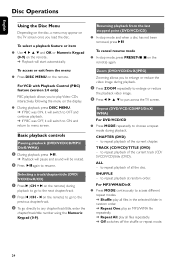
...or reduce the playback video image. 2 Press 1 2 3 4 to enlarge or reduce the video image during playback. Basic playback controls Pausing playback (DVD/VCD/CD/MP3/ DivX/WMA) 1 During playback, press ÉÅ. ➜ Playback will pause and sound will start automatically. For VCD with... Playback Control (PBC) feature (version 2.0 only) PBC playback allows you to pan across the TV screen. TRACK (CD/VCD)/TITLE (DVD) - to resume. to repeat playback at random order. To select a playback feature or item ● Use 1 2 3 4 and OK or Numeric...
...or reduce the playback video image. 2 Press 1 2 3 4 to enlarge or reduce the video image during playback. Basic playback controls Pausing playback (DVD/VCD/CD/MP3/ DivX/WMA) 1 During playback, press ÉÅ. ➜ Playback will pause and sound will start automatically. For VCD with... Playback Control (PBC) feature (version 2.0 only) PBC playback allows you to pan across the TV screen. TRACK (CD/VCD)/TITLE (DVD) - to resume. to repeat playback at random order. To select a playback feature or item ● Use 1 2 3 4 and OK or Numeric...
User manual
Page 25
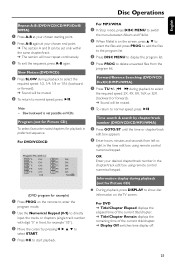
... or 32X (backward or forward). ➜ Sound will now repeat continuously. 3 To exit the sequence, press A-B again. English Disc Operations Repeat A-B (DVD/VCD/CD/MP3/DivX/ WMA) 1 Press A-B at your chosen starting point. 2 Press A-B again at your desired chapter/track number in the chapter/track... control numerical keypad. Note: - Time search & search by pressing 1 2 3 4 to select START. 4 Press OK to start playback. For DVD ➜ Title/Chapter Elapsed: displays the elapsed time of the current title/chapter. ➜ Title/Chapter Remain: displays the remaining time of the current...
... or 32X (backward or forward). ➜ Sound will now repeat continuously. 3 To exit the sequence, press A-B again. English Disc Operations Repeat A-B (DVD/VCD/CD/MP3/DivX/ WMA) 1 Press A-B at your chosen starting point. 2 Press A-B again at your desired chapter/track number in the chapter/track... control numerical keypad. Note: - Time search & search by pressing 1 2 3 4 to select START. 4 Press OK to start playback. For DVD ➜ Title/Chapter Elapsed: displays the elapsed time of the current title/chapter. ➜ Title/Chapter Remain: displays the remaining time of the current...
User manual
Page 26
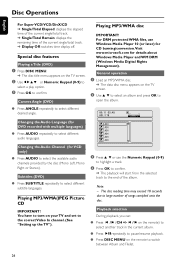
... songs compiled onto the disc . The disc reading time may exceed 10 seconds due to select different audio languages. Special disc features Playing a Title (DVD) 1 Press DISC MENU. ➜ The disc title menu appears on the TV screen. 2 Use 3 4 to select an album and press OK... to confirm. Camera Angle (DVD) ● Press ANGLE repeatedly to select different subtitle languages. Subtitles (DVD) ● Press SUBTITLE repeatedly to select different desired angle. General operation 1 Load an MP3/WMA disc. ➜ ...
... songs compiled onto the disc . The disc reading time may exceed 10 seconds due to select different audio languages. Special disc features Playing a Title (DVD) 1 Press DISC MENU. ➜ The disc title menu appears on the TV screen. 2 Use 3 4 to select an album and press OK... to confirm. Camera Angle (DVD) ● Press ANGLE repeatedly to select different subtitle languages. Subtitles (DVD) ● Press SUBTITLE repeatedly to select different desired angle. General operation 1 Load an MP3/WMA disc. ➜ ...


