
Leaflet
Page 1
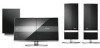
..., the HTS6600 delivers an embracing multi-channel surround experience from just two speakers, in for audio and video playback • USB Direct plays photos and music from Portable Media Players Philips DVD home theater system HTS6600 High performance surround sound with your Flat TV • Sophisticated design that matches any flat TV • Quick and easy set-up for no-fuss installation Connect and enjoy multiple sources • Connect your iPod for music playback from USB flash drives •...
..., the HTS6600 delivers an embracing multi-channel surround experience from just two speakers, in for audio and video playback • USB Direct plays photos and music from Portable Media Players Philips DVD home theater system HTS6600 High performance surround sound with your Flat TV • Sophisticated design that matches any flat TV • Quick and easy set-up for no-fuss installation Connect and enjoy multiple sources • Connect your iPod for music playback from USB flash drives •...
Leaflet
Page 2
... you change a disc or switch between movies and music. HDMI is a direct digital connection that feature default multi-channel surround settings, Smart Surround automatically changes the surround settings to the home theater system for High Definition Multimedia Interface. Your digital music and photos will be played directly from compact-sized subwoofers. DoubleBASS DoubleBASS ensures you to hook up the Philips dock to suit your music encoded in the audible range of multiple speakers and cables. USB Direct Simply plug your device into the USB port...
... you change a disc or switch between movies and music. HDMI is a direct digital connection that feature default multi-channel surround settings, Smart Surround automatically changes the surround settings to the home theater system for High Definition Multimedia Interface. Your digital music and photos will be played directly from compact-sized subwoofers. DoubleBASS DoubleBASS ensures you to hook up the Philips dock to suit your music encoded in the audible range of multiple speakers and cables. USB Direct Simply plug your device into the USB port...
Leaflet
Page 3
... • Playback Media: DVD-Video, DVD+R/+RW, DVDR/-RW, Video CD/SVCD, CD-R/CD-RW • Video disc playback system: NTSC, PAL Tuner/Reception/Transmission • Tuner Bands: AM, FM Connectivity • Front / Side connections: Dock connector, MP3 Line-in, USB • Rear Connections: HDMI output, Component Video output, Composite video (CVBS) output, TV in (audio, cinch), Interconnect (to Power Box) • Subwoofer (Power Box): Coaxial Digital input, AUX In (cinch, 2 pairs), FM Antenna, AM/MW Antenna, Easy Fit Speaker connectors, Interconnect (to Main Unit...
... • Playback Media: DVD-Video, DVD+R/+RW, DVDR/-RW, Video CD/SVCD, CD-R/CD-RW • Video disc playback system: NTSC, PAL Tuner/Reception/Transmission • Tuner Bands: AM, FM Connectivity • Front / Side connections: Dock connector, MP3 Line-in, USB • Rear Connections: HDMI output, Component Video output, Composite video (CVBS) output, TV in (audio, cinch), Interconnect (to Power Box) • Subwoofer (Power Box): Coaxial Digital input, AUX In (cinch, 2 pairs), FM Antenna, AM/MW Antenna, Easy Fit Speaker connectors, Interconnect (to Main Unit...
User manual
Page 2
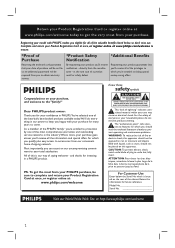
... to prevent operating and maintenance problems. WARNING: To reduce the risk of the cabinet. Dear PHILIPS product owner: Thank you for many years to obtain warranty service. *Product Safety Notification By registering your product, you'll receive notification - and thanks for future reference. NO USER-SERVICEABLE PARTS INSIDE. Return your Product Registration Card or register online at www.philips.com/welcome...
... to prevent operating and maintenance problems. WARNING: To reduce the risk of the cabinet. Dear PHILIPS product owner: Thank you for many years to obtain warranty service. *Product Safety Notification By registering your product, you'll receive notification - and thanks for future reference. NO USER-SERVICEABLE PARTS INSIDE. Return your Product Registration Card or register online at www.philips.com/welcome...
User manual
Page 4
... OUR TV SET COMPATIBILITY WITH THIS MODEL 525p AND 625p DVD PLAYER, PLEASE CONTACT OUR CUSTOMER SERVICE CENTER.' IN CASE OF 525 OR 625 PROGRESSIVE SCAN PICTURE PROBLEMS, IT IS RECOMMENDED THAT THE USER SWITCH THE CONNECTION TO THE 'STANDARD DEFINITION' OUTPUT. Français: Cet appareil numérique n'emet pas de bruits radioélectriques dépassant les limites applicables aux appareils num...
... OUR TV SET COMPATIBILITY WITH THIS MODEL 525p AND 625p DVD PLAYER, PLEASE CONTACT OUR CUSTOMER SERVICE CENTER.' IN CASE OF 525 OR 625 PROGRESSIVE SCAN PICTURE PROBLEMS, IT IS RECOMMENDED THAT THE USER SWITCH THE CONNECTION TO THE 'STANDARD DEFINITION' OUTPUT. Français: Cet appareil numérique n'emet pas de bruits radioélectriques dépassant les limites applicables aux appareils num...
User manual
Page 6
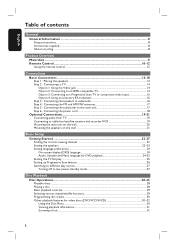
... On-screen display (OSD) language ...24 Audio, Subtitle and Menu language for DVD playback 24-25 Setting the TV Display ...25 Setting up Progressive Scan feature...26 Switching to different play source ...27 Turning off to low power standby mode 27 Disc Playback Disc Operations ...28-35 Playable discs ...28 Playing a disc ...28 Basic playback controls...29 Selecting various repeat/shuffle functions 29 Programming disc tracks...30 Other playback features for video discs (DVD/VCD/SVCD 30~32 Using the Disc Menu ...30 Viewing...
... On-screen display (OSD) language ...24 Audio, Subtitle and Menu language for DVD playback 24-25 Setting the TV Display ...25 Setting up Progressive Scan feature...26 Switching to different play source ...27 Turning off to low power standby mode 27 Disc Playback Disc Operations ...28-35 Playable discs ...28 Playing a disc ...28 Basic playback controls...29 Selecting various repeat/shuffle functions 29 Programming disc tracks...30 Other playback features for video discs (DVD/VCD/SVCD 30~32 Using the Disc Menu ...30 Viewing...

User manual
Page 7
... setup menu...39 General Setup Page...40 Audio Setup Page...41 Video Setup Page...42-43 Preference Setup Page ...44-45 Radio Tuning Radio Operations...46-47 Tuning to radio stations...46 Presetting radio stations ...46 Using auto install ...46-47 Using automatic preset...47 Using manual preset ...47 Selecting a preset radio station...47 Deleting a preset radio station...47 Others Sound and Volume Controls 48 Volume control ...48 Adjusting the Bass/ Treble level ...48 Selecting surround sound...48 Selecting digital sound effects...48 Other Features...49 Software upgrades ...49 Troubleshooting...
... setup menu...39 General Setup Page...40 Audio Setup Page...41 Video Setup Page...42-43 Preference Setup Page ...44-45 Radio Tuning Radio Operations...46-47 Tuning to radio stations...46 Presetting radio stations ...46 Using auto install ...46-47 Using automatic preset...47 Using manual preset ...47 Selecting a preset radio station...47 Deleting a preset radio station...47 Others Sound and Volume Controls 48 Volume control ...48 Adjusting the Bass/ Treble level ...48 Selecting surround sound...48 Selecting digital sound effects...48 Other Features...49 Software upgrades ...49 Troubleshooting...

User manual
Page 8
... for Apple iPod with adequate ventilation to a recycling center. If you are disposing of main unit wall mounting bracket - 1 remote control with batteries - 1 composite video cable (yellow) - 1 HDMI cable - 1 FM wire antenna - 1 AM/MW loop antenna - 1 MP3 LINE-IN cable (for connecting portable audio player) - 1 HTD7001 docking station for ventilation - Never place any userserviceable parts. Setup precautions Finding a suitable location - Allow at least 10 cm (4") clearance from the rear and the...
... for Apple iPod with adequate ventilation to a recycling center. If you are disposing of main unit wall mounting bracket - 1 remote control with batteries - 1 composite video cable (yellow) - 1 HDMI cable - 1 FM wire antenna - 1 AM/MW loop antenna - 1 MP3 LINE-IN cable (for connecting portable audio player) - 1 HTD7001 docking station for ventilation - Never place any userserviceable parts. Setup precautions Finding a suitable location - Allow at least 10 cm (4") clearance from the rear and the...

User manual
Page 9
... low power standby mode. Selects the relevant active source mode: DISC, DOCK, MP3 LINE-IN, RADIO FM, RADIO AM/MW, TV, AUX1, AUX2 or DIGITAL IN. Input for USB flash drive or USB memory card reader. Turns on your portable audio player. Input for iPod docking station (model HTD7001.) b USB jack - Phono input for first time setup. DISC: stops playback. - f ç - Press and hold this sensor. RADIO: starts auto radio installation for connecting to the headphone out jack on this unit or turns off to normal standby mode. - j SOURCE - k Display panel l Disc...
... low power standby mode. Selects the relevant active source mode: DISC, DOCK, MP3 LINE-IN, RADIO FM, RADIO AM/MW, TV, AUX1, AUX2 or DIGITAL IN. Input for USB flash drive or USB memory card reader. Turns on your portable audio player. Input for iPod docking station (model HTD7001.) b USB jack - Phono input for first time setup. DISC: stops playback. - f ç - Press and hold this sensor. RADIO: starts auto radio installation for connecting to the headphone out jack on this unit or turns off to normal standby mode. - j SOURCE - k Display panel l Disc...
User manual
Page 10
... modes; l AUDIO - b Source buttons - Sets the audio output delay times if the video playback is connected to turn off repeat or shuffle mode. RADIO: starts auto radio installation for Philips TVs or compatible brands only.) k REPEAT/SHUFFLE - RADIO: press and hold to the docking station. Adjusts the volume of the TV (for first time setup. DISC: selects an audio language/channel. - MP3 LINE-IN: switches to the audio device that is slower than the audio output. TV: switches to normal standby mode. - Opens/closes the disc compartment. d AUDIO SYNC - f DISPLAY - g PLAY...
... modes; l AUDIO - b Source buttons - Sets the audio output delay times if the video playback is connected to turn off repeat or shuffle mode. RADIO: starts auto radio installation for Philips TVs or compatible brands only.) k REPEAT/SHUFFLE - RADIO: press and hold to the docking station. Adjusts the volume of the TV (for first time setup. DISC: selects an audio language/channel. - MP3 LINE-IN: switches to the audio device that is slower than the audio output. TV: switches to normal standby mode. - Opens/closes the disc compartment. d AUDIO SYNC - f DISPLAY - g PLAY...

User manual
Page 11
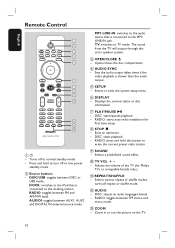
turns on/off PBC mode during playback. o OK - RADIO: press up or down to change the level setting. q TITLE 2 - Immediately after toggling, adjust the volume control to tune the radio frequency. - Switches the surround sound mode between Treble and Bass mode. x SELECT/PROGRAM - r PREV / REW ., NEXT / FFW > - t TREBLE / BASS - v AMBISOUND - Make multiple selection in stop mode; Selects a different viewing angle of the disc. - For VCD version 2.0 only; s MUTE - u VOL +- RADIO: press left or right to the main menu. During playback...
turns on/off PBC mode during playback. o OK - RADIO: press up or down to change the level setting. q TITLE 2 - Immediately after toggling, adjust the volume control to tune the radio frequency. - Switches the surround sound mode between Treble and Bass mode. x SELECT/PROGRAM - r PREV / REW ., NEXT / FFW > - t TREBLE / BASS - v AMBISOUND - Make multiple selection in stop mode; Selects a different viewing angle of the disc. - For VCD version 2.0 only; s MUTE - u VOL +- RADIO: press left or right to the main menu. During playback...

User manual
Page 22
... press the Channel Down button on your TVs remote control until 'DISC SOURCE' appears on the display panel (or DISC/USB on the remote control.) B Turn on the TV and switch it to continue. A Press SETUP on the Remote Control to the correct video-in the Setup Menu. You may press ° button repeatedly on your TVs remote control. Refer to your TVs user manual on how to exit. Before you see the speaker setup message on...
... press the Channel Down button on your TVs remote control until 'DISC SOURCE' appears on the display panel (or DISC/USB on the remote control.) B Turn on the TV and switch it to continue. A Press SETUP on the Remote Control to the correct video-in the Setup Menu. You may press ° button repeatedly on your TVs remote control. Refer to your TVs user manual on how to exit. Before you see the speaker setup message on...

User manual
Page 44
... the index menu and playback directly from 1 to 8 and press OK. 2) Use the numeric keypad 0-9 on the remote control to enter your four-digit password. Subtitle Select the preferred subtitle language for DVD playback. Display all discs to play Video CDs (2.0) interactively, following the menu on the display. { On } - Note: This unit can only be used instead. This is to prohibit viewing of discs. - The rating level feature does...
... the index menu and playback directly from 1 to 8 and press OK. 2) Use the numeric keypad 0-9 on the remote control to enter your four-digit password. Subtitle Select the preferred subtitle language for DVD playback. Display all discs to play Video CDs (2.0) interactively, following the menu on the display. { On } - Note: This unit can only be used instead. This is to prohibit viewing of discs. - The rating level feature does...
User manual
Page 48
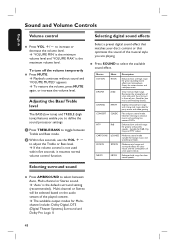
..., use the VOL +to adjust the Treble or Bass level. Î If the volume control is the default surround setting (recommended). GAMING PARTY Slightly enhanced low range and strong mid range ideal for lounge music and watching cartoons. CARTOONS LOUNGE Moderate sound mode suitable for party music and video gaming. Multi-channel or Stereo will be selected based on the audio stream of the musical style you are playing. To turn off the volume...
..., use the VOL +to adjust the Treble or Bass level. Î If the volume control is the default surround setting (recommended). GAMING PARTY Slightly enhanced low range and strong mid range ideal for lounge music and watching cartoons. CARTOONS LOUNGE Moderate sound mode suitable for party music and video gaming. Multi-channel or Stereo will be selected based on the audio stream of the musical style you are playing. To turn off the volume...
User manual
Page 50
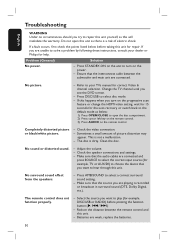
... channel selection. Change the TV channel until you turn on the power. - This is dirty. Clean the disc. The remote control does not function properly. - Reduce the distance between the subwoofer and main unit are playing is a risk of picture distortion may appear. Problem (General) No power. Adjust the volume. - Ensure that the source you are connected. Press DISC/USB to your dealer or Philips for the auto recovery or switch back to the default mode...
... channel selection. Change the TV channel until you turn on the power. - This is dirty. Clean the disc. The remote control does not function properly. - Reduce the distance between the subwoofer and main unit are playing is a risk of picture distortion may appear. Problem (General) No power. Adjust the volume. - Ensure that the source you are connected. Press DISC/USB to your dealer or Philips for the auto recovery or switch back to the default mode...
User manual
Page 51
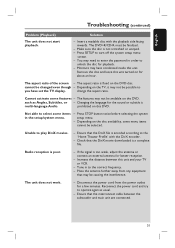
... system setup menu screen. - Ensure that the DivX movie downloaded is not scratched or warped. - Radio reception is fixed on the DVD disc. Increase the distance between the subwoofer and main unit are connected. 51 The DVD+R/CD-R must be changed even though - The aspect ratio is poor. - Tune in order to the correct frequency. - Make sure the disc is a complete file. Press STOP button twice before selecting...
... system setup menu screen. - Ensure that the DivX movie downloaded is not scratched or warped. - Radio reception is fixed on the DVD disc. Increase the distance between the subwoofer and main unit are connected. 51 The DVD+R/CD-R must be changed even though - The aspect ratio is poor. - Tune in order to the correct frequency. - Make sure the disc is a complete file. Press STOP button twice before selecting...

User manual
Page 52
Make sure that the audio output setting is only DVI/HDCP (High-bandwidth Digital Content Protection)-compatible. - No video output from iPod playback. - HDMI Setup - No picture after changing the HDMI video resolution. - Switch the HDMI video resolution to charge it again before use. 52 No video from HDMI connection. - Turn on the 'TV ON' setting of the USB flash drive. - If the battery level of your TV. Your TV cannot support the current HDMI video resolution. No audio output from the docking cradle and...
Make sure that the audio output setting is only DVI/HDCP (High-bandwidth Digital Content Protection)-compatible. - No video output from iPod playback. - HDMI Setup - No picture after changing the HDMI video resolution. - Switch the HDMI video resolution to charge it again before use. 52 No video from HDMI connection. - Turn on the 'TV ON' setting of the USB flash drive. - If the battery level of your TV. Your TV cannot support the current HDMI video resolution. No audio output from the docking cradle and...
User manual
Page 54
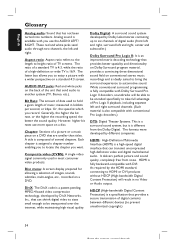
... the remote control directly Dolby Digital: A surround sound system developed by the HDMI standard, connecting to another system (TV, Stereo, etc.). While conventional surround programming is fully backward-compatible with you use more space on a DVD that provides better spatiality and directionality on Dolby Surround program material, provides a convincing three dimensional sound field on a standard 4:3 screen. HDMI is fully compatible with Dolby Surround Pro Logic II decoders, soundtracks will result in no Video or Audio output. Bit...
... the remote control directly Dolby Digital: A surround sound system developed by the HDMI standard, connecting to another system (TV, Stereo, etc.). While conventional surround programming is fully backward-compatible with you use more space on a DVD that provides better spatiality and directionality on Dolby Surround program material, provides a convincing three dimensional sound field on a standard 4:3 screen. HDMI is fully compatible with Dolby Surround Pro Logic II decoders, soundtracks will result in no Video or Audio output. Bit...
Quick start guide
Page 1
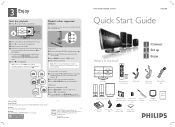
... the powerful surround sound from where it into the correct cradle. B Press PLAY on the multi-channel surround mode. Place the disc here B Place a disc with your USB device to press .. You can unplug your portable audio player. SAT AMBISOUND 1 Connect 2 Set up 3 Enjoy Main Unit Remote Control and 2 batteries HDMI cable Composite Video cable MP3 LINE-IN cable Speakers and subwoofer Main unit wall mounting bracket Speaker wall mount brackets (2x) FM wire antenna AM/MW loop antenna User Manual Docking station 3.5mm video iPod dock cable...
... the powerful surround sound from where it into the correct cradle. B Press PLAY on the multi-channel surround mode. Place the disc here B Place a disc with your USB device to press .. You can unplug your portable audio player. SAT AMBISOUND 1 Connect 2 Set up 3 Enjoy Main Unit Remote Control and 2 batteries HDMI cable Composite Video cable MP3 LINE-IN cable Speakers and subwoofer Main unit wall mounting bracket Speaker wall mount brackets (2x) FM wire antenna AM/MW loop antenna User Manual Docking station 3.5mm video iPod dock cable...
Quick start guide
Page 2
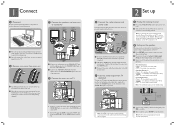
... subwoofer Subwoofer (rear) LEFT SPEAKER RIGHT SPEAKER SPEAKERS RIGHT LEFT FM/AM ANTENNA AM FM 75 L COAXIAL DIGITAL IN R AUX 1 AUX 2 SIRIUS TO MAIN UNIT MAINS SPEAKERS RIGHT LEFT A L AUDIO IN R VIDEO OUT TO SUBWOOFER Pr Pb Y COMPONENT VIDEO OUT HDMI OUT B TO SUBWOOFER Pr Pb Y A Connect the left speaker to the SPEAKER LEFT jack and the right speaker to get the sound output from the main unit. B Turn on the remote control to the SPEAKER RIGHT jack at the rear...
... subwoofer Subwoofer (rear) LEFT SPEAKER RIGHT SPEAKER SPEAKERS RIGHT LEFT FM/AM ANTENNA AM FM 75 L COAXIAL DIGITAL IN R AUX 1 AUX 2 SIRIUS TO MAIN UNIT MAINS SPEAKERS RIGHT LEFT A L AUDIO IN R VIDEO OUT TO SUBWOOFER Pr Pb Y COMPONENT VIDEO OUT HDMI OUT B TO SUBWOOFER Pr Pb Y A Connect the left speaker to the SPEAKER LEFT jack and the right speaker to get the sound output from the main unit. B Turn on the remote control to the SPEAKER RIGHT jack at the rear...


