User manual
Page 5
...cables/other devices 16 7 Adjust settings 39 Attach table stand to DVD Home General setup 39 Theater unit 18 Audio setup 41 Mount the DVD Home Theater unit 18 Video setup 42 Mount the speakers 19 Preference Setup 44 4 Get started 20 8 Additional information 47 Prepare the remote control 20 ... software 47 Find the correct viewing channel 21 Care 47 Select menu display language 21 Specifications 48 Start Ambisound setup 22 Turn on Progressive Scan 23 Activate EasyLink control 24 9 Troubleshooting 49 Select a play source 25 10 Glossary 51 EN 5
...cables/other devices 16 7 Adjust settings 39 Attach table stand to DVD Home General setup 39 Theater unit 18 Audio setup 41 Mount the DVD Home Theater unit 18 Video setup 42 Mount the speakers 19 Preference Setup 44 4 Get started 20 8 Additional information 47 Prepare the remote control 20 ... software 47 Find the correct viewing channel 21 Care 47 Select menu display language 21 Specifications 48 Start Ambisound setup 22 Turn on Progressive Scan 23 Activate EasyLink control 24 9 Troubleshooting 49 Select a play source 25 10 Glossary 51 EN 5
User manual
Page 8
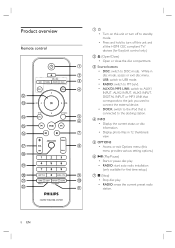
... to the docking station. e OPTIONS • Access or exit Options menu (this unit and all the HDMI CEC compliant TV/ devices (for first time setup.) g x (Stop) • Stop disc play . • RADIO: start auto radio installation (only available for EasyLink control only.) b Z (Open/Close) • Open or close the disc...
... to the docking station. e OPTIONS • Access or exit Options menu (this unit and all the HDMI CEC compliant TV/ devices (for first time setup.) g x (Stop) • Stop disc play . • RADIO: start auto radio installation (only available for EasyLink control only.) b Z (Open/Close) • Open or close the disc...
User manual
Page 10
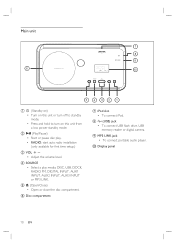
... turn on this unit from a low power standby mode. d SOURCE • Select a play . • RADIO: start auto radio installation (only available for first time setup.) c VOL +• Adjust the volume level. e Z (Open/Close) • Open or close the disc compartment. h (USB) jack • To connect USB flash drive, USB...
... turn on this unit from a low power standby mode. d SOURCE • Select a play . • RADIO: start auto radio installation (only available for first time setup.) c VOL +• Adjust the volume level. e Z (Open/Close) • Open or close the disc compartment. h (USB) jack • To connect USB flash drive, USB...
User manual
Page 13
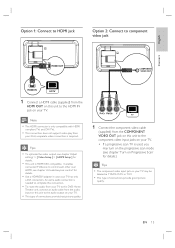
... connected TV/device to the HDMI IN jack on your TV. EN 13 Tips • To optimize the video output, see chapter 'Adjust settings' > [ Video Setup ] > [ HDMI Setup ] for details. • Use a HDMI/DVI adaptor in case your TV has only a DVI connection. Note • The HDMI connector is only compatible with...
... connected TV/device to the HDMI IN jack on your TV. EN 13 Tips • To optimize the video output, see chapter 'Adjust settings' > [ Video Setup ] > [ HDMI Setup ] for details. • Use a HDMI/DVI adaptor in case your TV has only a DVI connection. Note • The HDMI connector is only compatible with...
User manual
Page 21
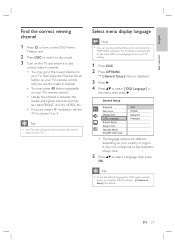
...the lowest channel on your TV, then press the Channel Down button on your TVs remote control until you see chapter 'Adjust settings' - [ Preference Setup ] for details. EN 21 It may not correspond to the illustration shown here. 5 Press vV to select a language, then press OK. It ...switches automatically to the same OSD menu language as per your TV setting. 1 Press DISC. 2 Press OPTIONS. [ General Setup ] menu is connected to a HDMI CEC compliant TV. Tips • To set the TV to channel 3 or 4. English Get started Find the correct viewing...
...the lowest channel on your TV, then press the Channel Down button on your TVs remote control until you see chapter 'Adjust settings' - [ Preference Setup ] for details. EN 21 It may not correspond to the illustration shown here. 5 Press vV to select a language, then press OK. It ...switches automatically to the same OSD menu language as per your TV setting. 1 Press DISC. 2 Press OPTIONS. [ General Setup ] menu is connected to a HDMI CEC compliant TV. Tips • To set the TV to channel 3 or 4. English Get started Find the correct viewing...
User manual
Page 22
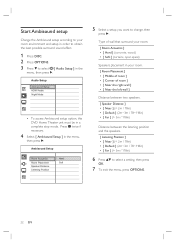
...) Speakers placement in a complete stop mode. Press x twice if necessary. 4 Select [ Ambisound Setup ] in the menu, then press B. Start Ambisound setup Change the Ambisound setup according to your room environment and setup in order to obtain the best possible surround sound effect. 1 Press DISC. 2 Press OPTIONS. ...3 Press V to select [ Audio Setup ] in the menu, then press B. Audio Setup Ambisound Setup HDMI Audio Night Mode • To access Ambisound setup option, this DVD Home Theater unit must be in your room. [ Room Placement ] &#...
...) Speakers placement in a complete stop mode. Press x twice if necessary. 4 Select [ Ambisound Setup ] in the menu, then press B. Start Ambisound setup Change the Ambisound setup according to your room environment and setup in order to obtain the best possible surround sound effect. 1 Press DISC. 2 Press OPTIONS. ...3 Press V to select [ Audio Setup ] in the menu, then press B. Audio Setup Ambisound Setup HDMI Audio Night Mode • To access Ambisound setup option, this DVD Home Theater unit must be in your room. [ Room Placement ] &#...
User manual
Page 23
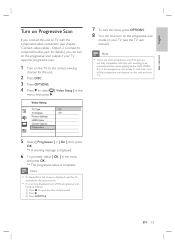
... Type On TV Display Off Picture Settings HDMI Setup Closed Caption Progressive 7 To exit the menu, press OPTIONS. 8 You can turn off the progressive scan mode as follows: 1) Press Z to open the disc compartment. 2) ... are some progressive scan TVs that are not fully compatible with this unit. 2 Press DISC. 3 Press OPTIONS. 4 Press V to select [ Video Setup ] in the menu, then press B. The progressive setup is displayed. 6 To proceed, select [ OK ] in the menu and press OK. English Get started Turn on Progressive Scan If you can...
... Type On TV Display Off Picture Settings HDMI Setup Closed Caption Progressive 7 To exit the menu, press OPTIONS. 8 You can turn off the progressive scan mode as follows: 1) Press Z to open the disc compartment. 2) ... are some progressive scan TVs that are not fully compatible with this unit. 2 Press DISC. 3 Press OPTIONS. 4 Press V to select [ Video Setup ] in the menu, then press B. The progressive setup is displayed. 6 To proceed, select [ OK ] in the menu and press OK. English Get started Turn on Progressive Scan If you can...

User manual
Page 24
...connected to HDMI CEC compliant TV/device. One touch power off this unit will turn on your TV/ devices. 1 Press DISC. 2 Press OPTIONS. [ General Setup ] menu is found in the factory. 5 Select [ System Audio Control ] > [ On ], then press OK. 6 Select [ Audio Input Mapping ], then... B. 4 Select [ EasyLink ], then press B. One touch play function, a video disc must be placed in the disc compartment before operation. • Philips does not guarantee 100% interoperability with one touch play [ Auto Wake-up from standby mode and start , ensure that an audio connection has been made...
...connected to HDMI CEC compliant TV/device. One touch power off this unit will turn on your TV/ devices. 1 Press DISC. 2 Press OPTIONS. [ General Setup ] menu is found in the factory. 5 Select [ System Audio Control ] > [ On ], then press OK. 6 Select [ Audio Input Mapping ], then... B. 4 Select [ EasyLink ], then press B. One touch play function, a video disc must be placed in the disc compartment before operation. • Philips does not guarantee 100% interoperability with one touch play [ Auto Wake-up from standby mode and start , ensure that an audio connection has been made...

User manual
Page 28
...;ve seconds, press VOL +- Access VCD menu The PBC (Playback Control) for PBC is on. To change the default setting, see chapter 'Adjust settings' [ Preference Setup ] > [ PBC ] for audio output.
...;ve seconds, press VOL +- Access VCD menu The PBC (Playback Control) for PBC is on. To change the default setting, see chapter 'Adjust settings' [ Preference Setup ] > [ PBC ] for audio output.
User manual
Page 29
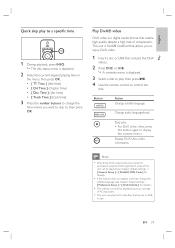
...English Play Quick skip play . • For DivX Ultra video, press this unit can be played (see chapter 'Adjust settings' > [ General Setup ] > [ DivX(R) VOD Code ] for details). • If the subtitle does not appear correctly, change the subtitle language (see chapter 'Adjust settings' [ ...Preference Setup ] > [ DivX Subtitle ] for details.) • The subtitle can only be displayed up to 4GB in the menu, then press OK. • [ TT ...
...English Play Quick skip play . • For DivX Ultra video, press this unit can be played (see chapter 'Adjust settings' > [ General Setup ] > [ DivX(R) VOD Code ] for details). • If the subtitle does not appear correctly, change the subtitle language (see chapter 'Adjust settings' [ ...Preference Setup ] > [ DivX Subtitle ] for details.) • The subtitle can only be displayed up to 4GB in the menu, then press OK. • [ TT ...

User manual
Page 30
... this unit will not be played on the disc type. Tips • To display the data disc contents without folders, see chapter 'Adjust settings' - [ Preference Setup ] > [ MP3/JPEG Nav ] for details. 30 EN Play MP3/WMA music MP3/WMA is a type of the current track or jump to the main menu...
... this unit will not be played on the disc type. Tips • To display the data disc contents without folders, see chapter 'Adjust settings' - [ Preference Setup ] > [ MP3/JPEG Nav ] for details. 30 EN Play MP3/WMA music MP3/WMA is a type of the current track or jump to the main menu...

User manual
Page 39
... Input Mapping ] to scan and map all the linked devices response or react to HDMI CEC compliant TV/ device. General Setup EasyLink Disc Lock Display Dim OSD Language Screen Saver Sleep Timer Standby Mode DivX(R) VOD Code • See the explanations of... of this unit is displayed. 2 Press B. 3 Select an option, then press OK. Symbol Options [ General Setup ] [ Audio Setup ] [ Video Setup ] [ Preference Setup ] General setup 1 Press OPTIONS. [ General Setup ] menu is connected to certain commands simultaneously with one touch control. It enables all the connected devices.
... Input Mapping ] to scan and map all the linked devices response or react to HDMI CEC compliant TV/ device. General Setup EasyLink Disc Lock Display Dim OSD Language Screen Saver Sleep Timer Standby Mode DivX(R) VOD Code • See the explanations of... of this unit is displayed. 2 Press B. 3 Select an option, then press OK. Symbol Options [ General Setup ] [ Audio Setup ] [ Video Setup ] [ Preference Setup ] General setup 1 Press OPTIONS. [ General Setup ] menu is connected to certain commands simultaneously with one touch control. It enables all the connected devices.

User manual
Page 40
Tips • To set the screen saver to appear after the preset time. • [ Off ] - set or change your password, go to [ Preference Setup ] > [ Password ]. [ Display Dim ] Change the brightness level of inactivity (for too long. • [ On ] - low standby power consumption. Select the ...to protect the TV screen from being damage due to over exposure to map (e.g. Before you want to play restriction for details. • Philips does not guarantee 100% interoperability with HDMI CEC. • You must turn on the HDMI CEC operations on the screen saver mode. all ...
Tips • To set the screen saver to appear after the preset time. • [ Off ] - set or change your password, go to [ Preference Setup ] > [ Password ]. [ Display Dim ] Change the brightness level of inactivity (for too long. • [ On ] - low standby power consumption. Select the ...to protect the TV screen from being damage due to over exposure to map (e.g. Before you want to play restriction for details. • Philips does not guarantee 100% interoperability with HDMI CEC. • You must turn on the HDMI CEC operations on the screen saver mode. all ...
User manual
Page 41
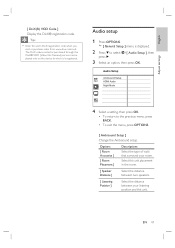
Audio setup 1 Press OPTIONS. [ General Setup ] menu is registered. Tips • Enter this unit. Select this unit placement in the room. [ Speaker Distance ] Select the distance between two speakers. [ Listening Position ... 2 Press V to the previous menu, press BACK. • To exit the menu, press OPTIONS. [ Ambisound Setup ] Change the Ambisound setup. Audio Setup Ambisound Setup HDMI Audio Night Mode 4 Select a setting, then press OK. • To return to select [ Audio Setup ], then press B. 3 Select an option, then press OK. EN 41 Options [ Room Acoustics ] [ Room ...
Audio setup 1 Press OPTIONS. [ General Setup ] menu is registered. Tips • Enter this unit. Select this unit placement in the room. [ Speaker Distance ] Select the distance between two speakers. [ Listening Position ... 2 Press V to the previous menu, press BACK. • To exit the menu, press OPTIONS. [ Ambisound Setup ] Change the Ambisound setup. Audio Setup Ambisound Setup HDMI Audio Night Mode 4 Select a setting, then press OK. • To return to select [ Audio Setup ], then press B. 3 Select an option, then press OK. EN 41 Options [ Room Acoustics ] [ Room ...
User manual
Page 42
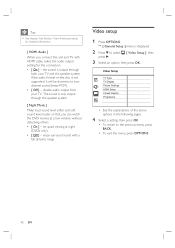
...• [ On ] - the sound is only output through both your TV. for this unit and TV with a full dynamic range. Video setup 1 Press OPTIONS. [ General Setup ] menu is not supported, it will be downmix to twochannel sound (linear-PCM). • [ Off ] - If the audio format on...displayed. 2 Press V to the previous menu, press BACK. • To exit the menu, press OPTIONS. 42 EN Video Setup TV Type TV Display Picture Settings HDMI Setup Closed Caption Progressive • See the explanations of the above options in the following pages. 4 Select a setting, then press OK...
...• [ On ] - the sound is only output through both your TV. for this unit and TV with a full dynamic range. Video setup 1 Press OPTIONS. [ General Setup ] menu is not supported, it will be downmix to twochannel sound (linear-PCM). • [ Off ] - If the audio format on...displayed. 2 Press V to the previous menu, press BACK. • To exit the menu, press OPTIONS. 42 EN Video Setup TV Type TV Display Picture Settings HDMI Setup Closed Caption Progressive • See the explanations of the above options in the following pages. 4 Select a setting, then press OK...
User manual
Page 43
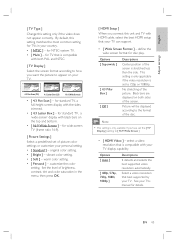
...can support. • [ Wide Screen Format ] - EN 43 for standard TV, a full-height screen display with HDMI cable, select the best HDMI setup that best supported by your TVs manual for details. warm color setting. • [ Personal ] - customize the color setting. See your TV. By ... TV display capability. English Adjust settings [ TV Type ] Change this setting matches the most common setting for TVs in the menu, then press OK. [ HDMI Setup ] When you connect this unit and TV with the sides trimmed. • [ 4:3 Letter Box ] - vibrant color setting. • [ Soft ] -...
...can support. • [ Wide Screen Format ] - EN 43 for standard TV, a full-height screen display with HDMI cable, select the best HDMI setup that best supported by your TVs manual for details. warm color setting. • [ Personal ] - customize the color setting. See your TV. By ... TV display capability. English Adjust settings [ TV Type ] Change this setting matches the most common setting for TVs in the menu, then press OK. [ HDMI Setup ] When you connect this unit and TV with the sides trimmed. • [ 4:3 Letter Box ] - vibrant color setting. • [ Soft ] -...

User manual
Page 44
...the explanations of this feature. • [ Off ] - Note • If the setting is displayed. 2 Press V to select then press B. [ Preference Setup ], 3 Select an option, then press OK. turn on or off display captions. • [ On ] - Turn on Progressive Scan' for auto recover or... If your TV can support progressive signals, you can activate the progressive scan mode of the above options in subtitle. Preference Setup 1 Press OPTIONS. [ General Setup ] menu is not compatible with Closed Caption information included and your TV, a blank screen appears. Only applicable to the ...
...the explanations of this feature. • [ Off ] - Note • If the setting is displayed. 2 Press V to select then press B. [ Preference Setup ], 3 Select an option, then press OK. turn on or off display captions. • [ On ] - Turn on Progressive Scan' for auto recover or... If your TV can support progressive signals, you can activate the progressive scan mode of the above options in subtitle. Preference Setup 1 Press OPTIONS. [ General Setup ] menu is not compatible with Closed Caption information included and your TV, a blank screen appears. Only applicable to the ...
User manual
Page 45
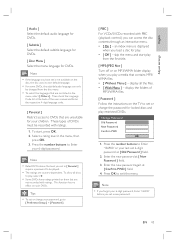
... ratings are not listed in the menu, then press OK. 3. Enter the new password at [ Confirm PWD ] field. 4. Press OK to [ Preference Setup ] > [ Password ]. [ PBC ] For VCDs/SVCDs recorded with PBC (playback control,) you can only be recorded with ratings. To start play from the disc menu. •...
... ratings are not listed in the menu, then press OK. 3. Enter the new password at [ Confirm PWD ] field. 4. Press OK to [ Preference Setup ] > [ Password ]. [ PBC ] For VCDs/SVCDs recorded with PBC (playback control,) you can only be recorded with ratings. To start play from the disc menu. •...

User manual
Page 47
...;rm update operation. English Additional information 8 Additional information Update software Philips provides software updates to reboot the system. Preference Setup Disc Menu Parental PBC MP3/JPEG Nav Password DivX Subtitle Version Info Default 2 Select [ Preference Setup ] > [ Version Info ], then press OK. 3 Write ...down the version number, then press OPTIONS to exit the menu. 4 Go to www.philips.com/support to check the latest software version available for a...
...;rm update operation. English Additional information 8 Additional information Update software Philips provides software updates to reboot the system. Preference Setup Disc Menu Parental PBC MP3/JPEG Nav Password DivX Subtitle Version Info Default 2 Select [ Preference Setup ] > [ Version Info ], then press OK. 3 Write ...down the version number, then press OPTIONS to exit the menu. 4 Go to www.philips.com/support to check the latest software version available for a...
User manual
Page 52
... of the original product's warranty, whichever provides longer coverage for installation or setup of improper installation or maintenance, connections to damage caused by service performed by some retailers. Contact Philips Customer Care Center at no signature verification receipt can be sent if all... defects in delay. Replacement product can result in materials and workmanship as refurbished or renewed carries a ninety (90) day limited warranty. Philips, P.O. WHAT IS NOT COVERED - Box 671539, Marietta, GA. 30006-0026 3121 233 48802 52 EN When a product or part is...
... of the original product's warranty, whichever provides longer coverage for installation or setup of improper installation or maintenance, connections to damage caused by service performed by some retailers. Contact Philips Customer Care Center at no signature verification receipt can be sent if all... defects in delay. Replacement product can result in materials and workmanship as refurbished or renewed carries a ninety (90) day limited warranty. Philips, P.O. WHAT IS NOT COVERED - Box 671539, Marietta, GA. 30006-0026 3121 233 48802 52 EN When a product or part is...
