
User manual
Page 4
...Serial Bus Implementers Forum, Inc. Plays all versions of DivX ® video (including DivX ® 6) with enhanced playback of Philips Electronics North America Corp. IN CASE OF 525 OR 625 PROGRESSIVE SCAN PICTURE PROBLEMS, IT IS RECOMMENDED THAT THE USER SWITCH THE ...HIGH DEFINITION TELEVISION SETS ARE FULLY COMPATIBLE WITH THIS PRODUCT AND MAY CAUSE ARTIFACTS TO BE DISPLAYED IN THE PICTURE. Declaration of Conformity Model number: HTS6515D Trade Name: Philips Responsible Party: Philips Consumer Lifestyle A Division of DivX® media files and the DivX® ...
...Serial Bus Implementers Forum, Inc. Plays all versions of DivX ® video (including DivX ® 6) with enhanced playback of Philips Electronics North America Corp. IN CASE OF 525 OR 625 PROGRESSIVE SCAN PICTURE PROBLEMS, IT IS RECOMMENDED THAT THE USER SWITCH THE ...HIGH DEFINITION TELEVISION SETS ARE FULLY COMPATIBLE WITH THIS PRODUCT AND MAY CAUSE ARTIFACTS TO BE DISPLAYED IN THE PICTURE. Declaration of Conformity Model number: HTS6515D Trade Name: Philips Responsible Party: Philips Consumer Lifestyle A Division of DivX® media files and the DivX® ...
User manual
Page 5
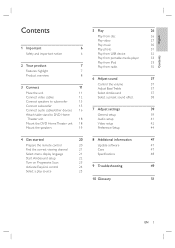
... 44 4 Get started 20 8 Additional information 47 Prepare the remote control 20 Update software 47 Find the correct viewing channel 21 Care 47 Select menu display language 21 Specifications 48 Start Ambisound setup 22 Turn on Progressive Scan 23 Activate EasyLink control 24 9 Troubleshooting 49 Select a play source 25...
... 44 4 Get started 20 8 Additional information 47 Prepare the remote control 20 Update software 47 Find the correct viewing channel 21 Care 47 Select menu display language 21 Specifications 48 Start Ambisound setup 22 Turn on Progressive Scan 23 Activate EasyLink control 24 9 Troubleshooting 49 Select a play source 25...
User manual
Page 8
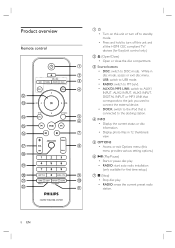
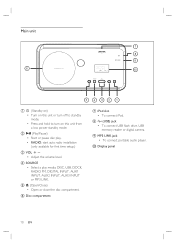
.../ devices (for first time setup.) g x (Stop) • Stop disc play. • RADIO: erase the current preset radio station. d INFO • Display the current status or disc information. • Display photo files in disc mode, access or exit disc menu. • USB: switch to USB mode. • RADIO: switch to FM...
.../ devices (for first time setup.) g x (Stop) • Stop disc play. • RADIO: erase the current preset radio station. d INFO • Display the current status or disc information. • Display photo files in disc mode, access or exit disc menu. • USB: switch to USB mode. • RADIO: switch to FM...
User manual
Page 9
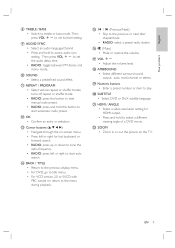
n BACK / TITLE • Return to the previous display menu. • For DVD, go to title menu. • For VCD version 2.0 or SVCD with PBC turned on the TV. EN 9 English Your product h TREBLE / ...
n BACK / TITLE • Return to the previous display menu. • For DVD, go to title menu. • For VCD version 2.0 or SVCD with PBC turned on the TV. EN 9 English Your product h TREBLE / ...
User manual
Page 10
... MP3 LINK. d SOURCE • Select a play . • RADIO: start auto radio installation (only available for first time setup.) c VOL +• Adjust the volume level. j Display panel 10 EN e Z (Open/Close) • Open or close the disc compartment. i MP3 LINK jack • To connect portable audio player. f Disc compartment g iPod slot...
... MP3 LINK. d SOURCE • Select a play . • RADIO: start auto radio installation (only available for first time setup.) c VOL +• Adjust the volume level. j Display panel 10 EN e Z (Open/Close) • Open or close the disc compartment. i MP3 LINK jack • To connect portable audio player. f Disc compartment g iPod slot...
User manual
Page 16
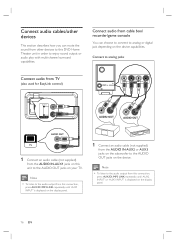
...8226; To listen to the audio output from this connection, press AUX/DI /MP3 LINK repeatedly until 'AUX2 INPUT' or 'AUX3 INPUT' is displayed on the display panel. 1 Connect an audio cable (not supplied) from other devices to this unit to the AUDIO OUT jacks on your TV. Connect to ...for EasyLink control) 1 Connect an audio cable (not supplied) from this connection, press AUX/DI /MP3 LINK repeatedly until 'AUX1 INPUT' is displayed on the display panel. 16 EN Connect audio cables/other devices This section describes how you can choose to connect to analog or digital jack depending on...
...8226; To listen to the audio output from this connection, press AUX/DI /MP3 LINK repeatedly until 'AUX2 INPUT' or 'AUX3 INPUT' is displayed on the display panel. 1 Connect an audio cable (not supplied) from other devices to this unit to the AUDIO OUT jacks on your TV. Connect to ...for EasyLink control) 1 Connect an audio cable (not supplied) from this connection, press AUX/DI /MP3 LINK repeatedly until 'AUX1 INPUT' is displayed on the display panel. 16 EN Connect audio cables/other devices This section describes how you can choose to connect to analog or digital jack depending on...

User manual
Page 17
... on such devices. • To listen to the audio output from this connection, press AUX/DI /MP3 LINK repeatedly until 'DIGITAL INPUT' is displayed on the device. English Connect Connect to digital jack Connect portable media player COAXIAL DIGITAL IN MP3 LINK MP3 1 Connect a coaxial cable (not supplied...press USB. Note • To listen to the audio output from this connection, press AUX/DI /MP3 LINK repeatedly until 'MP3 LINK' is displayed on the display panel. 1 Connect a 3.5mm stereo audio cable (not supplied) from the MP3 LINK jack on this unit to the phone jack on your ...
... on such devices. • To listen to the audio output from this connection, press AUX/DI /MP3 LINK repeatedly until 'DIGITAL INPUT' is displayed on the device. English Connect Connect to digital jack Connect portable media player COAXIAL DIGITAL IN MP3 LINK MP3 1 Connect a coaxial cable (not supplied...press USB. Note • To listen to the audio output from this connection, press AUX/DI /MP3 LINK repeatedly until 'MP3 LINK' is displayed on the display panel. 1 Connect a 3.5mm stereo audio cable (not supplied) from the MP3 LINK jack on this unit to the phone jack on your ...
User manual
Page 21
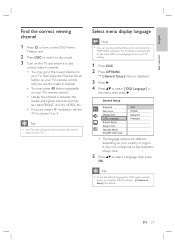
... TV, then press the Channel Down button on your TVs remote control until you are different depending on your TV. General Setup EasyLink Disc Lock Display Dim OSD Language Screen Saver Sleep Timer Standby Mode DivX(R) VOD Code Auto English Espanõl Français • The language options are ... manual on how to select the correct input on your country or region. Tips • To set the TV to channel 3 or 4. Select menu display language Note • You can skip this setting if this channel is between the lowest and highest channels and may be called FRONT, A/V IN, VIDEO...
... TV, then press the Channel Down button on your TVs remote control until you are different depending on your TV. General Setup EasyLink Disc Lock Display Dim OSD Language Screen Saver Sleep Timer Standby Mode DivX(R) VOD Code Auto English Espanõl Français • The language options are ... manual on how to select the correct input on your country or region. Tips • To set the TV to channel 3 or 4. Select menu display language Note • You can skip this setting if this channel is between the lowest and highest channels and may be called FRONT, A/V IN, VIDEO...
User manual
Page 23
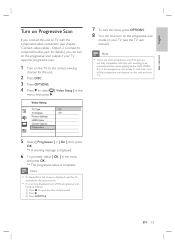
...TVs that are not fully compatible with the component video connection (see chapter 'Connect video cables - EN 23 Note • If a blank/distorted screen is displayed, wait for 15 seconds for this unit. 2 Press DISC. 3 Press OPTIONS. 4 Press V to open the disc compartment. 2) Press B. 3) Press SUBTITLE... Connect to component video jack' for details,) you connect this unit to the correct viewing channel for the auto recover. • If no picture displayed, turn off the progressive scan mode as follows: 1) Press Z to select [ Video Setup ] in the menu, then press B. Video Setup TV ...
...TVs that are not fully compatible with the component video connection (see chapter 'Connect video cables - EN 23 Note • If a blank/distorted screen is displayed, wait for 15 seconds for this unit. 2 Press DISC. 3 Press OPTIONS. 4 Press V to open the disc compartment. 2) Press B. 3) Press SUBTITLE... Connect to component video jack' for details,) you connect this unit to the correct viewing channel for the auto recover. • If no picture displayed, turn off the progressive scan mode as follows: 1) Press Z to select [ Video Setup ] in the menu, then press B. Video Setup TV ...

User manual
Page 24
...Select [ Audio Input Mapping ], then press OK. 24 EN It switches automatically to the correct viewing channel. General Setup EasyLink Disc Lock Display Dim OSD Language Screen Saver Sleep Timer Standby Mode DivX(R) VOD Code Auto Wake-up TV System Standby System Audio Control Audio Input Mapping ...devices Note • Before you start disc play function, a video disc must be placed in the disc compartment before operation. • Philips does not guarantee 100% interoperability with all the linked devices response or react to certain commands simultaneously with one touch play (if a ...
...Select [ Audio Input Mapping ], then press OK. 24 EN It switches automatically to the correct viewing channel. General Setup EasyLink Disc Lock Display Dim OSD Language Screen Saver Sleep Timer Standby Mode DivX(R) VOD Code Auto Wake-up TV System Standby System Audio Control Audio Input Mapping ...devices Note • Before you start disc play function, a video disc must be placed in the disc compartment before operation. • Philips does not guarantee 100% interoperability with all the linked devices response or react to certain commands simultaneously with one touch play (if a ...

User manual
Page 25
... [ AUX1 Input ] and map with the TV (brand name) at the right panel. 8 Select the audio input of devices. DIGITAL INPUT DIGITAL IN-COAXIAL jack. Display Device connected to select: DISC > USB > DOCK > RADIO FM > DIGITAL INPUT > AUX1 INPUT > AUX2 INPUT > AUX3 INPUT > MP3 LINK > DISC ...... AUX2 INPUT AUDIO IN-AUX2 jacks. EN 25 AUX1 Input, AUX2 Input), then press B. 9 Select the correct device that is displayed. Once complete, audio input mapping menu is used to connect to select other HDMI device (e.g. On the remote control • Press DISC to switch to...
... [ AUX1 Input ] and map with the TV (brand name) at the right panel. 8 Select the audio input of devices. DIGITAL INPUT DIGITAL IN-COAXIAL jack. Display Device connected to select: DISC > USB > DOCK > RADIO FM > DIGITAL INPUT > AUX1 INPUT > AUX2 INPUT > AUX3 INPUT > MP3 LINK > DISC ...... AUX2 INPUT AUDIO IN-AUX2 jacks. EN 25 AUX1 Input, AUX2 Input), then press B. 9 Select the correct device that is displayed. Once complete, audio input mapping menu is used to connect to select other HDMI device (e.g. On the remote control • Press DISC to switch to...
User manual
Page 26
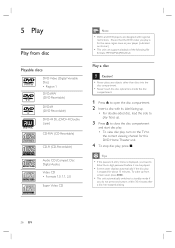
... channel for about 15 minutes. To wake up . 3 Press Z to close the disc compartment and start disc play. • To view disc play is displayed, you have to open the disc compartment. 2 Insert a disc with regional restrictions. Ensure that the DVD video you do not press any objects other than... touch the disc optical lens inside the disc compar tment. 1 Press Z to Enter the 6-digit password before it can be played. • Screen saver displays automatically if the disc play , turn on its label facing up. • For double-sided disc, load the side to play faces up from disc...
... channel for about 15 minutes. To wake up . 3 Press Z to close the disc compartment and start disc play. • To view disc play is displayed, you have to open the disc compartment. 2 Insert a disc with regional restrictions. Ensure that the DVD video you do not press any objects other than... touch the disc optical lens inside the disc compar tment. 1 Press Z to Enter the 6-digit password before it can be played. • Screen saver displays automatically if the disc play , turn on its label facing up. • For double-sided disc, load the side to play faces up from disc...

User manual
Page 27
English Play Play video Note • For video disc, playback always resumes from the beginning, press í while the message is displayed. Button Action Pause/ resume play . Search backward/ forward. • To change the video play. To start playback from the...Play a title. 2 Use the remote control to discs with multiple subtitle language. Jump to DVDs that contain sequences recorded from different camera angles. Display current play status. • You can change play speed, press this button repeatedly. View DVD play is turned off repeat mode. • ...
English Play Play video Note • For video disc, playback always resumes from the beginning, press í while the message is displayed. Button Action Pause/ resume play . Search backward/ forward. • To change the video play. To start playback from the...Play a title. 2 Use the remote control to discs with multiple subtitle language. Jump to DVDs that contain sequences recorded from different camera angles. Display current play status. • You can change play speed, press this button repeatedly. View DVD play is turned off repeat mode. • ...

User manual
Page 28
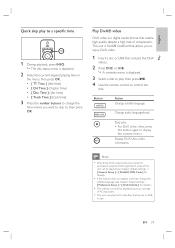
... to the title menu during playback, press TITLE. to set the delay time for details. 1 Press and hold AUDIO SYNC until 'AUDIO SYNC XXX' is displayed. • 'XXX' denotes the delay time. 2 Within five seconds, press VOL +- Access DVD menu Sync audio output with video play If the video play... the menu (if the PBC mode is on.) Tips • The default setting for PBC is on by default in a VCD, the contents menu is displayed. 1 Press vV to select a play option, then press OK to start play. • If PBC is off, it resumes normal volume control function. 28 EN...
... to the title menu during playback, press TITLE. to set the delay time for details. 1 Press and hold AUDIO SYNC until 'AUDIO SYNC XXX' is displayed. • 'XXX' denotes the delay time. 2 Within five seconds, press VOL +- Access DVD menu Sync audio output with video play If the video play... the menu (if the PBC mode is on.) Tips • The default setting for PBC is on by default in a VCD, the contents menu is displayed. 1 Press vV to select a play option, then press OK to start play. • If PBC is off, it resumes normal volume control function. 28 EN...
User manual
Page 29
... INFO. Button Action Change subtitle language. Note • Only those DivX videos that allows you want to skip to, then press OK. This unit is displayed. 3 Select a title to play, then press u. 4 Use the remote control to 4GB in the menu, then press OK. • [ TT Time ] (title time) • [ CH...that retains high quality despite a high rate of 45 characters. • This unit can play . • For DivX Ultra video, press this unit can be displayed up to control the title. The disc status menu is a digital media format that contains the DivX videos. 2 Press DISC or USB.
... INFO. Button Action Change subtitle language. Note • Only those DivX videos that allows you want to skip to, then press OK. This unit is displayed. 3 Select a title to play, then press u. 4 Use the remote control to 4GB in the menu, then press OK. • [ TT Time ] (title time) • [ CH...that retains high quality despite a high rate of 45 characters. • This unit can play . • For DivX Ultra video, press this unit can be displayed up to control the title. The disc status menu is a digital media format that contains the DivX videos. 2 Press DISC or USB.

User manual
Page 30
... on the disc type. To start playback from the point where it might not be displayed or played. Button Action Pause/ resume play . A contents menu is displayed. 3 Select a folder, then press OK. 4 Select a track to play mode; Toggle through various repeat/ shuffle play , then ...press u. • To return to the next track. Tips • To display the data disc contents without folders, see chapter 'Adjust settings' - [ Preference Setup ] > [ MP3/JPEG Nav ] for details. 30 EN Play music Note...
... on the disc type. To start playback from the point where it might not be displayed or played. Button Action Pause/ resume play . A contents menu is displayed. 3 Select a folder, then press OK. 4 Select a track to play mode; Toggle through various repeat/ shuffle play , then ...press u. • To return to the next track. Tips • To display the data disc contents without folders, see chapter 'Adjust settings' - [ Preference Setup ] > [ MP3/JPEG Nav ] for details. 30 EN Play music Note...
User manual
Page 31
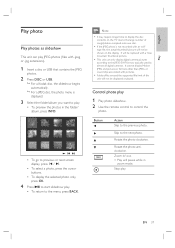
... a 'blue mountain' thumbnail picture. • This unit can play . English Play Play photo Play photos as slideshow This unit can only display digital camera pictures according to the large number of this unit will not be shown on the TV due to the JPEG-EXIF format, typically...with pictures. • Folders/files exceed the supported file limit of songs/photos compiled onto one disc. • If the JPEG photo is displayed. 3 Select the folder/album you want to play. • To preview the photos in zoom mode. For a Kodak disc, the slideshow begins automatically...
... a 'blue mountain' thumbnail picture. • This unit can play . English Play Play photo Play photos as slideshow This unit can only display digital camera pictures according to the large number of this unit will not be shown on the TV due to the JPEG-EXIF format, typically...with pictures. • Folders/files exceed the supported file limit of songs/photos compiled onto one disc. • If the JPEG photo is displayed. 3 Select the folder/album you want to play. • To preview the photos in zoom mode. For a Kodak disc, the slideshow begins automatically...

User manual
Page 32
... files that are not supported. 32 EN Play from USB device This unit can be stored on this unit. 2 Press USB. A contents menu is displayed. 3 Select a file to create musical slideshow. Play musical slideshow Play MP3/WMA music files and JPEG photo files simultaneously to play, then...
... files that are not supported. 32 EN Play from USB device This unit can be stored on this unit. 2 Press USB. A contents menu is displayed. 3 Select a file to create musical slideshow. Play musical slideshow Play MP3/WMA music files and JPEG photo files simultaneously to play, then...
User manual
Page 33
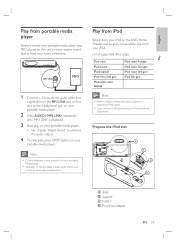
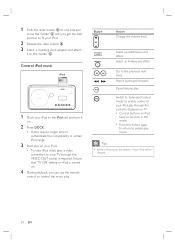
... to this DVD Home Theater unit to enhance the audio output. 4 To stop play, press STOP button on your iPod. Note • Control playback is displayed. 3 Start play on your portable media player. • See chapter 'Adjust Sound' to enjoy music/video play from your portable media player. Prepare the ... iPod range: iPod mini iPod touch iPod classic iPod mini 2nd gen iPod with color display iPod nano 1st gen iPod nano 2nd gen iPod nano 3rd gen iPod 5th gen Note • Refer to Philips website for latest updates on the portable media player before you switch to the 'headphone...
... to this DVD Home Theater unit to enhance the audio output. 4 To stop play, press STOP button on your iPod. Note • Control playback is displayed. 3 Start play on your portable media player. • See chapter 'Adjust Sound' to enjoy music/video play from your portable media player. Prepare the ... iPod range: iPod mini iPod touch iPod classic iPod mini 2nd gen iPod with color display iPod nano 1st gen iPod nano 2nd gen iPod nano 3rd gen iPod 5th gen Note • Refer to Philips website for latest updates on the portable media player before you switch to the 'headphone...
User manual
Page 34
... dock adaptor and attach it on. 2 Press DOCK. • It may require longer time to authenticate the compatibility of your iPod play through the contents displayed on TV. • Control buttons on iPod have no function in iPod mode, the battery of certain iPod range. 3 Start play on your iPod. •...
... dock adaptor and attach it on. 2 Press DOCK. • It may require longer time to authenticate the compatibility of your iPod play through the contents displayed on TV. • Control buttons on iPod have no function in iPod mode, the battery of certain iPod range. 3 Start play on your iPod. •...


