
Leaflet
Page 1
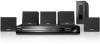
Philips DVD home theater system HTS3011 Powerful home theater Relax and immerse yourself in movies in FM tuner • Plays DivX, MP3, WMA and JPEG digital camera photos • Plays CD, (S)... • DivX Ultra Certified for enhanced playback of disc. Bring audio and video to life • Dolby Digital and Pro Logic II surround sound • 12-bit/108MHz video processing for sharp, natural images • Advanced Class D Amplifier for compact, powerful sound Easy to set up • Easy-fit™ connectors...
Philips DVD home theater system HTS3011 Powerful home theater Relax and immerse yourself in movies in FM tuner • Plays DivX, MP3, WMA and JPEG digital camera photos • Plays CD, (S)... • DivX Ultra Certified for enhanced playback of disc. Bring audio and video to life • Dolby Digital and Pro Logic II surround sound • 12-bit/108MHz video processing for sharp, natural images • Advanced Class D Amplifier for compact, powerful sound Easy to set up • Easy-fit™ connectors...
Leaflet
Page 2
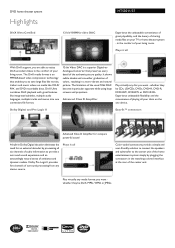
...quality. Dolby Pro Logic II provides five channels of colors, resulting in the comfort of your discs on the one convenient file format. 12-bit Video DAC is an MPEG4-based video compression technology that preserves every detail of the usual 10bit DAC become in particular apparent while...CDs, (S)VCDs, DVDs, DVD+R, DVD-R, DVD+RW, DVD-RW or DVD+R DL. DVD home theater system Highlights DivX Ultra Certified 12-bit/108MHz video DAC HTS3011/37 Experience the unbeatable convenience of great playability, and the luxury of sharing media files on your living room. Play virtually any stereo...
...quality. Dolby Pro Logic II provides five channels of colors, resulting in the comfort of your discs on the one convenient file format. 12-bit Video DAC is an MPEG4-based video compression technology that preserves every detail of the usual 10bit DAC become in particular apparent while...CDs, (S)VCDs, DVDs, DVD+R, DVD-R, DVD+RW, DVD-RW or DVD+R DL. DVD home theater system Highlights DivX Ultra Certified 12-bit/108MHz video DAC HTS3011/37 Experience the unbeatable convenience of great playability, and the luxury of sharing media files on your living room. Play virtually any stereo...
Leaflet
Page 3
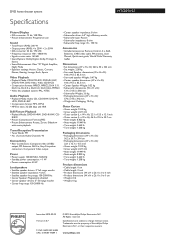
... Weight: 3.6 kg • Packaging dimensions (W x H x D): 570 x 310 x 392 mm • Weight incl. DVD home theater system Specifications HTS3011/37 Picture/Display • D/A converter: 12 bit, 108 MHz • Picture enhancement: Progressive scan Sound • Total Power (RMS): 200 W • Output power (RMS): 4 x 25W ... Picture Enhancement: Rotate, Zoom, Slideshow with music playback Tuner/Reception/Transmission • Tuner Bands: FM • No. of Koninklijke Philips Electronics N.V. Packaging: 10.4 kg Outer Carton • Gross weight: 10.03 kg • Gross weight: 22.112 lb • Outer...
... Weight: 3.6 kg • Packaging dimensions (W x H x D): 570 x 310 x 392 mm • Weight incl. DVD home theater system Specifications HTS3011/37 Picture/Display • D/A converter: 12 bit, 108 MHz • Picture enhancement: Progressive scan Sound • Total Power (RMS): 200 W • Output power (RMS): 4 x 25W ... Picture Enhancement: Rotate, Zoom, Slideshow with music playback Tuner/Reception/Transmission • Tuner Bands: FM • No. of Koninklijke Philips Electronics N.V. Packaging: 10.4 kg Outer Carton • Gross weight: 10.03 kg • Gross weight: 22.112 lb • Outer...
User manual
Page 2
...purchase, and welcome to your Product Registration Card at once, or register online at http://www.philips.com/welcome 2 1_hts3011_37_eng 3_final809.indd2 2 2008-02-26 2:12:28 PM Congratulations on our uncompromising commitment to the "family!" Most importantly, you 'll receive... notification - Model No Serial No Visit our World Wide Web Site at www.philips.com/welcome to accessories from the manufacturer...
...purchase, and welcome to your Product Registration Card at once, or register online at http://www.philips.com/welcome 2 1_hts3011_37_eng 3_final809.indd2 2 2008-02-26 2:12:28 PM Congratulations on our uncompromising commitment to the "family!" Most importantly, you 'll receive... notification - Model No Serial No Visit our World Wide Web Site at www.philips.com/welcome to accessories from the manufacturer...

User manual
Page 3
...apparatus combination to environmental considerations. Use only with the cart, stand, tripod, bracket, or table specified by the manufacturer. 12. disconnect power: unplug the power cord from the apparatus. 11.Only use this apparatus during lightning storms or when unused for replacement ... the other apparatus (including amplifiers) that the unit has a double insulation system 3 1_hts3011_37_eng 3_final809.indd3 3 2008-02-26 2:12:29 PM Install in bodily injury, property damage, or damage to dripping or splashing. 17.Do not place any way, such as radiators...
...apparatus combination to environmental considerations. Use only with the cart, stand, tripod, bracket, or table specified by the manufacturer. 12. disconnect power: unplug the power cord from the apparatus. 11.Only use this apparatus during lightning storms or when unused for replacement ... the other apparatus (including amplifiers) that the unit has a double insulation system 3 1_hts3011_37_eng 3_final809.indd3 3 2008-02-26 2:12:29 PM Install in bodily injury, property damage, or damage to dripping or splashing. 17.Do not place any way, such as radiators...
User manual
Page 4
... foam sheet.) Your system consists of packaging materials, exhausted batteries and old equipment. 1_hts3011_37_eng 3_final809.indd4 4 2008-02-26 2:12:29 PM Cet appareil numérique de la classe B est conforme à la norme NMB-003 du Canada. This... los aquí descritos puede ocasionar peligro de exposición a radiación. Declaration of Conformity Model number: HTS3011 Trade Name: Philips Responsible Party: Philips Consumer Electronics A Division of Communications. AVOID DIRECT EXPOSURE TO BEAM. 4 Environmental information All unnecessary packaging has been omitted...
... foam sheet.) Your system consists of packaging materials, exhausted batteries and old equipment. 1_hts3011_37_eng 3_final809.indd4 4 2008-02-26 2:12:29 PM Cet appareil numérique de la classe B est conforme à la norme NMB-003 du Canada. This... los aquí descritos puede ocasionar peligro de exposición a radiación. Declaration of Conformity Model number: HTS3011 Trade Name: Philips Responsible Party: Philips Consumer Electronics A Division of Communications. AVOID DIRECT EXPOSURE TO BEAM. 4 Environmental information All unnecessary packaging has been omitted...
User manual
Page 5
... DISPLAYED IN THE PICTURE. Plays all versions of the following measures: - However, there is no guarantee that is prohibited. 5 1_hts3011_37_eng 3_final809.indd5 5 2008-02-26 2:12:29 PM patents and other rights owners. Reserve engineering or disassembly is protected by Macrovision Corporation and other intellectual property rights owned by method claims...
... DISPLAYED IN THE PICTURE. Plays all versions of the following measures: - However, there is no guarantee that is prohibited. 5 1_hts3011_37_eng 3_final809.indd5 5 2008-02-26 2:12:29 PM patents and other rights owners. Reserve engineering or disassembly is protected by Macrovision Corporation and other intellectual property rights owned by method claims...
User manual
Page 6
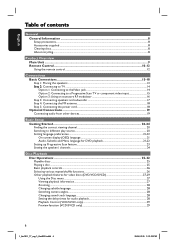
English Table of contents General General Information ...8 Setup precautions...8 Accessories supplied ...8 Cleaning discs ...8 About recycling...8 Product Overview Main Unit ...9 Remote Control ...10-12 Using the remote control ...12 Connections Basic Connections ...13-18 Step 1: Placing the speakers...13 Step 2: Connecting to TV ...14 Option 1: Connecting to theVideo jack 14 Option 2: Connecting to a Progressive... the delay times for audio playback 28 Playback Control (VCD/SVCD only)...29 Preview function (VCD/SVCD only) ...29 6 1_hts3011_37_eng 3_final809.indd6 6 2008-02-26 2:12:30 PM
English Table of contents General General Information ...8 Setup precautions...8 Accessories supplied ...8 Cleaning discs ...8 About recycling...8 Product Overview Main Unit ...9 Remote Control ...10-12 Using the remote control ...12 Connections Basic Connections ...13-18 Step 1: Placing the speakers...13 Step 2: Connecting to TV ...14 Option 1: Connecting to theVideo jack 14 Option 2: Connecting to a Progressive... the delay times for audio playback 28 Playback Control (VCD/SVCD only)...29 Preview function (VCD/SVCD only) ...29 6 1_hts3011_37_eng 3_final809.indd6 6 2008-02-26 2:12:30 PM
User manual
Page 7
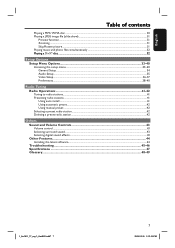
... sound effects...43 Other Features...44 Installing the latest software ...44 Troubleshooting...45-46 Specifications ...47 Glossary...48-49 1_hts3011_37_eng 3_final809.indd7 7 7 2008-02-26 2:12:30 PM
... sound effects...43 Other Features...44 Installing the latest software ...44 Troubleshooting...45-46 Specifications ...47 Glossary...48-49 1_hts3011_37_eng 3_final809.indd7 7 7 2008-02-26 2:12:30 PM

User manual
Page 8
... (e.g., liquid filled objects, lighted candles). The electronic equipment contains a large number of packaging materials, exhausted batteries and old equipment. 8 1_hts3011_37_eng 3_final809.indd8 8 2008-02-26 2:12:30 PM Please observe the local regulations regarding disposal of materials that can damage this unit on a flat, hard and stable surface. Never place the...
... (e.g., liquid filled objects, lighted candles). The electronic equipment contains a large number of packaging materials, exhausted batteries and old equipment. 8 1_hts3011_37_eng 3_final809.indd8 8 2008-02-26 2:12:30 PM Please observe the local regulations regarding disposal of materials that can damage this unit on a flat, hard and stable surface. Never place the...

User manual
Page 9
Turns on this unit or turns off to erase the current preset radio station. 1_hts3011_37_eng 3_final809.indd9 9 9 2008-02-26 2:12:31 PM e IR Sensor - RADIO: starts auto radio installation for first time setup. h SOURCE - j VOL - Adjusts the volume level. f PLAY/ PAUSE u - Selects multi-channel surround ...
Turns on this unit or turns off to erase the current preset radio station. 1_hts3011_37_eng 3_final809.indd9 9 9 2008-02-26 2:12:31 PM e IR Sensor - RADIO: starts auto radio installation for first time setup. h SOURCE - j VOL - Adjusts the volume level. f PLAY/ PAUSE u - Selects multi-channel surround ...

User manual
Page 10
... or disc information. f OK - g vVbB - i u (Play/Pause) - j x (Stop) - Enters a track/title/chapter number of a preset radio station. 10 1_hts3011_37_eng 3_final809.indd10 10 2008-02-26 2:12:31 PM b ç (Open/Close) - turns off to start manual preset programming. - e INFO - DISC: press left or right to erase the current preset radio station...
... or disc information. f OK - g vVbB - i u (Play/Pause) - j x (Stop) - Enters a track/title/chapter number of a preset radio station. 10 1_hts3011_37_eng 3_final809.indd10 10 2008-02-26 2:12:31 PM b ç (Open/Close) - turns off to start manual preset programming. - e INFO - DISC: press left or right to erase the current preset radio station...
User manual
Page 11
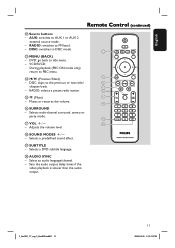
... Sets the audio output delay times if the video playback is slower than the audio output. 1_hts3011_37_eng 3_final809.indd11 11 11 2008-02-26 2:12:31 PM RADIO: switches to the previous or next title/ 14 chapter/track. 15 - DISC: switches to title menu. - Selects ...DVD subtitle language. Adjusts the volume level. r SOUND MODES +/- English Remote Control (continued) l Source buttons - s SUBTITLE - DVD: go back to DISC mode. 12 m MENU (BACK) - AUX: switches to PBC menu. VCD/SVCD: During playback (PBC ON mode only) return to AUX 1 or AUX 2 external source mode....
... Sets the audio output delay times if the video playback is slower than the audio output. 1_hts3011_37_eng 3_final809.indd11 11 11 2008-02-26 2:12:31 PM RADIO: switches to the previous or next title/ 14 chapter/track. 15 - DISC: switches to title menu. - Selects ...DVD subtitle language. Adjusts the volume level. r SOUND MODES +/- English Remote Control (continued) l Source buttons - s SUBTITLE - DVD: go back to DISC mode. 12 m MENU (BACK) - AUX: switches to PBC menu. VCD/SVCD: During playback (PBC ON mode only) return to AUX 1 or AUX 2 external source mode....

User manual
Page 12
... panel. E Select the source you wish to open the battery compartment. Remove batteries if they should be used for example í, ë). 12 1_hts3011_37_eng 3_final809.indd12 12 2008-02-26 2:12:31 PM B Insert two batteries type R03 or AAA, following the indications (+-) inside the compartment. F Then select the desired function (for a long...
... panel. E Select the source you wish to open the battery compartment. Remove batteries if they should be used for example í, ë). 12 1_hts3011_37_eng 3_final809.indd12 12 2008-02-26 2:12:31 PM B Insert two batteries type R03 or AAA, following the indications (+-) inside the compartment. F Then select the desired function (for a long...

User manual
Page 13
... speakers at an angle of the room. English Basic Connections REAR LEFT LFERFOTNT CENTER RFRIGOHNTT REAR RIGHT Step 1: Placing the speakers The Philips Home Theater System is localized. B Place the center speaker above the TV or the main unit such that are labelled as FRONT LEFT... optimum sound experience. For speaker setting, see 'Getting Started Setting the speakers' channels'. 1_hts3011_37_eng 3_final809.indd13 13 13 2008-02-26 2:12:31 PM SUBWOOFER Helpful Hints: - The placement diagram shown here is critical to your room layout that provides great system performance. The...
... speakers at an angle of the room. English Basic Connections REAR LEFT LFERFOTNT CENTER RFRIGOHNTT REAR RIGHT Step 1: Placing the speakers The Philips Home Theater System is localized. B Place the center speaker above the TV or the main unit such that are labelled as FRONT LEFT... optimum sound experience. For speaker setting, see 'Getting Started Setting the speakers' channels'. 1_hts3011_37_eng 3_final809.indd13 13 13 2008-02-26 2:12:31 PM SUBWOOFER Helpful Hints: - The placement diagram shown here is critical to your room layout that provides great system performance. The...

User manual
Page 14
... to enjoy optimum video quality. - Helpful Hint: - For a standard TV, follow option 3. It provides good picture quality. 14 1_hts3011_37_eng 3_final809.indd14 14 2008-02-26 2:12:31 PM For a progressive scan TV, follow option 2. -
... to enjoy optimum video quality. - Helpful Hint: - For a standard TV, follow option 3. It provides good picture quality. 14 1_hts3011_37_eng 3_final809.indd14 14 2008-02-26 2:12:31 PM For a progressive scan TV, follow option 2. -

User manual
Page 15
... progressive signals, proceed to chapter 'Getting Started Setting up Progressive Scan feature' for detailed progressive feature setup. 1_hts3011_37_eng 3_final809.indd15 15 15 2008-02-26 2:12:31 PM
... progressive signals, proceed to chapter 'Getting Started Setting up Progressive Scan feature' for detailed progressive feature setup. 1_hts3011_37_eng 3_final809.indd15 15 15 2008-02-26 2:12:31 PM

User manual
Page 16
...) to connect the CVBS jack on the main unit to the video input jack on the TV. 16 1_hts3011_37_eng 3_final809.indd16 16 2008-02-26 2:12:31 PM See your TV previously. English Basic Connections (continued) Antenna Main Unit (rear) Back of RF Modulator (example only) Option 3: Using an accessory RF... an RF modulator in order to view the DVD playback on the RF modulator. (It may have been connected to your electronics retailer or contact Philips for details about RF modulator availability and operations.
...) to connect the CVBS jack on the main unit to the video input jack on the TV. 16 1_hts3011_37_eng 3_final809.indd16 16 2008-02-26 2:12:31 PM See your TV previously. English Basic Connections (continued) Antenna Main Unit (rear) Back of RF Modulator (example only) Option 3: Using an accessory RF... an RF modulator in order to view the DVD playback on the RF modulator. (It may have been connected to your electronics retailer or contact Philips for details about RF modulator availability and operations.

User manual
Page 17
English FRONT RIGHT Basic Connections (continued) FRONT CENTRE FRONT LEFT REAR LEFT REAR RIGHT SUBWOOFER Main Unit (rear) Step 3: Connecting speakers and subwoofer Connect all the speakers and subwoofer to the main unit, subwoofer, AC power adapter, TV or any other radiation sources. 1_hts3011_37_eng 3_final809.indd17 17 17 2008-02-26 2:12:31 PM To prevent unwanted noise, never place the speakers too close to the matching jacks at the rear of the main unit, Make sure that the colors of the cables and jacks are matched. Helpful Hint: -
English FRONT RIGHT Basic Connections (continued) FRONT CENTRE FRONT LEFT REAR LEFT REAR RIGHT SUBWOOFER Main Unit (rear) Step 3: Connecting speakers and subwoofer Connect all the speakers and subwoofer to the main unit, subwoofer, AC power adapter, TV or any other radiation sources. 1_hts3011_37_eng 3_final809.indd17 17 17 2008-02-26 2:12:31 PM To prevent unwanted noise, never place the speakers too close to the matching jacks at the rear of the main unit, Make sure that the colors of the cables and jacks are matched. Helpful Hint: -

User manual
Page 18
Position the antenna as far away as possible from the power outlet. 18 1_hts3011_37_eng 3_final809.indd18 18 2008-02-26 2:12:32 PM Step 5: Connecting the power cord After everything is connected properly, connect the AC power cord into the power outlet. Refer to the type ...
Position the antenna as far away as possible from the power outlet. 18 1_hts3011_37_eng 3_final809.indd18 18 2008-02-26 2:12:32 PM Step 5: Connecting the power cord After everything is connected properly, connect the AC power cord into the power outlet. Refer to the type ...


