
Leaflet
Page 1
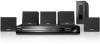
...; Advanced Class D Amplifier for compact, powerful sound Easy to set up • Easy-fit™ connectors with color-coding for a simple set-up Play all your very own living room. Philips DVD home theater system HTS3011 Powerful home theater Relax and immerse yourself in movies in FM tuner • Plays DivX, MP3, WMA and JPEG digital camera photos • Plays CD, (S)VCD, DVD, DVD+R/RW, DVD-R/RW, DVD+R DL Enjoy high quality multi-channel surround sound from practically...
...; Advanced Class D Amplifier for compact, powerful sound Easy to set up • Easy-fit™ connectors with color-coding for a simple set-up Play all your very own living room. Philips DVD home theater system HTS3011 Powerful home theater Relax and immerse yourself in movies in FM tuner • Plays DivX, MP3, WMA and JPEG digital camera photos • Plays CD, (S)VCD, DVD, DVD+R/RW, DVD-R/RW, DVD+R DL Enjoy high quality multi-channel surround sound from practically...
Leaflet
Page 3
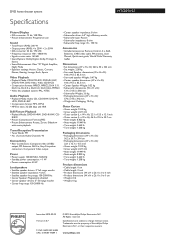
... the property of preset Audio Channels: 40 Connectivity • Rear Connections: Composite video (CVBS) output, FM Antenna, AUX in, Easy-Fit speaker connectors, Component Video output Power • Power supply: 120/230VAC, 50/60Hz • Standby power consumption: < 1 W • Power consumption: 40 W Loudspeakers • Satellite speaker drivers: 3" full range woofer • Satellite speaker impedance: 4 ohm • Satellite speaker freq range: 150-20000 Hz • Center Speaker: Magnetically shielded • Center speaker drivers: 3" full range woofer • Center freq range: 150...
... the property of preset Audio Channels: 40 Connectivity • Rear Connections: Composite video (CVBS) output, FM Antenna, AUX in, Easy-Fit speaker connectors, Component Video output Power • Power supply: 120/230VAC, 50/60Hz • Standby power consumption: < 1 W • Power consumption: 40 W Loudspeakers • Satellite speaker drivers: 3" full range woofer • Satellite speaker impedance: 4 ohm • Satellite speaker freq range: 150-20000 Hz • Center Speaker: Magnetically shielded • Center speaker drivers: 3" full range woofer • Center freq range: 150...
User manual
Page 2
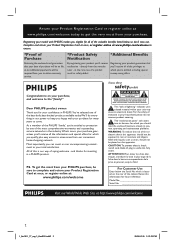
... shock. Dear PHILIPS product owner: Thank you 'll receive all of lightning" indicates uninsulated material within your Product Registration Card at once, or register online at : www.philips.com/welcome Know these safetysymbols CAUTION RISK OF ELECTRIC SHOCK DO NOT OPEN CAUTION: TO REDUCE THE RISK OF ELECTRIC SHOCK, DO NOT REMOVE COVER (OR BACK). Model No Serial...
... shock. Dear PHILIPS product owner: Thank you 'll receive all of lightning" indicates uninsulated material within your Product Registration Card at once, or register online at : www.philips.com/welcome Know these safetysymbols CAUTION RISK OF ELECTRIC SHOCK DO NOT OPEN CAUTION: TO REDUCE THE RISK OF ELECTRIC SHOCK, DO NOT REMOVE COVER (OR BACK). Model No Serial...
User manual
Page 4
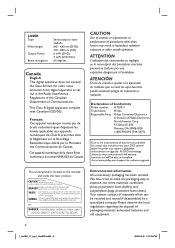
...) 6 mW (DVD) 7 mW (VCD/CD) 60 degrees Canada English: This digital apparatus does not exceed the Class B limits for radio noise emissions from digital apparatus as set out in the Radio Interference Regulations of the Canadian Department of procedures other than herein may result in hazardous radiation exposure or other unsafe operation. CAUTION Use of controls or adjustments or performance...
...) 6 mW (DVD) 7 mW (VCD/CD) 60 degrees Canada English: This digital apparatus does not exceed the Class B limits for radio noise emissions from digital apparatus as set out in the Radio Interference Regulations of the Canadian Department of procedures other than herein may result in hazardous radiation exposure or other unsafe operation. CAUTION Use of controls or adjustments or performance...
User manual
Page 5
... are used in a particular installation. Connect the equipment into an outlet on , the user is encouraged to try to radio communications. Consult the dealer or an experienced radio/TV technician for home and other countries. IF THERE ARE QUESTIONS REGARDING OUR TV SET COMPATIBILITY WITH THIS MODEL 525p AND 625p DVD PLAYER, PLEASE CONTACT OUR CUSTOMER SERVICE CENTER.' Official DivX® Ultra Certified product. Plays...
... are used in a particular installation. Connect the equipment into an outlet on , the user is encouraged to try to radio communications. Consult the dealer or an experienced radio/TV technician for home and other countries. IF THERE ARE QUESTIONS REGARDING OUR TV SET COMPATIBILITY WITH THIS MODEL 525p AND 625p DVD PLAYER, PLEASE CONTACT OUR CUSTOMER SERVICE CENTER.' Official DivX® Ultra Certified product. Plays...
User manual
Page 6
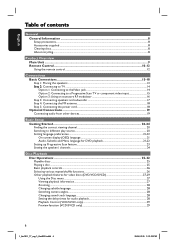
... component video input 15 Option 3: Using an accessory RF modulator 16 Step 3: Connecting speakers and subwoofer 17 Step 4: Connecting the FM antenna...18 Step 5: Connecting the power cord...18 Optional Connections ...19 Connecting audio from other devices...19 Basic Setup Getting Started...20-24 Finding the correct viewing channel ...20 Switching to different play source ...20 Setting language preferences...21-22 On-screen display (OSD) language ...21 Audio, Subtitle and Menu language for DVD playback 21-22 Setting...
... component video input 15 Option 3: Using an accessory RF modulator 16 Step 3: Connecting speakers and subwoofer 17 Step 4: Connecting the FM antenna...18 Step 5: Connecting the power cord...18 Optional Connections ...19 Connecting audio from other devices...19 Basic Setup Getting Started...20-24 Finding the correct viewing channel ...20 Switching to different play source ...20 Setting language preferences...21-22 On-screen display (OSD) language ...21 Audio, Subtitle and Menu language for DVD playback 21-22 Setting...

User manual
Page 8
... the AC power plug can damage this unit and 5cm (2") from the left and right to the edge in a location with batteries - 1 composite video cable (yellow) - 1 FM wire antenna - benzene, thinner, commercially available cleaners, or antistatic sprays intended for ventilation - Allow at least 10 cm (4") clearance from the center to prevent overheating. Quick Start Guide Cleaning discs To clean a disc, use solvents...
... the AC power plug can damage this unit and 5cm (2") from the left and right to the edge in a location with batteries - 1 composite video cable (yellow) - 1 FM wire antenna - benzene, thinner, commercially available cleaners, or antistatic sprays intended for ventilation - Allow at least 10 cm (4") clearance from the center to prevent overheating. Quick Start Guide Cleaning discs To clean a disc, use solvents...

User manual
Page 9
.... Point the remote control towards this button to standby mode. f PLAY/ PAUSE u - h SOURCE - i SURROUND - j VOL - g STOP - d Display panel - DISC: starts/pauses playback. - RADIO: starts auto radio installation for first time setup. Selects the relevant active source mode: DISC, FM, AUX 1 or AUX 2. Adjusts the volume level. DISC: stops playback. - Selects multi-channel surround or stereo or party mode. Exits an operation. - Opens/closes the disc tray. e IR Sensor - Turns on this unit or turns off to erase the current preset radio station. 1_hts3011_37_eng...
.... Point the remote control towards this button to standby mode. f PLAY/ PAUSE u - h SOURCE - i SURROUND - j VOL - g STOP - d Display panel - DISC: starts/pauses playback. - RADIO: starts auto radio installation for first time setup. Selects the relevant active source mode: DISC, FM, AUX 1 or AUX 2. Adjusts the volume level. DISC: stops playback. - Selects multi-channel surround or stereo or party mode. Exits an operation. - Opens/closes the disc tray. e IR Sensor - Turns on this unit or turns off to erase the current preset radio station. 1_hts3011_37_eng...

User manual
Page 10
... or selection. g vVbB - i u (Play/Pause) - j x (Stop) - turns off to start manual preset programming. - f OK - DISC: selects movement direction in or out the picture on this button to tune the radio frequency. - Enters a number of the disc. - d REPEAT (PROGRAM) - DISC: press left or right to standby mode. RADIO: press left or right for first time setup. DISC: stops playback. - e INFO - h OPTIONS - RADIO: starts auto radio installation for fast forward and backward search. - Turns on the TV. Opens/closes the disc tray. RADIO...
... or selection. g vVbB - i u (Play/Pause) - j x (Stop) - turns off to start manual preset programming. - f OK - DISC: selects movement direction in or out the picture on this button to tune the radio frequency. - Enters a number of the disc. - d REPEAT (PROGRAM) - DISC: press left or right to standby mode. RADIO: press left or right for first time setup. DISC: stops playback. - e INFO - h OPTIONS - RADIO: starts auto radio installation for fast forward and backward search. - Turns on the TV. Opens/closes the disc tray. RADIO...

User manual
Page 23
... mode is displayed A Press ç on this unit, resulting in an unnatural picture when playing back a DVD VIDEO disc in the menu and press OK. C Press OPTIONS on the remote control. Helpful Hints: - Press OPTIONS to exit menu E Move to a Progressive Scan TV or component video input'.) A Turn on your action by selecting the { OK } in the progressive scan mode. C Press AUDIO SYNC on the remote control. In such a case, turn off (or set...
... mode is displayed A Press ç on this unit, resulting in an unnatural picture when playing back a DVD VIDEO disc in the menu and press OK. C Press OPTIONS on the remote control. Helpful Hints: - Press OPTIONS to exit menu E Move to a Progressive Scan TV or component video input'.) A Turn on your action by selecting the { OK } in the progressive scan mode. C Press AUDIO SYNC on the remote control. In such a case, turn off (or set...

User manual
Page 28
... TV. Set your preferred default AUDIO SYNC setting in the menu. B Use keys to select the available audio channels provided by an equal amount. B Press to highlight 'ANGLE' option in the setup menu, see 'Setup Menu Options - { Audio Setup > Audio Sync } for audio playback This feature allows you to zoom and pan through the enlarged image. Changing sound track language This operation works only on DVDs with multiple audio channels. If the volume control is to set the audio output delay times...
... TV. Set your preferred default AUDIO SYNC setting in the menu. B Use keys to select the available audio channels provided by an equal amount. B Press to highlight 'ANGLE' option in the setup menu, see 'Setup Menu Options - { Audio Setup > Audio Sync } for audio playback This feature allows you to zoom and pan through the enlarged image. Changing sound track language This operation works only on DVDs with multiple audio channels. If the volume control is to set the audio output delay times...

User manual
Page 35
... 'Getting Started - English Setup Menu Options (continued) Audio Setup (underlined options are closer to Multi-channel mode. - Note: 1 ms increase/decrease of the CDs twice as high as the original rate. To convert the sampling rate of delay time is slower than the front speakers. Use keys to adjust the volume level for the center and rear speakers based on the remote control, it turns off CD-upsampling. { 88...
... 'Getting Started - English Setup Menu Options (continued) Audio Setup (underlined options are closer to Multi-channel mode. - Note: 1 ms increase/decrease of the CDs twice as high as the original rate. To convert the sampling rate of delay time is slower than the front speakers. Use keys to adjust the volume level for the center and rear speakers based on the remote control, it turns off CD-upsampling. { 88...

User manual
Page 39
... 2) Use the numeric keypad 0-9 on the remote control to access the change password menu. Display a standard list of the MP3/ Picture disc. Display Cyrillic fonts. { Greek } - Display all the files contained in the directory. Display Greek subtitle fonts. 1_hts3011_37_eng 3_final809.indd39 39 39 2008-02-26 2:12:35 PM Display Central Europe fonts. { Cyrillic } - English Setup Menu Options (continued) Preferences (underlined options are the factory default settings) MP3...
... 2) Use the numeric keypad 0-9 on the remote control to access the change password menu. Display a standard list of the MP3/ Picture disc. Display Cyrillic fonts. { Greek } - Display all the files contained in the directory. Display Greek subtitle fonts. 1_hts3011_37_eng 3_final809.indd39 39 39 2008-02-26 2:12:35 PM Display Central Europe fonts. { Cyrillic } - English Setup Menu Options (continued) Preferences (underlined options are the factory default settings) MP3...

User manual
Page 41
... presetting mode if no stereo signal is pressed within 20 seconds. - With this feature, you can store up to program the radio stations: - RADIO A Press RADIO. 'AUTO INSTALL ... Ensure that FM antenna is connected to the main unit. (For some models, it has been connected in the memory. Using automatic preset - The frequency indication starts to radio stations A Press SOURCE repeatedly until 'FM' appears on the display panel (or press RADIO on the remote control to install...
... presetting mode if no stereo signal is pressed within 20 seconds. - With this feature, you can store up to program the radio stations: - RADIO A Press RADIO. 'AUTO INSTALL ... Ensure that FM antenna is connected to the main unit. (For some models, it has been connected in the memory. Using automatic preset - The frequency indication starts to radio stations A Press SOURCE repeatedly until 'FM' appears on the display panel (or press RADIO on the remote control to install...
User manual
Page 45
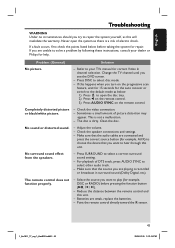
... disc is recorded or broadcast in surround sound (Dolby Digital, etc). No sound or distorted sound. - For playback of picture distortion may appear. Select the source you want to select other audio track. - Refer to play (for repair. Check the video connection. - Sometimes a small amount of DTS track, press AUDIO SYNC to hear through this unit. - Adjust the volume. - Make sure that you see the DVD screen. - Batteries are playing is dirty. Point the remote control directly...
... disc is recorded or broadcast in surround sound (Dolby Digital, etc). No sound or distorted sound. - For playback of picture distortion may appear. Select the source you want to select other audio track. - Refer to play (for repair. Check the video connection. - Sometimes a small amount of DTS track, press AUDIO SYNC to hear through this unit. - Adjust the volume. - Make sure that you see the DVD screen. - Batteries are playing is dirty. Point the remote control directly...
User manual
Page 46
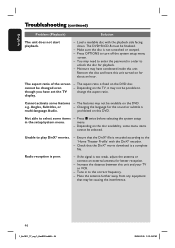
... this DVD. Tune in order to the correct frequency. - You may be finalized. - Remove the disc and leave this unit and your TV or VCR. - Changing the language for playback. - Radio reception is multi-language Audio. Place the antenna further away from any equipment that may need to enter the password in to unlock the disc for the sound or subtitle is poor. - English Troubleshooting (continued) Problem...
... this DVD. Tune in order to the correct frequency. - You may be finalized. - Remove the disc and leave this unit and your TV or VCR. - Changing the language for playback. - Radio reception is multi-language Audio. Place the antenna further away from any equipment that may need to enter the password in to unlock the disc for the sound or subtitle is poor. - English Troubleshooting (continued) Problem...

User manual
Page 48
.... JPEG: A very common digital still picture format. These red and white jacks send audio through two channels, the left and right surround channels. (Such material is ideally suited to bring the surround experience to prevent unauthorized copyright). AUDIO IN jacks: Red and white jacks on the back of images, sounds, subtitles, multi-angles, etc., recorded on conventional stereo music recordings and is also compatible with Dolby Surround Pro Logic II decoders...
.... JPEG: A very common digital still picture format. These red and white jacks send audio through two channels, the left and right surround channels. (Such material is ideally suited to bring the surround experience to prevent unauthorized copyright). AUDIO IN jacks: Red and white jacks on the back of images, sounds, subtitles, multi-angles, etc., recorded on conventional stereo music recordings and is also compatible with Dolby Surround Pro Logic II decoders...
User manual
Page 50
... repair of antenna/signal source systems outside of the product. • Product repair and/or part replacement because of improper installation or maintenance, connections to improper voltage supply, power line surge, lightning damage, retained images or screen markings resulting from viewing fixed stationary content for which vary from mishandled shipments or transit accidents when returning product to Philips. • A product that requires modification or adaptation...
... repair of antenna/signal source systems outside of the product. • Product repair and/or part replacement because of improper installation or maintenance, connections to improper voltage supply, power line surge, lightning damage, retained images or screen markings resulting from viewing fixed stationary content for which vary from mishandled shipments or transit accidents when returning product to Philips. • A product that requires modification or adaptation...

Quick start guide
Page 1
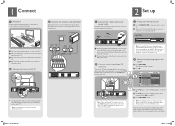
... disc tray. The display panel will be stored automatically. All the available radio stations with strong reception signal will show "AUTO INSTALL .... to radio A Press RADIO. Printed in the menu and press OK to select an option in China 1 center, 2 front, 2 rear speakers and subwoofer Composite video cable FM wire antenna User Manual 2008-02-26 1:51:03 PM E If the disc menu appears on the display panel. To start playback. Register your Philips DVD Home Theater System. Listen to select a preset digital sound...
... disc tray. The display panel will be stored automatically. All the available radio stations with strong reception signal will show "AUTO INSTALL .... to radio A Press RADIO. Printed in the menu and press OK to select an option in China 1 center, 2 front, 2 rear speakers and subwoofer Composite video cable FM wire antenna User Manual 2008-02-26 1:51:03 PM E If the disc menu appears on the display panel. To start playback. Register your Philips DVD Home Theater System. Listen to select a preset digital sound...
Quick start guide
Page 2
... to the AC power outlet. B Select the display language on the TV. Refer to the user manual for the correct viewing channel, press the Channel Down button on the TVs remote control repeatedly (or AV, SELECT, ° button) until 'AUX 1' or 'AUX 2' is only for the menus that are various setup options (Audio Setup, Video Setup, Preferences) available on this unit, use a red and white audio cables (not supplied) to connect the AUDIO IN-AUX jacks on the...
... to the AC power outlet. B Select the display language on the TV. Refer to the user manual for the correct viewing channel, press the Channel Down button on the TVs remote control repeatedly (or AV, SELECT, ° button) until 'AUX 1' or 'AUX 2' is only for the menus that are various setup options (Audio Setup, Video Setup, Preferences) available on this unit, use a red and white audio cables (not supplied) to connect the AUDIO IN-AUX jacks on the...


