
Leaflet
Page 2
...system Specifications HSB3280/F7 Sound • Output power (RMS): Total 300W RMS • Sound System...remote control, FM antenna, Power cord, Quick start guide, World Wide Warranty leaflet Dimensions • Set dimensions (W x H x D): 800 x 91 x 95 mm • Set dimensions with stand (W x H x D): 800 x 100 x 100 mm • Subwoofer dimensions (W x H x D): 170 x 378 x 302 mm • Packaging dimensions (W x H x D): 397 x 375 x 354 mm Audio...kg • Nett weight: 7.7 kg • Number of Koninklijke Philips Electronics N.V. Specifications are the property of products included: 1 •...
...system Specifications HSB3280/F7 Sound • Output power (RMS): Total 300W RMS • Sound System...remote control, FM antenna, Power cord, Quick start guide, World Wide Warranty leaflet Dimensions • Set dimensions (W x H x D): 800 x 91 x 95 mm • Set dimensions with stand (W x H x D): 800 x 100 x 100 mm • Subwoofer dimensions (W x H x D): 170 x 378 x 302 mm • Packaging dimensions (W x H x D): 397 x 375 x 354 mm Audio...kg • Nett weight: 7.7 kg • Number of Koninklijke Philips Electronics N.V. Specifications are the property of products included: 1 •...

User manual
Page 4
... 1 Important 6 Important safety instructions 6 Important Safety Instructions 6 Notice 7 Recycling 8 2 Your Soundbar System 9 Introduction 9 What's in the box 9 Overview of the main unit 10 Overview of the remote control 11 3 Get started 13 Attach speakers to the main unit 13 Attach the stand 13 Connect AV ... automatically 23 Program radio stations manually 23 Tune to a preset radio station 23 8 Use more of your soundbar 24 Program remote control 24 Rename an AV source 24 Enable/disable automatic on/standby 25 Set the alarm timer 25 Set the sleep timer 25...
... 1 Important 6 Important safety instructions 6 Important Safety Instructions 6 Notice 7 Recycling 8 2 Your Soundbar System 9 Introduction 9 What's in the box 9 Overview of the main unit 10 Overview of the remote control 11 3 Get started 13 Attach speakers to the main unit 13 Attach the stand 13 Connect AV ... automatically 23 Program radio stations manually 23 Tune to a preset radio station 23 8 Use more of your soundbar 24 Program remote control 24 Rename an AV source 24 Enable/disable automatic on/standby 25 Set the alarm timer 25 Set the sleep timer 25...

User manual
Page 8
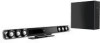
...identify the contents of your purchase, and welcome to Philips! The wireless subwoofer makes setup simple, too - there are no messy cables to music, or play games. You can control all connected audio/video devices easily with battery) • AC power...• Composite cable EN 9 English 2 Your Soundbar System Congratulations on your package: • Main unit • Speakers (x 2) • Digital wireless subwoofer • Smart remote control (with the programmable smart remote control. To fully benefit from the support that Philips offers, register your product at www...
...identify the contents of your purchase, and welcome to Philips! The wireless subwoofer makes setup simple, too - there are no messy cables to music, or play games. You can control all connected audio/video devices easily with battery) • AC power...• Composite cable EN 9 English 2 Your Soundbar System Congratulations on your package: • Main unit • Speakers (x 2) • Digital wireless subwoofer • Smart remote control (with the programmable smart remote control. To fully benefit from the support that Philips offers, register your product at www...

User manual
Page 10
AUDIO - m AUDIO IN - q FM ANTENNA • Connect the FM antenna. l DC IN • Connect the AC adaptor. n VIDEO OUT • Socket for composite video output. R) • AV input sockets. R) • AV input sockets. o AV1 IN (VIDEO L - AUDIO - Overview of the remote control a y b x c w d v e u f t s r q g p o h i n m j l k EN 11 COAXIAL • Coaxial audio output socket. English k PRESS • Detach speakers from the main unit. p AV2 IN (VIDEO L -
AUDIO - m AUDIO IN - q FM ANTENNA • Connect the FM antenna. l DC IN • Connect the AC adaptor. n VIDEO OUT • Socket for composite video output. R) • AV input sockets. R) • AV input sockets. o AV1 IN (VIDEO L - AUDIO - Overview of the remote control a y b x c w d v e u f t s r q g p o h i n m j l k EN 11 COAXIAL • Coaxial audio output socket. English k PRESS • Detach speakers from the main unit. p AV2 IN (VIDEO L -

User manual
Page 11
.... j COAX • Select the AV input source from the AV2 IN (VIDEO L - AUDIO - p Indicator for remote control programing. c SETUP • Rename AV resource. l AV2 • Select the AV source input from the AUDIO IN - o / • Fast reverse or fast forward within a track in the USB ...source input from the AV FRONT (VIDEO L-AUDIO-R) sockets. s OK / • Start or pause USB play mode for the connected USB device. w SLEEP • Set the sleep timer. y TUNER • Select the tuner (FM) source. i LEARN • Program remote control. h VOL +/• Adjust volume. •...
.... j COAX • Select the AV input source from the AV2 IN (VIDEO L - AUDIO - p Indicator for remote control programing. c SETUP • Rename AV resource. l AV2 • Select the AV source input from the AUDIO IN - o / • Fast reverse or fast forward within a track in the USB ...source input from the AV FRONT (VIDEO L-AUDIO-R) sockets. s OK / • Start or pause USB play mode for the connected USB device. w SLEEP • Set the sleep timer. y TUNER • Select the tuner (FM) source. i LEARN • Program remote control. h VOL +/• Adjust volume. •...
User manual
Page 17
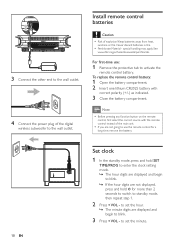
... away from heat, sunshine or fire. See www.dtsc.ca.gov/hazardouswaste/perchlorate. special handling may apply. For first-time use the remote control for a long time, remove the battery. 18 EN Set clock 1 In the standby mode, press and hold SET TIME/PROG to enter the clock... are not displayed, press and hold for more than 2 seconds to switch to standby mode, then repeat step 1. 2 Press + VOL - to activate the remote control battery. 3 Connect the other end to the wall outlet. 4 Connect the power plug of the digital wireless subwoofer to blink. 3 Press + VOL - Install...
... away from heat, sunshine or fire. See www.dtsc.ca.gov/hazardouswaste/perchlorate. special handling may apply. For first-time use the remote control for a long time, remove the battery. 18 EN Set clock 1 In the standby mode, press and hold SET TIME/PROG to enter the clock... are not displayed, press and hold for more than 2 seconds to switch to standby mode, then repeat step 1. 2 Press + VOL - to activate the remote control battery. 3 Connect the other end to the wall outlet. 4 Connect the power plug of the digital wireless subwoofer to blink. 3 Press + VOL - Install...

User manual
Page 23
...default, the remote control codes of a Philips TV are stored in the smart remote control.This feature allows you want to rename. » The default name of the selected sound source is received successfully, the blue indicator flashes. 4 Press one remote control to operate ...(cable) • [SATELLITE] (satellite) 24 EN 8 Use more buttons on the smart remote control (A) to exit the learning mode. Note • During the learning process, the normal remote control functions are disabled. B 1-10mm A (HSB3280) 2 Press LEARN for 2 seconds, then turns blue again. 5 Repeat steps 3 and...
...default, the remote control codes of a Philips TV are stored in the smart remote control.This feature allows you want to rename. » The default name of the selected sound source is received successfully, the blue indicator flashes. 4 Press one remote control to operate ...(cable) • [SATELLITE] (satellite) 24 EN 8 Use more buttons on the smart remote control (A) to exit the learning mode. Note • During the learning process, the normal remote control functions are disabled. B 1-10mm A (HSB3280) 2 Press LEARN for 2 seconds, then turns blue again. 5 Repeat steps 3 and...

User manual
Page 27
...' on the timer. Poor radio reception • Increase the distance between the remote control and the soundbar. • Insert the batteries with its polarities (+/- If the problem remains unsolved, go to repair the system yourself. Remote control does not work • Set the clock correctly. • Switch on page...the USB device has exceeded a certain limit.This phenomenon is nearby and the model number and serial number are not suppor ted. Philips.com/support).When you press any function button, first select the source with the soundbar.Try another one. 10 Troubleshooting ...
...' on the timer. Poor radio reception • Increase the distance between the remote control and the soundbar. • Insert the batteries with its polarities (+/- If the problem remains unsolved, go to repair the system yourself. Remote control does not work • Set the clock correctly. • Switch on page...the USB device has exceeded a certain limit.This phenomenon is nearby and the model number and serial number are not suppor ted. Philips.com/support).When you press any function button, first select the source with the soundbar.Try another one. 10 Troubleshooting ...
Quick start guide
Page 1
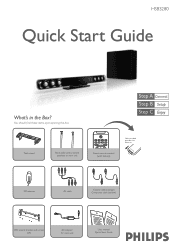
Table stand Studs (x2) used to attach speakers to main unit Smart remote control (with battery) FM antenna AV cable Coaxial cable (orange) Composite cable (yellow) Wall mount bracket and screws (x4) AC adaptor for main unit User manual Quick Start Guide You should find these items upon opening the box. HSB3280 Quick Start Guide What's in the Box?
Table stand Studs (x2) used to attach speakers to main unit Smart remote control (with battery) FM antenna AV cable Coaxial cable (orange) Composite cable (yellow) Wall mount bracket and screws (x4) AC adaptor for main unit User manual Quick Start Guide You should find these items upon opening the box. HSB3280 Quick Start Guide What's in the Box?

Quick start guide
Page 3
By default, the remote control codes of a Philips TV are disabled. - Setting the clock IMPORTANT! - to set the minutes. 5 Press SET TIME/PRO again to set clock in the smart remote control. During the learning process, the normal remote control functions are stored in the Eco Power Standby mode,...to switch to exit the learning mode. The available preset buttons are POWER, AV, 3CH4, 3VOL4, MUTE and SLEEP. Program remote control 1 Place the smart remote control (A) within 8 seconds, the systme quits the learning mode automatically and the indicator turns off. - To set the hours. ...
By default, the remote control codes of a Philips TV are disabled. - Setting the clock IMPORTANT! - to set the minutes. 5 Press SET TIME/PRO again to set clock in the smart remote control. During the learning process, the normal remote control functions are stored in the Eco Power Standby mode,...to switch to exit the learning mode. The available preset buttons are POWER, AV, 3CH4, 3VOL4, MUTE and SLEEP. Program remote control 1 Place the smart remote control (A) within 8 seconds, the systme quits the learning mode automatically and the indicator turns off. - To set the hours. ...


