

Leaflet
Page 2
... Highlights Technology Display technology: DLP Light source: Philips UHP Image Life Lamp Lamp type: 250 watt UHP light source: lasts over 10.000 hours Color wheel segment: 6 segments (RGBRGB) Contrast ratio: 150.000:1 Brightness: 2.000 color lumens Displayable colors: 1,07 billions Resolution: 1920 x 1080 pixel Throw ratio: 0,21:1 Screen size: 50"-120" Screen distance: 10 cm-42 cm / 3,94"-16,5" Keystone correction Aspect ratio: 4:3 and 16:9 Projection modes: front, rear, front ceiling, rear ceiling Wall color correction Focus adjustment: electrical...
... Highlights Technology Display technology: DLP Light source: Philips UHP Image Life Lamp Lamp type: 250 watt UHP light source: lasts over 10.000 hours Color wheel segment: 6 segments (RGBRGB) Contrast ratio: 150.000:1 Brightness: 2.000 color lumens Displayable colors: 1,07 billions Resolution: 1920 x 1080 pixel Throw ratio: 0,21:1 Screen size: 50"-120" Screen distance: 10 cm-42 cm / 3,94"-16,5" Keystone correction Aspect ratio: 4:3 and 16:9 Projection modes: front, rear, front ceiling, rear ceiling Wall color correction Focus adjustment: electrical...

User manual
Page 2
... the Main menu functions 10 3 Initial operation 11 Setting up the device 11 Connecting power supply 11 Installing or changing the batteries of the IR remote control 12 Using the remote control 12 3D glasses (optional 12 Initial installation 14 4 Connect to the playback device ........ 16 Connecting to devices with HDMI output ........ 16 Connecting to a computer (VGA 16 Connecting a screen using the automatic Trigger input 17 Connecting using an audio/video (CVBS) adapter cable 17 Connecting to...
... the Main menu functions 10 3 Initial operation 11 Setting up the device 11 Connecting power supply 11 Installing or changing the batteries of the IR remote control 12 Using the remote control 12 3D glasses (optional 12 Initial installation 14 4 Connect to the playback device ........ 16 Connecting to devices with HDMI output ........ 16 Connecting to a computer (VGA 16 Connecting a screen using the automatic Trigger input 17 Connecting using an audio/video (CVBS) adapter cable 17 Connecting to...

User manual
Page 4
... or damage to two hours before moving it down immediately and unplug the power cable. To minimize the risk of heaters or air conditioners. 1 General safety information Do not make any moisture buildup: 1 Seal this device is moved from a cold location to such a change in temperature, moisture may not be repaired by an authorised service centre. Otherwise the device...
... or damage to two hours before moving it down immediately and unplug the power cable. To minimize the risk of heaters or air conditioners. 1 General safety information Do not make any moisture buildup: 1 Seal this device is moved from a cold location to such a change in temperature, moisture may not be repaired by an authorised service centre. Otherwise the device...

User manual
Page 5
... occurrence of eye problems or discomfort, and in mind: • 3D glasses must be installed on bare ground. This device shall be easily accessible. Risk of the device. Power supply Before turning on your device, check that the outlet that you are to be used together with a long-life UHP lamp, which emit very bright light. Turn off the projector. DANGER! The...
... occurrence of eye problems or discomfort, and in mind: • 3D glasses must be installed on bare ground. This device shall be easily accessible. Risk of the device. Power supply Before turning on your device, check that the outlet that you are to be used together with a long-life UHP lamp, which emit very bright light. Turn off the projector. DANGER! The...
User manual
Page 6
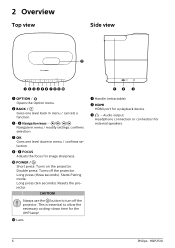
... back in menu / cancels a function. 3-6 Navigation keys Navigate in menu / modify settings, confirms selection. 7 OK Goes one level down time for the UHP lamp! ƒ Lens 1 Handle (retractable) 2 HDMI HDMI port for external speakers. 6 Philips · HDP2510 Always use the B button to allow the necessary cooling-down in menu / confirms selection. 8-9 FOCUS Adjusts the focus for image sharpness. , POWER / B Short press: Turns on the projector. Double...
... back in menu / cancels a function. 3-6 Navigation keys Navigate in menu / modify settings, confirms selection. 7 OK Goes one level down time for the UHP lamp! ƒ Lens 1 Handle (retractable) 2 HDMI HDMI port for external speakers. 6 Philips · HDP2510 Always use the B button to allow the necessary cooling-down in menu / confirms selection. 8-9 FOCUS Adjusts the focus for image sharpness. , POWER / B Short press: Turns on the projector. Double...
User manual
Page 8
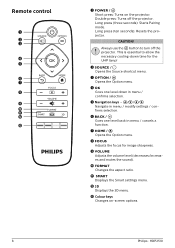
.... 7 HOME / Î Opens the Option menu. 8 FOCUS Adjusts the focus for image sharpness. 9 VOLUME Adjusts the volume level (decreases/increases and mutes the sound). , FORMAT Changes the aspect ratio. ƒ SMART Displays the Smart settings menu. „ 3D Displays the 3D menu. ... Colour keys Changes on the projector. Double press: Turns off the projector. Philips · HDP2510 Remote control a b c d e f g h i j Œ ÷ ... 8 1 POWER / B Short press: Turns on -screen...
.... 7 HOME / Î Opens the Option menu. 8 FOCUS Adjusts the focus for image sharpness. 9 VOLUME Adjusts the volume level (decreases/increases and mutes the sound). , FORMAT Changes the aspect ratio. ƒ SMART Displays the Smart settings menu. „ 3D Displays the 3D menu. ... Colour keys Changes on the projector. Double press: Turns off the projector. Philips · HDP2510 Remote control a b c d e f g h i j Œ ÷ ... 8 1 POWER / B Short press: Turns on -screen...

User manual
Page 11
... the projection surface. Diagonal size (b) (mm) [inch] Projection distance (a) (mm) 1270 108 [50] 3048 420 [120] Connecting power supply CAUTION! Initial operation 11 The size of the screen (b) is comprised between the projector and the screen determines the actual size of your device, make sure that the projection surface is appropriated to the projector. Check that the projector is turned off the projector. Always use the B button to turn off and the power cable...
... the projection surface. Diagonal size (b) (mm) [inch] Projection distance (a) (mm) 1270 108 [50] 3048 420 [120] Connecting power supply CAUTION! Initial operation 11 The size of the screen (b) is comprised between the projector and the screen determines the actual size of your device, make sure that the projection surface is appropriated to the projector. Check that the projector is turned off the projector. Always use the B button to turn off and the power cable...

User manual
Page 12
... remote control. Installing or changing the batteries of batteries! Charging takes several hours and is complete when the LED on the glasses is not used batteries should be disposed of according to the recycling regulations of the cable to open fire and water. • Replace empty batteries immediately. • Remove the battery from the device. CAUTION! • The improper use . If the remote control...
... remote control. Installing or changing the batteries of batteries! Charging takes several hours and is complete when the LED on the glasses is not used batteries should be disposed of according to the recycling regulations of the cable to open fire and water. • Replace empty batteries immediately. • Remove the battery from the device. CAUTION! • The improper use . If the remote control...
User manual
Page 14
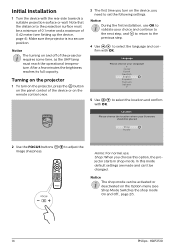
... the operational temperature. In this option, the projector starts in a secure position. Turning on the projector 1 To turn on the projector, press the B button on the panel control of 0.42 meter (see Shop Mode Switches the shop mode On and Off., page 27). 14 Philips · HDP2510 Notice During the first installation, use . Shop: When you need to adjust the image sharpness. Make sure the projector is in shop mode. Note...
... the operational temperature. In this option, the projector starts in a secure position. Turning on the projector 1 To turn on the projector, press the B button on the panel control of 0.42 meter (see Shop Mode Switches the shop mode On and Off., page 27). 14 Philips · HDP2510 Notice During the first installation, use . Shop: When you need to adjust the image sharpness. Make sure the projector is in shop mode. Note...

User manual
Page 16
... of the computer. 3 Adjust the computer's resolution to the correct setting and switch the VGA signal to an external monitor. Notice Many laptops do not activate the external video output automatically when you connect a second display such as a projector. Connecting to a computer (VGA) Use a VGA cable to connect the projector to a computer, laptop or other devices. The following message appears: NO SIGNAL Connecting to devices with HDMI output Use a HDMI cable to connect the projector to a Blu-ray...
... of the computer. 3 Adjust the computer's resolution to the correct setting and switch the VGA signal to an external monitor. Notice Many laptops do not activate the external video output automatically when you connect a second display such as a projector. Connecting to a computer (VGA) Use a VGA cable to connect the projector to a computer, laptop or other devices. The following message appears: NO SIGNAL Connecting to devices with HDMI output Use a HDMI cable to connect the projector to a Blu-ray...

User manual
Page 19
... Screeneo firmware version on the Philips website: www.philips.com You must download the file on Software & drivers. 5 In the Software & drivers screen select your model HDP2510. 4 The Screeneo HDP2510 projector screen appears. In the new screen, research Support and click on USB storage medium in order to the playback device 19 Never pull out the digital media while the device is now completed. The firmware update is accessing it. Download from...
... Screeneo firmware version on the Philips website: www.philips.com You must download the file on Software & drivers. 5 In the Software & drivers screen select your model HDP2510. 4 The Screeneo HDP2510 projector screen appears. In the new screen, research Support and click on USB storage medium in order to the playback device 19 Never pull out the digital media while the device is now completed. The firmware update is accessing it. Download from...
User manual
Page 20
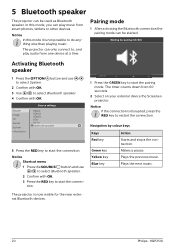
... started. The projector is not possible to restart the connection. Waiting for the near external Bluetooth devices. 20 Philips · HDP2510 Power Off 1 Press the GREEN key to select Bluetooth speaker. 2 Confirm with OK. 5 Bluetooth speaker The projector can be used as Bluetooth speaker. The timer counts down from one device at a time. Plays the previous music. Source settings Source HDMI1 Image 3D HDMI2 HDMI3 VGA Sound...
... started. The projector is not possible to restart the connection. Waiting for the near external Bluetooth devices. 20 Philips · HDP2510 Power Off 1 Press the GREEN key to select Bluetooth speaker. 2 Confirm with OK. 5 Bluetooth speaker The projector can be used as Bluetooth speaker. The timer counts down from one device at a time. Plays the previous music. Source settings Source HDMI1 Image 3D HDMI2 HDMI3 VGA Sound...

User manual
Page 23
... show can adjust the volume using the keys À/Á. 5 Press OK on the remote control to continue playback. pletely. Navigation by colour keys Keys RED key Action Allows to set the repeat mode: off the volume com- The image is shown as an overview. Photo playback (optional) Supported file formats Supported file formats are displayed on OK rotates the picture 90°...
... show can adjust the volume using the keys À/Á. 5 Press OK on the remote control to continue playback. pletely. Navigation by colour keys Keys RED key Action Allows to set the repeat mode: off the volume com- The image is shown as an overview. Photo playback (optional) Supported file formats Supported file formats are displayed on OK rotates the picture 90°...

User manual
Page 27
... Shop mode or Home mode (see Initial installation, page 14). Do not reset the lamp timer if the lamp has not been replaced as this mode, the Screeneo logo is continuously displayed on the screen and system powers on after power is connected to default settings after ten seconds if user doesn't stop it. Auto power down (APD) Switches the auto power down the lamp if no source is available. Notice The default setting is switched on...
... Shop mode or Home mode (see Initial installation, page 14). Do not reset the lamp timer if the lamp has not been replaced as this mode, the Screeneo logo is continuously displayed on the screen and system powers on after power is connected to default settings after ten seconds if user doesn't stop it. Auto power down (APD) Switches the auto power down the lamp if no source is available. Notice The default setting is switched on...
User manual
Page 28
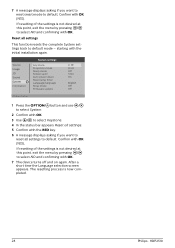
... installation again. The resetting process is not desired at this point, exit the menu by pressing À/Á to select NO and confirming with OK. 7 A message displays asking if you want to reset smart mode to default. starting with OK (YES). Reset all settings. 5 Confirm with OK (YES). Source Image 3D Sound System OK Information System settings Key stone Projection mode Sleep mode Screen saver Auto power down Reset lamp timer Language/language Shop mode Firmware update...
... installation again. The resetting process is not desired at this point, exit the menu by pressing À/Á to select NO and confirming with OK. 7 A message displays asking if you want to reset smart mode to default. starting with OK (YES). Reset all settings. 5 Confirm with OK (YES). Source Image 3D Sound System OK Information System settings Key stone Projection mode Sleep mode Screen saver Auto power down Reset lamp timer Language/language Shop mode Firmware update...

User manual
Page 29
..., alcohol, etc.). A replacement lamp can check the elapsed lamp time from our customer service centre. Do not operate the lamp beyond the rated lamp life. Instructions for at least 45 minutes before replacing the lamp. • To reduce the risk of the projector. Service 29 Instructions for cleaning the lens of injuries to fingers and damage to fingers and/or compromising image quality by touching the lens, do not scratch...
..., alcohol, etc.). A replacement lamp can check the elapsed lamp time from our customer service centre. Do not operate the lamp beyond the rated lamp life. Instructions for at least 45 minutes before replacing the lamp. • To reduce the risk of the projector. Service 29 Instructions for cleaning the lens of injuries to fingers and damage to fingers and/or compromising image quality by touching the lens, do not scratch...
User manual
Page 30
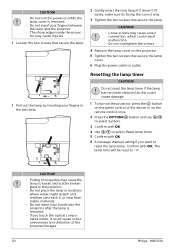
.... 6 A message displays asking if you touch the optical components inside the projector may cause a bad connection, which could result malfunction. • Do not overtighten the screws. 4 Replace the lamp cover on the projector. 5 Tighten the two screws that secure the lamp. 2 Gently insert the new lamp.If it could cause damage. 1 To turn on the projector, press the B button on the panel control of the projected images. 30 Philips · HDP2510 CAUTION...
.... 6 A message displays asking if you touch the optical components inside the projector may cause a bad connection, which could result malfunction. • Do not overtighten the screws. 4 Replace the lamp cover on the projector. 5 Tighten the two screws that secure the lamp. 2 Gently insert the new lamp.If it could cause damage. 1 To turn on the projector, press the B button on the panel control of the projected images. 30 Philips · HDP2510 CAUTION...

User manual
Page 31
... the instructions in this user manual, follow the steps given here. 1 Turn the device off • Push the B button longer than ten seconds. Service 31 The projector cannot be turned on • Disconnect and connect the power cable and try to Multichannel (Raw data) & Stereo (PCM). Troubleshooting Power cycling If a problem occurs that the 3D mode is activated on the projector (see Sound settings, page 26). • Adjust the volume using...
... the instructions in this user manual, follow the steps given here. 1 Turn the device off • Push the B button longer than ten seconds. Service 31 The projector cannot be turned on • Disconnect and connect the power cable and try to Multichannel (Raw data) & Stereo (PCM). Troubleshooting Power cycling If a problem occurs that the 3D mode is activated on the projector (see Sound settings, page 26). • Adjust the volume using...
User manual
Page 32
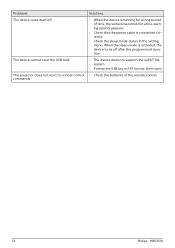
... Philips · HDP2510 The projector does not react to remote control • Check the batteries of time, the surface becomes hot and a warning symbol appears. • Check that the power cable is activated, the device turns off after the programmed duration. The device cannot read the USB stick • The device does not support the exFAT file system. • Format the USB key in the setting menu...
... Philips · HDP2510 The projector does not react to remote control • Check the batteries of time, the surface becomes hot and a warning symbol appears. • Check that the power cable is activated, the device turns off after the programmed duration. The device cannot read the USB stick • The device does not support the exFAT file system. • Format the USB key in the setting menu...

User manual
Page 33
... HDMI, VGA composite, 1x back standard USB headphone out side, Audio in & out, AV in speakers 2+subwoofer Output power 26 W Sound System Dolby Digital 2.1 Connection Bluetooth ........ operating: 190 to Screeneo via Bluetooth aptX® Standard; operated frequency band 2400-2483.5 MHz max. Single 0.65" DarkChip3 1080p DLP® Technology by Texas Instruments Light source Philips UHP Image life lamp Lamp type 250 watt UHP light source lasts over ~10000 hours...
... HDMI, VGA composite, 1x back standard USB headphone out side, Audio in & out, AV in speakers 2+subwoofer Output power 26 W Sound System Dolby Digital 2.1 Connection Bluetooth ........ operating: 190 to Screeneo via Bluetooth aptX® Standard; operated frequency band 2400-2483.5 MHz max. Single 0.65" DarkChip3 1080p DLP® Technology by Texas Instruments Light source Philips UHP Image life lamp Lamp type 250 watt UHP light source lasts over ~10000 hours...


