User manual
Page 2
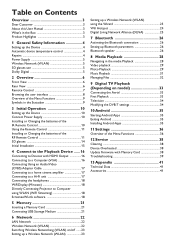
... 4 Automatic device temperature control 4 Repairs 4 Power Supply 5 Wireless Network (WLAN 5 3D glasses use 5 Dolby Digital 5 2 Overview 6 Front View 6 Rear View 6 Remote Control 7 Browsing the user interface 8 Overview of the Menu Functions 9 Symbols in the Statusbar 9 3 Initial Operation 10 Setting up the Device 10 Connect Power Supply 10 Installing or Changing the batteries of the IR Remote Control 10 Using the Remote Control 11 Installing or Changing the batteries of the RF Remote Control 11 3D glasses 14 Initial Installation 15 4 Connect to the...
... 4 Automatic device temperature control 4 Repairs 4 Power Supply 5 Wireless Network (WLAN 5 3D glasses use 5 Dolby Digital 5 2 Overview 6 Front View 6 Rear View 6 Remote Control 7 Browsing the user interface 8 Overview of the Menu Functions 9 Symbols in the Statusbar 9 3 Initial Operation 10 Setting up the Device 10 Connect Power Supply 10 Installing or Changing the batteries of the IR Remote Control 10 Using the Remote Control 11 Installing or Changing the batteries of the RF Remote Control 11 3D glasses 14 Initial Installation 15 4 Connect to the...
User manual
Page 3
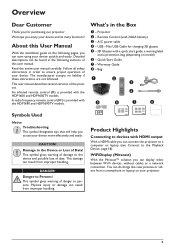
... WXYZ9 0 SUBTITLE TEXT PHILIPS c d f g h Symbols Used Notice Troubleshooting This symbol designates tips that will help you enjoy your projector. 3 You can display video between Wi-Fi devices, without cables or a network connection. An infrared remote control (IR) is provided with HDMI output With a HDMI cable you can be found in the following pages, you can result from improper handling. Detailed descriptions can start guide, a warning label and a protection...
... WXYZ9 0 SUBTITLE TEXT PHILIPS c d f g h Symbols Used Notice Troubleshooting This symbol designates tips that will help you enjoy your projector. 3 You can display video between Wi-Fi devices, without cables or a network connection. An infrared remote control (IR) is provided with HDMI output With a HDMI cable you can be found in the following pages, you can result from improper handling. Detailed descriptions can start guide, a warning label and a protection...
User manual
Page 4
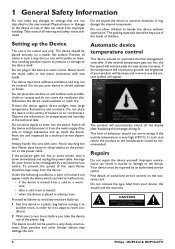
... not remove the type label from improper handling. Position all warning and safety notes indicated. Always handle the unit with wet hands. Never place heavy or sharp objects on soft surfaces such as follows to avoid any changes or settings that no one to two hours before moving it to be recommended. Automatic device temperature control This device...
... not remove the type label from improper handling. Position all warning and safety notes indicated. Always handle the unit with wet hands. Never place heavy or sharp objects on soft surfaces such as follows to avoid any changes or settings that no one to two hours before moving it to be recommended. Automatic device temperature control This device...

User manual
Page 6
... Remote screen connection ANTENNA - Aerial socket for navigation and operation u - To display the home menu ¿ - One menu step back, one directory level back / cancelling a function Navigation keys / navigate the menu / modify settings OK - Confirms selection B- LAN network connector 8 AUDIO - 2 Overview Front View 1 Control panel for TV connection - USB port for a USB storage medium or to connect accessories (mouse or keyboard). 6 Focus wheel for a playback device ‹ TRIG OUT- Digital audio connector 4 HDMI - A/V port for image sharpness Rear View 1 - HDMI...
... Remote screen connection ANTENNA - Aerial socket for navigation and operation u - To display the home menu ¿ - One menu step back, one directory level back / cancelling a function Navigation keys / navigate the menu / modify settings OK - Confirms selection B- LAN network connector 8 AUDIO - 2 Overview Front View 1 Control panel for TV connection - USB port for a USB storage medium or to connect accessories (mouse or keyboard). 6 Focus wheel for a playback device ‹ TRIG OUT- Digital audio connector 4 HDMI - A/V port for image sharpness Rear View 1 - HDMI...

User manual
Page 7
... the control panel 2 Playback keys - To display the list of input connections. For radio frequency remote control (RF), a QWERTY keyboard is available below for numbers and long press to switch "letters" SUB/SHIFT - To display the 3D menu. Short press for you to mute the sound). RECALL - SOURCE - To display the Smart settings menu FORMAT - TAB Overview 7 To rewind - To display the favourite list in input mode. - / + - To display subtitles...
... the control panel 2 Playback keys - To display the list of input connections. For radio frequency remote control (RF), a QWERTY keyboard is available below for numbers and long press to switch "letters" SUB/SHIFT - To display the 3D menu. Short press for you to mute the sound). RECALL - SOURCE - To display the Smart settings menu FORMAT - TAB Overview 7 To rewind - To display the favourite list in input mode. - / + - To display subtitles...
User manual
Page 8
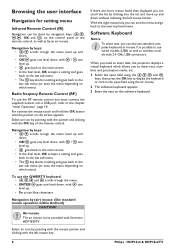
... user interface Navigation for setting menu Infrared Remote Control (IR) Navigation can be done by navigation keys OK and ¿) on the control panel or the remote control, as well as wireless models with 2.4 GHz USB-connectors. Navigation by an air mouse. When you need to enter data, the projector displays a virtual keyboard which allows you to enter text, numbers and punctuation marks, etc. 1 Select the input field using...
... user interface Navigation for setting menu Infrared Remote Control (IR) Navigation can be done by navigation keys OK and ¿) on the control panel or the remote control, as well as wireless models with 2.4 GHz USB-connectors. Navigation by an air mouse. When you need to enter data, the projector displays a virtual keyboard which allows you to enter text, numbers and punctuation marks, etc. 1 Select the input field using...

User manual
Page 10
... depending on the projection distance (a), as a power unit cut off and the power cord is used . 1 To access the battery, press to tilt it towards or away from the slanted projection (pincushion distortion). PHILIPS S/PDIF 1 OPTICAL 2 VGA L R AUDIO OUT AV TRIG IN OUT b a To change the size of the image. CAUTION! Risk of Explosion with Incorrect Type of the IR Remote Control DANGER! it lies...
... depending on the projection distance (a), as a power unit cut off and the power cord is used . 1 To access the battery, press to tilt it towards or away from the slanted projection (pincushion distortion). PHILIPS S/PDIF 1 OPTICAL 2 VGA L R AUDIO OUT AV TRIG IN OUT b a To change the size of the image. CAUTION! Risk of Explosion with Incorrect Type of the IR Remote Control DANGER! it lies...

User manual
Page 14
... on the 3D glasses . 3x 1.5 SEC The LED flashes green three times and becomes fixed. When the LED turns red, do a new charge. Activate 3D glasses 1 Press the ON / OFF button on the top of the device. Your glasses are equipped with a battery. They have to be charged before first use. 1 Take USB mini cable (supplied), connect the USB mini on the 3D glasses and the...
... on the 3D glasses . 3x 1.5 SEC The LED flashes green three times and becomes fixed. When the LED turns red, do a new charge. Activate 3D glasses 1 Press the ON / OFF button on the top of the device. Your glasses are equipped with a battery. They have to be charged before first use. 1 Take USB mini cable (supplied), connect the USB mini on the 3D glasses and the...

User manual
Page 15
... this mode, the projector automatically displays the pictures or videos stored in the internal memory in a secure position. 3 Use the focus wheel on the font of the device or on the remote control more than 5 seconds. Make sure the projector is in loop. Turning off the projector Press the B button on the panel control of the device to return on the previous step. to set the date (hour...
... this mode, the projector automatically displays the pictures or videos stored in the internal memory in a secure position. 3 Use the focus wheel on the font of the device or on the remote control more than 5 seconds. Make sure the projector is in loop. Turning off the projector Press the B button on the panel control of the device to return on the previous step. to set the date (hour...

User manual
Page 18
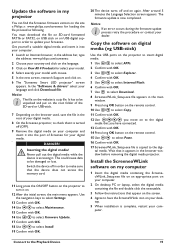
... connected to the Settings menu > Maintenance > Firmware version. especially when using the on your projector by SD card or USB disk from the address: APPs_explorer_internal flash_Download. 2 Connect the device with the wireless network (see also Wireless Network (WLAN), page 22). 3 Start ScreeneoWLink (Viewer) on the device. For this, both devices must be installed on /off key. 2 After the initial screen the main menu appears. For this function. 1 Switch...
... connected to the Settings menu > Maintenance > Firmware version. especially when using the on your projector by SD card or USB disk from the address: APPs_explorer_internal flash_Download. 2 Connect the device with the wireless network (see also Wireless Network (WLAN), page 22). 3 Start ScreeneoWLink (Viewer) on the device. For this, both devices must be installed on /off key. 2 After the initial screen the main menu appears. For this function. 1 Switch...
User manual
Page 19
... Internal Flash. 6 Confirm with mouse. 5 In the new screen, research Support and click on . 12 After the initial screen, the main menu appears. Install the ScreeneoWLink software on my computer 1 Insert the digital media containing the ScreeneoWLink_Setup.exe file on an appropriate port on your model with OK. 7 Use ¢ to select Download. 8 ScreeneoWLink_Setup.exe file appears in the browser window before removing the digital media projector.
... Internal Flash. 6 Confirm with mouse. 5 In the new screen, research Support and click on . 12 After the initial screen, the main menu appears. Install the ScreeneoWLink software on my computer 1 Insert the digital media containing the ScreeneoWLink_Setup.exe file on an appropriate port on your model with OK. 7 Use ¢ to select Download. 8 ScreeneoWLink_Setup.exe file appears in the browser window before removing the digital media projector.

User manual
Page 22
...-Fi connection. The LAN connection takes priority over radio waves (high frequency waves). Connecting to the LAN network 1 Connect one end of a LAN cable (not supplied) to the ETHERNET port of the local network settings may be connected to the network by a network hard-wired cable or through a wireless (Wi-Fi) connection. Automatic configuration The automatic configuration of your projector manually, you want. Data transmission in manual or automatic configuration. 6 Network The projector can dynamically assign addresses...
...-Fi connection. The LAN connection takes priority over radio waves (high frequency waves). Connecting to the LAN network 1 Connect one end of a LAN cable (not supplied) to the ETHERNET port of the local network settings may be connected to the network by a network hard-wired cable or through a wireless (Wi-Fi) connection. Automatic configuration The automatic configuration of your projector manually, you want. Data transmission in manual or automatic configuration. 6 Network The projector can dynamically assign addresses...
User manual
Page 23
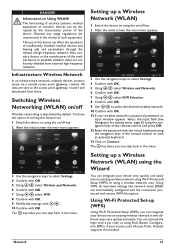
... step back in the vicinity of the remote control or with OK. DANGER! Switching Wireless Networking (WLAN) on /off Wireless networking is password protected, an input window appears. Information on Connect. Setting up a Wireless Network (WLAN) using the on/off key. 2 After the initial screen the main menu appears. Select the input field (see Navigation for setting menu, page 8) using the navigation keys of the remote control and press OK. 12 Enter the...
... step back in the vicinity of the remote control or with OK. DANGER! Switching Wireless Networking (WLAN) on /off Wireless networking is password protected, an input window appears. Information on Connect. Setting up a Wireless Network (WLAN) using the on/off key. 2 After the initial screen the main menu appears. Select the input field (see Navigation for setting menu, page 8) using the navigation keys of the remote control and press OK. 12 Enter the...

User manual
Page 30
... press u, you want to start the background sound confirm with OK. 6 Adjust the volume level with the volume keys on the left of selected media is displayed. 5 To only display the picture content, select Picture using the keys ¡/¢on the remote control. 7 If no input is made, the menu bar is hidden after 5 seconds. Zoom and rotate functions During the slide show...
... press u, you want to start the background sound confirm with OK. 6 Adjust the volume level with the volume keys on the left of selected media is displayed. 5 To only display the picture content, select Picture using the keys ¡/¢on the remote control. 7 If no input is made, the menu bar is hidden after 5 seconds. Zoom and rotate functions During the slide show...
User manual
Page 34
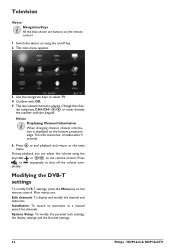
... keypad. System Setup: To modify the parental lock settings, the display settings and the favorite settings. 34 Philips · HDP16x0 & HDP16x0TV repeatedly to shut off key. 2 The main menu appears. 3 Use the navigation keys to the main menu. Modifying the DVB-T settings To modify DVB-T settings, press the Menu key on the bottom projection edge. Main menus are buttons on the remote control. 1 Switch the device on using the on...
... keypad. System Setup: To modify the parental lock settings, the display settings and the favorite settings. 34 Philips · HDP16x0 & HDP16x0TV repeatedly to shut off key. 2 The main menu appears. 3 Use the navigation keys to the main menu. Modifying the DVB-T settings To modify DVB-T settings, press the Menu key on the bottom projection edge. Main menus are buttons on the remote control. 1 Switch the device on using the on...

User manual
Page 36
... device is switched to connect. select the wireless network with OK. switching DLNA off and on and off Speaker - Bluetooth - Image settings 3D - set Android system 36 Philips · HDP16x0 & HDP16x0TV use ¡/¢ to adjust the size of the projected image. normal projection; Front Ceiling - Manual colors RGB - Manual colors CMY - Network Selection - use ¡/¢ to select the screen mode to set the keystone. to convert the color space setting to your needs. Use to adjust the colors according...
... device is switched to connect. select the wireless network with OK. switching DLNA off and on and off Speaker - Bluetooth - Image settings 3D - set Android system 36 Philips · HDP16x0 & HDP16x0TV use ¡/¢ to adjust the size of the projected image. normal projection; Front Ceiling - Manual colors RGB - Manual colors CMY - Network Selection - use ¡/¢ to select the screen mode to set the keystone. to convert the color space setting to your needs. Use to adjust the colors according...

User manual
Page 37
... projector automatically goes to change the HDMI names. use ¡/¢ to select the desired language and press OK to confirm. Firmware Update - In this : - it works like this mode, Screeneo is continuously displayed on /off , - use ¡/¢ to select the desired language and press OK to factory defaults. Reset settings to confirm. switching demo mode on : APD off the auto power down. dome mode on and off mode...
... projector automatically goes to change the HDMI names. use ¡/¢ to select the desired language and press OK to confirm. Firmware Update - In this : - it works like this mode, Screeneo is continuously displayed on /off , - use ¡/¢ to select the desired language and press OK to factory defaults. Reset settings to confirm. switching demo mode on : APD off the auto power down. dome mode on and off mode...

User manual
Page 38
Never use any liquid cleaning agents for cleaning the lens, to select Install. 11 Confirm with à. 38 Philips · HDP16x0 & HDP16x0TV After around 5 minutes the Language Selection screen appears. Notice If an error occurs during the firmware update process retry the procedure or contact your data that you do not scratch the surfaces. Device Overheated A overheat symbol appears if the device is...
Never use any liquid cleaning agents for cleaning the lens, to select Install. 11 Confirm with à. 38 Philips · HDP16x0 & HDP16x0TV After around 5 minutes the Language Selection screen appears. Notice If an error occurs during the firmware update process retry the procedure or contact your data that you do not scratch the surfaces. Device Overheated A overheat symbol appears if the device is...
User manual
Page 40
... high power LED. Then pressing the red and blue key on the projection (see the list in order to 10 s at the same time. 40 Philips · HDP16x0 & HDP16x0TV The device changes from maximum level of brightness to minimum level of brightness in the chapter Appendix). installed. ing the Projector via USB. mands when using the RF remote control. • The remote control has to remote control com- • Check...
... high power LED. Then pressing the red and blue key on the projection (see the list in order to 10 s at the same time. 40 Philips · HDP16x0 & HDP16x0TV The device changes from maximum level of brightness to minimum level of brightness in the chapter Appendix). installed. ing the Projector via USB. mands when using the RF remote control. • The remote control has to remote control com- • Check...

Leaflet
Page 3
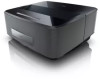
... smartphone or tablet to change without notice. Screeneo Smart LED Projector HDP1690/F7 Specifications Technology/ optical Aspect ratio: 4:3 and 16:9 Contrast ratio: 100.000:1 Display technology: DLP Focus adjustment: manual Internal memory: 4 GB Keystone correction LED light source lasts over: 30.000 hours Light source: RGB LED MP4 player Noise level: < 25 dB(A) Operating system: Android 4.2 Resolution: 1280 x 800 pixel Screen distance: 10 - 44 cm Screen sizes: 50" - 100" Throw ratio...
... smartphone or tablet to change without notice. Screeneo Smart LED Projector HDP1690/F7 Specifications Technology/ optical Aspect ratio: 4:3 and 16:9 Contrast ratio: 100.000:1 Display technology: DLP Focus adjustment: manual Internal memory: 4 GB Keystone correction LED light source lasts over: 30.000 hours Light source: RGB LED MP4 player Noise level: < 25 dB(A) Operating system: Android 4.2 Resolution: 1280 x 800 pixel Screen distance: 10 - 44 cm Screen sizes: 50" - 100" Throw ratio...


