

Leaflet
Page 3
... smartphone or tablet to change without notice. Screeneo Smart LED Projector HDP1590/F7 Specifications Technology/ optical Aspect ratio: 4:3 and 16:9 Contrast ratio: 100.000:1 Display technology: DLP Focus adjustment: manual Internal memory: 4 GB Keystone correction LED light source lasts over: 30.000 hours Light source: RGB LED MP4 player Noise level: < 25 dB(A) Operating system: Android 4.2 Resolution: 1280 x 800 pixel Screen distance: 10 - 44 cm Screen sizes: 50" - 100" Throw ratio...
... smartphone or tablet to change without notice. Screeneo Smart LED Projector HDP1590/F7 Specifications Technology/ optical Aspect ratio: 4:3 and 16:9 Contrast ratio: 100.000:1 Display technology: DLP Focus adjustment: manual Internal memory: 4 GB Keystone correction LED light source lasts over: 30.000 hours Light source: RGB LED MP4 player Noise level: < 25 dB(A) Operating system: Android 4.2 Resolution: 1280 x 800 pixel Screen distance: 10 - 44 cm Screen sizes: 50" - 100" Throw ratio...
User manual
Page 2
...temperature control 4 Repairs 4 Power Supply 5 Wireless Network (WLAN 5 3D glasses use 5 Dolby Digital 5 2 Overview 6 Front View 6 Rear View 6 Remote Control 7 Browsing the user interface 8 Overview of the Menu Functions 8 Symbols in the Statusbar 9 3 Initial Operation 10 Setting up the Device 10 Connect Power Supply 10 Installing or Changing the Batteries of the Remote Control 10 Using the Remote Control 11 Initial Installation 12 4 Connect to the Playback Device ...... 13 Connecting to Devices with HDMI Output 13 Connecting to a Computer (VGA 13 Connecting Using an Audio...
...temperature control 4 Repairs 4 Power Supply 5 Wireless Network (WLAN 5 3D glasses use 5 Dolby Digital 5 2 Overview 6 Front View 6 Rear View 6 Remote Control 7 Browsing the user interface 8 Overview of the Menu Functions 8 Symbols in the Statusbar 9 3 Initial Operation 10 Setting up the Device 10 Connect Power Supply 10 Installing or Changing the Batteries of the Remote Control 10 Using the Remote Control 11 Initial Installation 12 4 Connect to the Playback Device ...... 13 Connecting to Devices with HDMI Output 13 Connecting to a Computer (VGA 13 Connecting Using an Audio...

User manual
Page 3
... symbol gives warning of data. Physical injury or damage can result from improper handling. A/C power cable 4 - Bag a e b GUIDE 3D AMBILIGHT SOURCE LIST TV FORMAT SMART TV INFO OK EXIT CH - Only the models HDP1590 has the WiFi (Miracast, DLNA,..) and Bluetooth functions. CAUTION! Projector 2 - Remote Control (with HDMI output With the HDMI cable you for purchasing our projector. HDMI A to A cable 5 - 3D Glasses with his quick start using your...
... symbol gives warning of data. Physical injury or damage can result from improper handling. A/C power cable 4 - Bag a e b GUIDE 3D AMBILIGHT SOURCE LIST TV FORMAT SMART TV INFO OK EXIT CH - Only the models HDP1590 has the WiFi (Miracast, DLNA,..) and Bluetooth functions. CAUTION! Projector 2 - Remote Control (with HDMI output With the HDMI cable you for purchasing our projector. HDMI A to A cable 5 - 3D Glasses with his quick start using your...

User manual
Page 4
... damage to a warm area; • after displaying this message during 5s. Do not place the machine on the projector or the power cable. Observe the information on temperature and humidity in closed cabinets or boxes. To prevent the spread of fire, open flames should be kept away from the mains supply if liquids or foreign substances end up...
... damage to a warm area; • after displaying this message during 5s. Do not place the machine on the projector or the power cable. Observe the information on temperature and humidity in closed cabinets or boxes. To prevent the spread of fire, open flames should be kept away from the mains supply if liquids or foreign substances end up...

User manual
Page 5
...installed on bare ground. Turn off the device and unplug from Dolby Laboratories. Dolby Digital Manufactured under license from the power outlet before cleaning the surface. High Power LED This device is supplied with the instruments of vision correction in case the consumer is the presence of small moving parts... failure, the power cable is delivered with a grounded power cord. This could cause eye irritation or damage. • how to be supplied by the transmission power of the device. where disinfection of the glasses is not possible as it into the projector lens. The use...
...installed on bare ground. Turn off the device and unplug from Dolby Laboratories. Dolby Digital Manufactured under license from the power outlet before cleaning the surface. High Power LED This device is supplied with the instruments of vision correction in case the consumer is the presence of small moving parts... failure, the power cable is delivered with a grounded power cord. This could cause eye irritation or damage. • how to be supplied by the transmission power of the device. where disinfection of the glasses is not possible as it into the projector lens. The use...

User manual
Page 6
... OPTICAL - HDMI port for external speakers 3 HDMI 3- Personal Computer input 7 LAN - Digital audio connector 4 HDMI - LAN network connector 8 AUDIO - Remote screen connection Œ Lens PHILIPS PHILIPS S/PDIF 1 OPTICAL 2 VGA L R AUDIO OUT AV TRIG IN OUT 6 Philips · HDP15x0 Memory card slot 5 ý - To display the home menu ¿ - Confirms selection B- headphone connection or connection for a playback device 4 SD - Analog audio connectors 9 A/V IN - HDMI 1 and 2 ports for navigation and operation u - 2 Overview Front View 1 Control panel for...
... OPTICAL - HDMI port for external speakers 3 HDMI 3- Personal Computer input 7 LAN - Digital audio connector 4 HDMI - LAN network connector 8 AUDIO - Remote screen connection Œ Lens PHILIPS PHILIPS S/PDIF 1 OPTICAL 2 VGA L R AUDIO OUT AV TRIG IN OUT 6 Philips · HDP15x0 Memory card slot 5 ý - To display the home menu ¿ - Confirms selection B- headphone connection or connection for a playback device 4 SD - Analog audio connectors 9 A/V IN - HDMI 1 and 2 ports for navigation and operation u - 2 Overview Front View 1 Control panel for...
User manual
Page 8
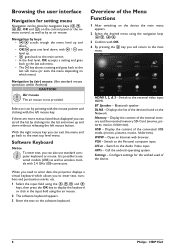
... aborts a setting and goes back to the next top level menu. Software Keyboard Notice To enter text, you will return to the Audio Video input. Displays the list of the devices found on the control panel or the remote control, as well as wireless models with À / ¿ one level up and down , with 2.4 GHz USB-connectors. It is not provided. Switch to use standard computer...
... aborts a setting and goes back to the next top level menu. Software Keyboard Notice To enter text, you will return to the Audio Video input. Displays the list of the devices found on the control panel or the remote control, as well as wireless models with À / ¿ one level up and down , with 2.4 GHz USB-connectors. It is not provided. Switch to use standard computer...

User manual
Page 10
... the screen, just move the projector towards the projection surface. As a precaution, the outlet shall be of easy access in case of danger. 2 Insert the new batteries into the socket on the projection distance (a), as a power unit cut off. it towards or away from the wall. PHILIPS S/PDIF 1 OPTICAL 2 VGA L R AUDIO OUT AV TRIG IN OUT b a To change the size of the Remote Control...
... the screen, just move the projector towards the projection surface. As a precaution, the outlet shall be of easy access in case of danger. 2 Insert the new batteries into the socket on the projection distance (a), as a power unit cut off. it towards or away from the wall. PHILIPS S/PDIF 1 OPTICAL 2 VGA L R AUDIO OUT AV TRIG IN OUT b a To change the size of the Remote Control...
User manual
Page 12
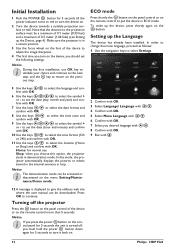
Notice During the first installation, use . ECO mode Press shortly the B button on the panel control or on the remote control to put the device in loop. In this option, the projector starts in a secure position. 3 Use the focus wheel on the font of the device to adjust the image sharpness. 4 The first time you turn on the device, you desired language with ¡/¢. 8 Confirm with OK...
Notice During the first installation, use . ECO mode Press shortly the B button on the panel control or on the remote control to put the device in loop. In this option, the projector starts in a secure position. 3 Use the focus wheel on the font of the device to adjust the image sharpness. 4 The first time you turn on the device, you desired language with ¡/¢. 8 Confirm with OK...
User manual
Page 13
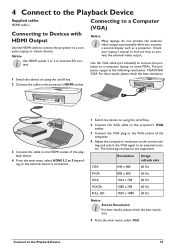
... PHILIPS S/PDIF 1 OPTICAL 2 VGA L R AUDIO OUT AV TRIG IN OUT 3 Connect the cable to the HDMI socket of the computer. 4 Adjust the computer's resolution to the correct setting and switch the VGA signal to a Computer (VGA) Notice Many laptops do not activate the external video output automatically when you connect a second display such as a projector. The following resolutions: VGA/SVGA/ XGA. 4 Connect to the Playback Device Supplied cables HDMI cable s Connecting to Devices with HDMI Output Use the HDMI cable to connect...
... PHILIPS S/PDIF 1 OPTICAL 2 VGA L R AUDIO OUT AV TRIG IN OUT 3 Connect the cable to the HDMI socket of the computer. 4 Adjust the computer's resolution to the correct setting and switch the VGA signal to a Computer (VGA) Notice Many laptops do not activate the external video output automatically when you connect a second display such as a projector. The following resolutions: VGA/SVGA/ XGA. 4 Connect to the Playback Device Supplied cables HDMI cable s Connecting to Devices with HDMI Output Use the HDMI cable to connect...
User manual
Page 15
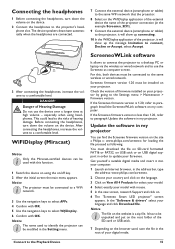
... SD-card or USB-stick. 7 Depending on the browser used to identify the projector can find the Screeneo firmware version on the site « Philips »: www.philips.com/screeneo for select your model. 4 Select exactly your model with mouse. 5 In the new screen, research Support and click on. 6 The "Screeneo Smart LED projector" screen appears. Connecting the headphones 1 Before connecting the headphones, turn down the volume...
... SD-card or USB-stick. 7 Depending on the browser used to identify the projector can find the Screeneo firmware version on the site « Philips »: www.philips.com/screeneo for select your model. 4 Select exactly your model with mouse. 5 In the new screen, research Support and click on. 6 The "Screeneo Smart LED projector" screen appears. Connecting the headphones 1 Before connecting the headphones, turn down the volume...
User manual
Page 16
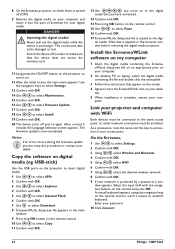
... 5 minutes the Language Selection screen appears. Select the input field with OK. 20 The device turns off and on . 12 After the initial screen, the main menu appears. Link your projector and computer with OK. 9 If your network is protected by a password, a window appears. Switch the device off in the main window. 9 Press long OK button on the remote control. 10 Use ¡/¢ to...
... 5 minutes the Language Selection screen appears. Select the input field with OK. 20 The device turns off and on . 12 After the initial screen, the main menu appears. Link your projector and computer with OK. 9 If your network is protected by a password, a window appears. Switch the device off in the main window. 9 Press long OK button on the remote control. 10 Use ¡/¢ to...
User manual
Page 19
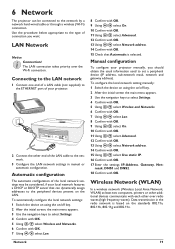
... 802.11n. Data transmission in manual or automatic configuration. PHILIPS S/PDIF 1 OPTICAL 2 VGA L R AUDIO OUT AV TRIG IN OUT 2 Connect the other end of connection you should obtain the usual information used to set a peripheral device (IP address, sub-network mask, network and gateway address). Network 19 To configure the local network setting manually: 1 Switch the device on using the on the LAN. 6 Network The projector can dynamically assign addresses to the peripheral...
... 802.11n. Data transmission in manual or automatic configuration. PHILIPS S/PDIF 1 OPTICAL 2 VGA L R AUDIO OUT AV TRIG IN OUT 2 Connect the other end of connection you should obtain the usual information used to set a peripheral device (IP address, sub-network mask, network and gateway address). Network 19 To configure the local network setting manually: 1 Switch the device on using the on the LAN. 6 Network The projector can dynamically assign addresses to the peripheral...

User manual
Page 20
... code or using a wireless network scan. Also consult a doctor or the manufacturer of the remote control or with secure WPA Encryption. All data are sufficiently shielded from there. Information on /off key. 2 After the initial screen the main menu appears. The ¿ key takes you one step back in the menu. The use of this function on. 1 Switch the device on Connect. Switching Wireless Networking (WLAN...
... code or using a wireless network scan. Also consult a doctor or the manufacturer of the remote control or with secure WPA Encryption. All data are sufficiently shielded from there. Information on /off key. 2 After the initial screen the main menu appears. The ¿ key takes you one step back in the menu. The use of this function on. 1 Switch the device on Connect. Switching Wireless Networking (WLAN...

User manual
Page 22
... device supports Digital Living Network Alliance (DLNA). Security Password Select among the 3 levels of turning this function off. 1 Switch the device on using the on and off key. 2 After the initial screen the main menu appears. 3 Use the navigation keys to select the desired parameter. DLNA Control You can access them in media playback and file management (see the instruction manual for the...
... device supports Digital Living Network Alliance (DLNA). Security Password Select among the 3 levels of turning this function off. 1 Switch the device on using the on and off key. 2 After the initial screen the main menu appears. 3 Use the navigation keys to select the desired parameter. DLNA Control You can access them in media playback and file management (see the instruction manual for the...

User manual
Page 27
... is hidden after 5 seconds. To perform a zoom, use of color keys The Green key allows to start the background sound confirm with OK. 6 Adjust the volume level with the volume keys on the remote control. 7 If no input is made, the menu bar is displayed. 5 To only display the picture content, select Picture using the keys ¡/¢on the screen as miniatures or in a list. Media...
... is hidden after 5 seconds. To perform a zoom, use of color keys The Green key allows to start the background sound confirm with OK. 6 Adjust the volume level with the volume keys on the remote control. 7 If no input is made, the menu bar is displayed. 5 To only display the picture content, select Picture using the keys ¡/¢on the screen as miniatures or in a list. Media...

User manual
Page 31
... control function Key beep - select predefined settings for brightness / contrast / colour saturation. use ¡/¢ to select the screen mode Projection mode Front - Dynamic contrast - adjusts the gamma correction according to connect. switching the speaker on and off the sleep mode. set date and time Android Settings - Keystone - set the picture modes with 2D/3D options. turn on/off Image settings 3D - LAN - the device is to the type of the Menu Functions Wireless...
... control function Key beep - select predefined settings for brightness / contrast / colour saturation. use ¡/¢ to select the screen mode Projection mode Front - Dynamic contrast - adjusts the gamma correction according to connect. switching the speaker on and off the sleep mode. set date and time Android Settings - Keystone - set the picture modes with 2D/3D options. turn on/off Image settings 3D - LAN - the device is to the type of the Menu Functions Wireless...

User manual
Page 33
... the projector. 12 The device turns off and on the lens. Use a soft, lint-free cloth. DANGER! DANGER! Notice If an error occurs during the firmware update process retry the procedure or contact your data that you do not scratch the surfaces. Instructions for cleaning the lens of the memory card. 3 Insert the memory card (see Inserting a Memory Card, page 18) and switch...
... the projector. 12 The device turns off and on the lens. Use a soft, lint-free cloth. DANGER! DANGER! Notice If an error occurs during the firmware update process retry the procedure or contact your data that you do not scratch the surfaces. Instructions for cleaning the lens of the memory card. 3 Insert the memory card (see Inserting a Memory Card, page 18) and switch...
User manual
Page 34
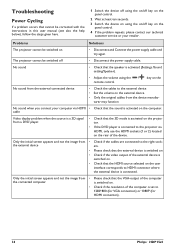
.... Troubleshooting Power Cycling If a problem occurs that cannot be corrected with the instructions in this user manual (see also the help below), follow the steps given here. 1 Switch the device off using the on/off key on the panel control. 2 Wait at least ten seconds. 3 Switch the device on using the / remote control. key on the No sound from • Please check that the HDMI source selected on The projector...
.... Troubleshooting Power Cycling If a problem occurs that cannot be corrected with the instructions in this user manual (see also the help below), follow the steps given here. 1 Switch the device off using the on/off key on the panel control. 2 Wait at least ten seconds. 3 Switch the device on using the / remote control. key on the No sound from • Please check that the HDMI source selected on The projector...

User manual
Page 35
... connected over USB to play videos. • When the environment temperature is too high, the devices turns automatically from maximum level of brightness to protect the high power LED. operating system) when connected via USB; ing the Projector via USB. The device cannot read the USB stick • The device does not support the exFAT file system. • Format the USB key in the chapter Appendix). Service 35 Problems...
... connected over USB to play videos. • When the environment temperature is too high, the devices turns automatically from maximum level of brightness to protect the high power LED. operating system) when connected via USB; ing the Projector via USB. The device cannot read the USB stick • The device does not support the exFAT file system. • Format the USB key in the chapter Appendix). Service 35 Problems...


