
User manual
Page 2
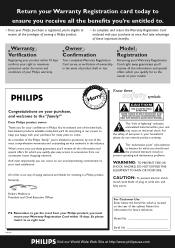
... home shopping network. Congratulations on the rear of the cabinet. So please mail it to us right now! NO USER-SERVICEABLE PARTS INSIDE. For Customer Use Enter below the Serial No. What's more, your purchase guarantees you'll receive all the information and special offers for which you should read the enclosed literature closely to prevent operating and maintenance problems...
... home shopping network. Congratulations on the rear of the cabinet. So please mail it to us right now! NO USER-SERVICEABLE PARTS INSIDE. For Customer Use Enter below the Serial No. What's more, your purchase guarantees you'll receive all the information and special offers for which you should read the enclosed literature closely to prevent operating and maintenance problems...
User manual
Page 4
... CD(RW) handling 5 Controls and connections 6-7 Installation Power...8 Speaker connections 8 Antenna connections 8 Analog audio connections 9 Digital audio connections 9 Connecting a subwoofer 9 Remote control Remote control buttons 10 Remote control batteries 10 Display ...11 Basic functions Switching on, switching to standby 12 Loading the CD changer, CD recorder 12 Playing a CD(RW 12 Sound control 13 Demo mode 13 Selecting a disc on the CD changer 14 Selecting a track and searching 14 SHUFFLE and REPEAT 14 CD text...14 Microphone mixing 14 Program Programming track numbers...
... CD(RW) handling 5 Controls and connections 6-7 Installation Power...8 Speaker connections 8 Antenna connections 8 Analog audio connections 9 Digital audio connections 9 Connecting a subwoofer 9 Remote control Remote control buttons 10 Remote control batteries 10 Display ...11 Basic functions Switching on, switching to standby 12 Loading the CD changer, CD recorder 12 Playing a CD(RW 12 Sound control 13 Demo mode 13 Selecting a disc on the CD changer 14 Selecting a track and searching 14 SHUFFLE and REPEAT 14 CD text...14 Microphone mixing 14 Program Programming track numbers...
User manual
Page 5
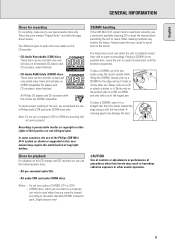
... this user manual may result in a straight line from cold to warm surroundings. In some countries, the use of audio discs are marked "Digital Audio" and with a soft, felt-tipped pen. Discs for recording For recording, make sure to play a CD-ROM, CD-I or CDV! - The lenses may cloud over when the unit is suddenly moved from the center toward the edge using a soft, lint-free...
... this user manual may result in a straight line from cold to warm surroundings. In some countries, the use of audio discs are marked "Digital Audio" and with a soft, felt-tipped pen. Discs for recording For recording, make sure to play a CD-ROM, CD-I or CDV! - The lenses may cloud over when the unit is suddenly moved from the center toward the edge using a soft, lint-free...
User manual
Page 7
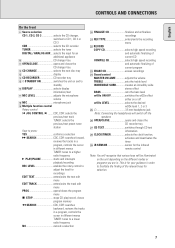
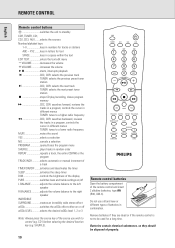
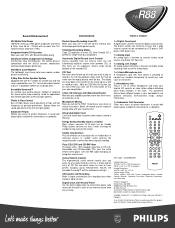
... for your guidance in . OPEN/CLOSE opens and closes the CD changer tray @ CD CHANGE selects the next disc tray display $ CD RECORDER CD recorder tray % y STANDBY ON switches the unit on and to standby ^ DISPLAY selects display information/text & MIC LEVEL adjusts the microphone volume * MIC microphone jack ( Multiple function control Rotary control: í JOG CONTROL ë ........CDC, CDR: selects the previous/next track TUNER: selects the previous/next preset tuner station Keys to press: YES confirms...
... for your guidance in . OPEN/CLOSE opens and closes the CD changer tray @ CD CHANGE selects the next disc tray display $ CD RECORDER CD recorder tray % y STANDBY ON switches the unit on and to standby ^ DISPLAY selects display information/text & MIC LEVEL adjusts the microphone volume * MIC microphone jack ( Multiple function control Rotary control: í JOG CONTROL ë ........CDC, CDR: selects the previous/next track TUNER: selects the previous/next preset tuner station Keys to press: YES confirms...
User manual
Page 8
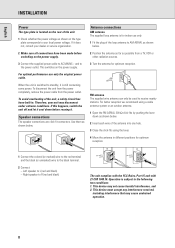
... switched to receive nearby stations. To avoid overheating of the antenna into one hole. 3 Close the click-fits using a cable antenna system or an outdoor antenna. 1 Open the FM AERIAL 300 Ω click-fits by pushing the lever down before switching on the power supply. 3 Connect the supplied power cable to AC MAINS ~ and to the power outlet. Use them as shown on the power supply. For better reception we recommend using...
... switched to receive nearby stations. To avoid overheating of the antenna into one hole. 3 Close the click-fits using a cable antenna system or an outdoor antenna. 1 Open the FM AERIAL 300 Ω click-fits by pushing the lever down before switching on the power supply. 3 Connect the supplied power cable to AC MAINS ~ and to the power outlet. Use them as shown on the power supply. For better reception we recommend using...
User manual
Page 10
... backward, reviews the tracks in a program, controls the cursor in different menus TUNER: tunes to the right speaker INCREDIBLE SURROUND creates an incredibly wide stereo effect wOOx switches the wOOx effect either on /off L BALANCE adjusts the volume balance to the left speaker R BALANCE adjusts the volume balance to a lower radio frequency MUTE mutes the sound YES selects a selection NO cancels a selection PROGRAM opens/closes the program menu SHUFFLE plays tracks...
... backward, reviews the tracks in a program, controls the cursor in different menus TUNER: tunes to the right speaker INCREDIBLE SURROUND creates an incredibly wide stereo effect wOOx switches the wOOx effect either on /off L BALANCE adjusts the volume balance to the left speaker R BALANCE adjusts the volume balance to a lower radio frequency MUTE mutes the sound YES selects a selection NO cancels a selection PROGRAM opens/closes the program menu SHUFFLE plays tracks...
User manual
Page 11
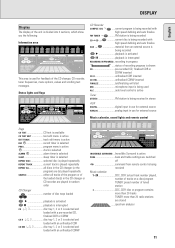
... 17 18 19 This area is used for external source Music calendar, sound lights and remote control PRESET STEP TOTAL TRACK TIME TOTAL REM REC TRACK TIME CD CHANGER CD R W CD TEXT EDIT TRACK REC PROG ALARM SLEEP REPEAT SHUFFLE DISC TRACK ALL AM PM CD RECORDER COMPILE CDC FM TUNER CD CD AUX CD R W START RECORDING IN PROGRESS FINALIZE MIC ALC FINISH TUNER STEREO NEWS TA EON INCREDIBLE SURROUND AUX LOUDNESS DIGITAL ANALOG PURE 20 + 1 2 3 4 5 6 7 8 9 10 11...
... 17 18 19 This area is used for external source Music calendar, sound lights and remote control PRESET STEP TOTAL TRACK TIME TOTAL REM REC TRACK TIME CD CHANGER CD R W CD TEXT EDIT TRACK REC PROG ALARM SLEEP REPEAT SHUFFLE DISC TRACK ALL AM PM CD RECORDER COMPILE CDC FM TUNER CD CD AUX CD R W START RECORDING IN PROGRESS FINALIZE MIC ALC FINISH TUNER STEREO NEWS TA EON INCREDIBLE SURROUND AUX LOUDNESS DIGITAL ANALOG PURE 20 + 1 2 3 4 5 6 7 8 9 10 11...

User manual
Page 13
... switch back to standby. yINCREDIBLE SURROUND is shown and Incredible Surround is displayed if the surround sound effect is cancelled permanently. Optimal sound For optimal sound listening, you to adjust the treble or bass. yTreble or Bass and the actual value (between the front speakers. PURE 1 Press PURE on . yThe demo mode is on the remote control to cancel the demo mode. Incredible Surround Stereo sound is determined by using MASTER VOLUME (-VOLUME/+on the remote control...
... switch back to standby. yINCREDIBLE SURROUND is shown and Incredible Surround is displayed if the surround sound effect is cancelled permanently. Optimal sound For optimal sound listening, you to adjust the treble or bass. yTreble or Bass and the actual value (between the front speakers. PURE 1 Press PURE on . yThe demo mode is on the remote control to cancel the demo mode. Incredible Surround Stereo sound is determined by using MASTER VOLUME (-VOLUME/+on the remote control...
User manual
Page 14
... the speakers to normal playback, press REPEAT on the remote control until the display indication disappears. yPlayback starts with the selected track. yREPEAT DISC: The entire selected disc is scrolled once. yCD TEXT is shown and the album title is played repeatedly. Album title - a loud howling sound) before you connect the microphone. 2 Connect a microphone to MIC. 3 Press CD 1, CD 2, CD 3, CDR, TUNER or DIGITAL / ANALOG AUX to...
... the speakers to normal playback, press REPEAT on the remote control until the display indication disappears. yPlayback starts with the selected track. yREPEAT DISC: The entire selected disc is scrolled once. yCD TEXT is shown and the album title is played repeatedly. Album title - a loud howling sound) before you connect the microphone. 2 Connect a microphone to MIC. 3 Press CD 1, CD 2, CD 3, CDR, TUNER or DIGITAL / ANALOG AUX to...
User manual
Page 16
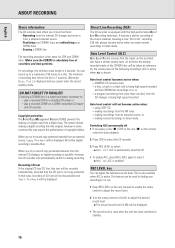
... is shown. play a recorded CDRW on a CDRW compatible CD player and CD recorder. When you try to standby. 16 It ensures a perfect recording of the source material, meaning a true "bit for the volume level of the following recordings. ALC is active when ALC is the same for fading your CDRW discs - Auto level control becomes active when: - using COPY CD, - making normal recordings in listen mode. This...
... is shown. play a recorded CDRW on a CDRW compatible CD player and CD recorder. When you try to standby. 16 It ensures a perfect recording of the source material, meaning a true "bit for the volume level of the following recordings. ALC is active when ALC is the same for fading your CDRW discs - Auto level control becomes active when: - using COPY CD, - making normal recordings in listen mode. This...
User manual
Page 19
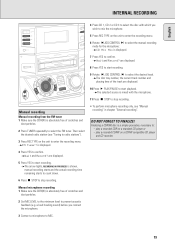
... only, see "Tuning to radio stations"). 3 Press REC TYPE on a CDRW compatible CD player and CD recorder. 19 English INTERNAL RECORDING STANDBY ON CD 1 CD 2 CD 3 DISPLAY CDR MIC LEVEL MIC DIGITAL / ANALOG AUX TUNER iR SENSOR CD TEXT CLOCK/TIM CD-TEXT EDITING CD RECORDER OPEN/CLOSE EDIT RECORD COPY CD COMPILE CD REC TYPE FINALIZE CD ERASE CD MVOALSUTEMRE Manual recording Manual recording from the FM tuner 1 Make sure the CDR(W) is absolutely free of scratches and...
... only, see "Tuning to radio stations"). 3 Press REC TYPE on a CDRW compatible CD player and CD recorder. 19 English INTERNAL RECORDING STANDBY ON CD 1 CD 2 CD 3 DISPLAY CDR MIC LEVEL MIC DIGITAL / ANALOG AUX TUNER iR SENSOR CD TEXT CLOCK/TIM CD-TEXT EDITING CD RECORDER OPEN/CLOSE EDIT RECORD COPY CD COMPILE CD REC TYPE FINALIZE CD ERASE CD MVOALSUTEMRE Manual recording Manual recording from the FM tuner 1 Make sure the CDR(W) is absolutely free of scratches and...

User manual
Page 21
... . DO NOT FORGET TO FINALIZE! play a recorded CDRW on a standard CD player or - play a recorded CDR on a CDRW compatible CD player and CD recorder. 3 Connect a microphone to MIC. 21 yWait is shown. yThe CD recorder starts to record and RECORDING IN PROGRESS is displayed. yAUX Digital is displayed if the digital input is displayed. The remaining recording time of the CDR(W) is flashing, check the digital connection. 10 Press Ç STOP...
... . DO NOT FORGET TO FINALIZE! play a recorded CDRW on a standard CD player or - play a recorded CDR on a CDRW compatible CD player and CD recorder. 3 Connect a microphone to MIC. 21 yWait is shown. yThe CD recorder starts to record and RECORDING IN PROGRESS is displayed. yAUX Digital is displayed if the digital input is displayed. The remaining recording time of the CDR(W) is flashing, check the digital connection. 10 Press Ç STOP...
User manual
Page 26
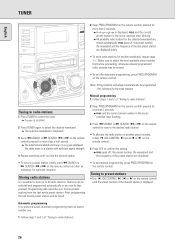
... reception. The radio tunes to preset stations • Use í JOG CONTROL ë (í or ë on the remote control). yPROG goes off , the preset number, the waveband and the frequency of "Tuning to 40 radio stations. Make sure to select the tuner. yTuner is displayed, PROG and the current preset number in the music calendar start blinking. yAutoprogram is scrolled. 2 Press TUNER again to radio stations". 26 Automatic programming If no preset is displayed. 3 Keep à...
... reception. The radio tunes to preset stations • Use í JOG CONTROL ë (í or ë on the remote control). yPROG goes off , the preset number, the waveband and the frequency of "Tuning to 40 radio stations. Make sure to select the tuner. yTuner is displayed, PROG and the current preset number in the music calendar start blinking. yAutoprogram is scrolled. 2 Press TUNER again to radio stations". 26 Automatic programming If no preset is displayed. 3 Keep à...
User manual
Page 28
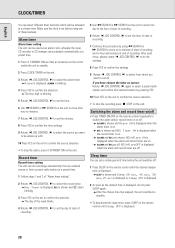
... on the remote control until Sleep OFF is shown and X starts blinking. 3 Press YES on the unit. 3 Rotate í JOG CONTROL ë to select the alarm timer. yRec Timer is displayed, REC is displayed. 28 After each move, always rotate í JOG CONTROL ë to do the settings. 8 Press YES to confirm the settings. 9 Rotate í JOG CONTROL ë to select from a preset radio station at a preset time. 1 Follow...
... on the remote control until Sleep OFF is shown and X starts blinking. 3 Press YES on the unit. 3 Rotate í JOG CONTROL ë to select the alarm timer. yRec Timer is displayed, REC is displayed. 28 After each move, always rotate í JOG CONTROL ë to do the settings. 8 Press YES to confirm the settings. 9 Rotate í JOG CONTROL ë to select from a preset radio station at a preset time. 1 Follow...
User manual
Page 30
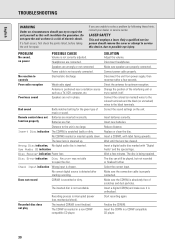
... input. Only a qualified service person should you are properly connected. PROBLEM No sound, no circumstances should remove the cover or attempt to service this will invalidate the guarantee. Power cable is not finalized. Speakers are flat. function properly Batteries are not in phase. The inserted CDR(W) is not securely connected. Disconnect headphones. Distance to controls Poor radio reception Poor bass sound POSSIBLE CAUSE Volume is not correctly adjusted. Change...
... input. Only a qualified service person should you are properly connected. PROBLEM No sound, no circumstances should remove the cover or attempt to service this will invalidate the guarantee. Power cable is not finalized. Speakers are flat. function properly Batteries are not in phase. The inserted CDR(W) is not securely connected. Disconnect headphones. Distance to controls Poor radio reception Poor bass sound POSSIBLE CAUSE Volume is not correctly adjusted. Change...

User manual
Page 31
... setup of the product, adjustment of customer controls on the product, and installation or repair of antenna systems outside of the product. • product repair and/or part replacement because of misuse, accident, unauthorized repair or other cause not within the control of Philips Consumer Electronics Company. • reception problems caused by signal conditions or cable or antenna systems outside the unit. • a product that requires modification or adaptation to enable it to operate...
... setup of the product, adjustment of customer controls on the product, and installation or repair of antenna systems outside of the product. • product repair and/or part replacement because of misuse, accident, unauthorized repair or other cause not within the control of Philips Consumer Electronics Company. • reception problems caused by signal conditions or cable or antenna systems outside the unit. • a product that requires modification or adaptation to enable it to operate...
Leaflet
Page 1
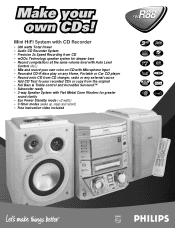
... your own voice on CD with Microphone input • Recorded CD-R discs play on any Home, Portable or Car CD player • Record onto CD from CD changer, radio or any external source • Add CD Text to your recorded CDs or copy from the original • Full Bass & Treble control and Incredible Surround™ • Subwoofer ready • 3-way Speaker System with Flat Metal Cone Woofers for greater sound clarity • Eco Power Standby mode (
... your own voice on CD with Microphone input • Recorded CD-R discs play on any Home, Portable or Car CD player • Record onto CD from CD changer, radio or any external source • Add CD Text to your recorded CDs or copy from the original • Full Bass & Treble control and Incredible Surround™ • Subwoofer ready • 3-way Speaker System with Flat Metal Cone Woofers for greater sound clarity • Eco Power Standby mode (
Leaflet
Page 2
... the room. phono, CD,Tape, etc.). 1 x Analog Line Output An analog output connection is foreseen to enable analog recordings from CD Make your own compilations. 3-Disc CD Changer with your favorite CD, cassette, or radio station without interference. 1 x Subwoofer Out Connector Offers easy access to greater dimensions in FM only). 1 x Digital Coax Input A digital input is provided to connect any standard microphone to record your own voice or instrument. 1 x Headphone Jack Plug in a set...
... the room. phono, CD,Tape, etc.). 1 x Analog Line Output An analog output connection is foreseen to enable analog recordings from CD Make your own compilations. 3-Disc CD Changer with your favorite CD, cassette, or radio station without interference. 1 x Subwoofer Out Connector Offers easy access to greater dimensions in FM only). 1 x Digital Coax Input A digital input is provided to connect any standard microphone to record your own voice or instrument. 1 x Headphone Jack Plug in a set...

Quick start guide
Page 1
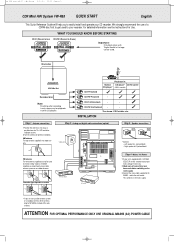
...:31 Pagina 1 CDR Mini HiFi System FW-R88 QUICK START CD 1 CD 2 CD 3 STANDBY/ON English STANDBY ON CD 1 CD 2 CD 3 DISPLAY CDR MIC LEVEL MIC CD CHANGE OPEN/CLOSE CD C H A N G E R DIGITAL / ANALOG AUX TUNER iR SENSOR CD TEXT CLOCK/TIMER AUX TUNER CD-TEXT EDITING CD RECORDER OPEN/CLOSE EDIT RECORD COMPILE CD REC TYPE FINALIZE CD ERASE CD MVOALSUTEMRE COPY CD COMPILE CD CDR NO JOG YES FINALIZE CD REC TYPE ERASE CD OPERATION GENERAL OPERATION For your guidance, the set is equipped with CD 1, CD 2 or CD 3. 2 Press REC...
...:31 Pagina 1 CDR Mini HiFi System FW-R88 QUICK START CD 1 CD 2 CD 3 STANDBY/ON English STANDBY ON CD 1 CD 2 CD 3 DISPLAY CDR MIC LEVEL MIC CD CHANGE OPEN/CLOSE CD C H A N G E R DIGITAL / ANALOG AUX TUNER iR SENSOR CD TEXT CLOCK/TIMER AUX TUNER CD-TEXT EDITING CD RECORDER OPEN/CLOSE EDIT RECORD COMPILE CD REC TYPE FINALIZE CD ERASE CD MVOALSUTEMRE COPY CD COMPILE CD CDR NO JOG YES FINALIZE CD REC TYPE ERASE CD OPERATION GENERAL OPERATION For your guidance, the set is equipped with CD 1, CD 2 or CD 3. 2 Press REC...
Quick start guide
Page 2
... Mini HiFi System FW-R88 QUICK START English This Quick Reference Guide will help you are using a cable antenna system or an outdoor antenna. INSTALLATION Step 1 - For better reception we recommend using a cable antenna system or an outdoor antenna, fit the antenna plug to FM AERIAL instead of a CDRW disc first to get used to easily install and operate your recorder. AM antenna The loop antenna supplied is equipped with 'Digital Audio' in : Normal CD-player* CD-Recorder CD-player* CDRW compatible CD-RW Finalized - Mains / AC Power...
... Mini HiFi System FW-R88 QUICK START English This Quick Reference Guide will help you are using a cable antenna system or an outdoor antenna. INSTALLATION Step 1 - For better reception we recommend using a cable antenna system or an outdoor antenna, fit the antenna plug to FM AERIAL instead of a CDRW disc first to get used to easily install and operate your recorder. AM antenna The loop antenna supplied is equipped with 'Digital Audio' in : Normal CD-player* CD-Recorder CD-player* CDRW compatible CD-RW Finalized - Mains / AC Power...


