Quick start guide
Page 5
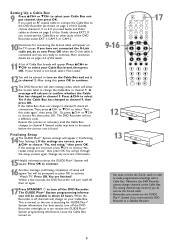
... allow the G-Link cable to change to choose "Yes, end setup," then press OK. If your Cable Box. STOP Ç PLAY TV VOLUME SLOW PAUSE H k G 17 CLEAR MUTE 12 13 BCOABXLE BCOABXLE • You must connect the G-Link cable in about the GUIDE Plus+® System will go through the setup...
... allow the G-Link cable to change to choose "Yes, end setup," then press OK. If your Cable Box. STOP Ç PLAY TV VOLUME SLOW PAUSE H k G 17 CLEAR MUTE 12 13 BCOABXLE BCOABXLE • You must connect the G-Link cable in about the GUIDE Plus+® System will go through the setup...
Quick start guide
Page 8
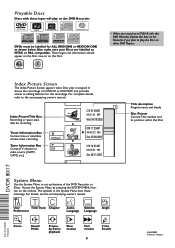
... Recorder if you plan to play the Disc on the remote.The symbols in Hungary 3103 605 20832 3194/000 (WwnN N wnwWNnwNwn NnwWnwWnN) DVDR 80/17 M6 Wed 06/18/2003 K Timer Information Box Current time or time/date of the DVD Recorder or Discs. For complete details, refer to set...
... Recorder if you plan to play the Disc on the remote.The symbols in Hungary 3103 605 20832 3194/000 (WwnN N wnwWNnwNwn NnwWnwWnN) DVDR 80/17 M6 Wed 06/18/2003 K Timer Information Box Current time or time/date of the DVD Recorder or Discs. For complete details, refer to set...
User manual
Page 3
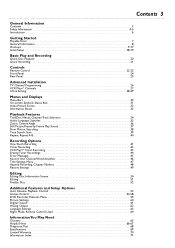
Contents 3 General Information Contents 3 Safety Information 4-5 Introduction 6 Getting Started Playable Discs 7 General Information 8 Hookups 9-17 Initial Setup 18-19 Basic Play and Recording Quick Disc Playback 20 Quick Recording 21 Controls Remote Control 22-23 Front Panel 24 Rear Panel ...
Contents 3 General Information Contents 3 Safety Information 4-5 Introduction 6 Getting Started Playable Discs 7 General Information 8 Hookups 9-17 Initial Setup 18-19 Basic Play and Recording Quick Disc Playback 20 Quick Recording 21 Controls Remote Control 22-23 Front Panel 24 Rear Panel ...
User manual
Page 5
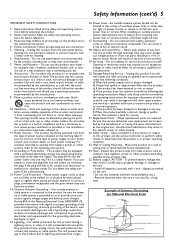
... in bodily injury, property damage, or damage to the unit: • Install all batteries correctly, with them , paying particular attention to the product, be fatal. 17. Safety Check - Upon completion of overhead power lines or other sources, refer to . 11. Mount the product to a wall or ceiling only as a bookcase or...
... in bodily injury, property damage, or damage to the unit: • Install all batteries correctly, with them , paying particular attention to the product, be fatal. 17. Safety Check - Upon completion of overhead power lines or other sources, refer to . 11. Mount the product to a wall or ceiling only as a bookcase or...
User manual
Page 9
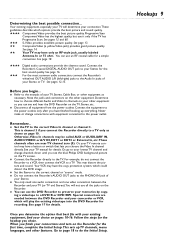
... if the TV has Progressive Scan. See your Stereo or TV. q Connect the Recorder directly to the correct channel or "source" mode. See page 17 for a simple connection. See page 13. 55 Composite Video (a yellow Video jack) provides good picture quality. q Set the TV to the PHONO IN...only as necessary. q Do not connect the Recorder's AUDIO OUT jacks to the correct Video In channel or channel 3. q You can see the blue Philips DVD background picture on the other equipment so you connect the Recorder directly to choose different Audio and Video In channels on pages 10-16...
... if the TV has Progressive Scan. See your Stereo or TV. q Connect the Recorder directly to the correct channel or "source" mode. See page 17 for a simple connection. See page 13. 55 Composite Video (a yellow Video jack) provides good picture quality. q Set the TV to the PHONO IN...only as necessary. q Do not connect the Recorder's AUDIO OUT jacks to the correct Video In channel or channel 3. q You can see the blue Philips DVD background picture on the other equipment so you connect the Recorder directly to choose different Audio and Video In channels on pages 10-16...
User manual
Page 17
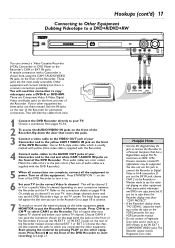
.... Choose a connection from view. 1 Connect the DVD Recorder directly to your TV to the correct Video In channel. Press Record I on pages 9-16. Hookups (cont'd) 17 Connecting to Other Equipment Dubbing Videotape to a DVD+R/DVD+RW STANDBY-ON OPEN/CLOSE You can use the IN EXT 1 or IN EXT 2 jacks on...
.... Choose a connection from view. 1 Connect the DVD Recorder directly to your TV to the correct Video In channel. Press Record I on pages 9-16. Hookups (cont'd) 17 Connecting to Other Equipment Dubbing Videotape to a DVD+R/DVD+RW STANDBY-ON OPEN/CLOSE You can use the IN EXT 1 or IN EXT 2 jacks on...
User manual
Page 21
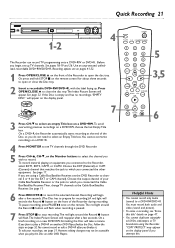
... avoid overwriting previous recordings on the remote control for recording.) A red light will begin , set the DVD Recorder to record the selected channel. See page 17. Recording will encircle the Record I button on the front of the Disc, so you do not need to close the Disc tray. 2 Insert a recordable DVD...
... avoid overwriting previous recordings on the remote control for recording.) A red light will begin , set the DVD Recorder to record the selected channel. See page 17. Recording will encircle the Record I button on the front of the Disc, so you do not need to close the Disc tray. 2 Insert a recordable DVD...
User manual
Page 22
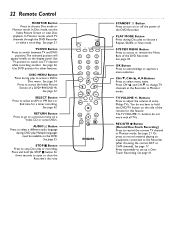
... to access the Index Picture Screen of a DVD+RW/DVD+R. See page 35. Press and hold the DVD/TV button on a Video CD or some Philips TVs. CH-/9, CH+/8, ;, :Buttons Press to select menu items. Press CH+8 and CH-9 to open or close the Recorder's disc tray. The TV VOLUME +/- Use... audio language during play . AUDIO Y Button Press to switch between TV and DVD positions.The selected position will appear briefly on the DVD. See page 17. MONITOR STANDBY TV / DVD T / C PLAY MODE REC. See page 32. See page 42. MODE 123 456 789 DISC SELECT 0 MENU CH SYSTEM OK CH ...
... to access the Index Picture Screen of a DVD+RW/DVD+R. See page 35. Press and hold the DVD/TV button on a Video CD or some Philips TVs. CH-/9, CH+/8, ;, :Buttons Press to select menu items. Press CH+8 and CH-9 to open or close the Recorder's disc tray. The TV VOLUME +/- Use... audio language during play . AUDIO Y Button Press to switch between TV and DVD positions.The selected position will appear briefly on the DVD. See page 17. MONITOR STANDBY TV / DVD T / C PLAY MODE REC. See page 32. See page 42. MODE 123 456 789 DISC SELECT 0 MENU CH SYSTEM OK CH ...
User manual
Page 24
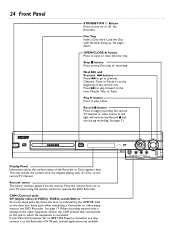
..., or the current TV channel. If your TV, when using the remote control to the beginning of the current one. See page 21. See page 17. OPEN/CLOSE A button Press to stop Disc play a Disc. Stop C button Press to open or close the Disc tray. Record I button during recording. Limited applications...
..., or the current TV channel. If your TV, when using the remote control to the beginning of the current one. See page 21. See page 17. OPEN/CLOSE A button Press to stop Disc play a Disc. Stop C button Press to open or close the Disc tray. Record I button during recording. Limited applications...
User manual
Page 25
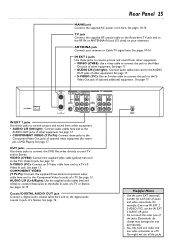
... L/R (left /right): Connect audio cables here and to the Video Out jack of other equipment. Video Out jack of audio and video connections. See page 17. OUT jacks Use these jacks to receive picture and sound from other equipment. • AUDIO L/R (left /right): Connect audio cables here and to the AUDIO... Audio In jacks of the jacks. See page 14. See page 12. See page 16. See pages 10-16. See pages 10-16. See page 17. • COMPONENT VIDEO (Y PB PR): Connect these jacks to your antenna or Cable TV signal here. See page 13. TV jack Connect the supplied RF...
... L/R (left /right): Connect audio cables here and to the Video Out jack of other equipment. Video Out jack of audio and video connections. See page 17. OUT jacks Use these jacks to receive picture and sound from other equipment. • AUDIO L/R (left /right): Connect audio cables here and to the AUDIO... Audio In jacks of the jacks. See page 14. See page 12. See page 16. See pages 10-16. See pages 10-16. See page 17. • COMPONENT VIDEO (Y PB PR): Connect these jacks to your antenna or Cable TV signal here. See page 13. TV jack Connect the supplied RF...
User manual
Page 33
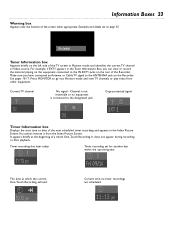
... have connected an Antenna or Cable TV signal to the IN EXT1 jacks on the left side of the screen when appropriate. See pages 10-17. Press MONITOR to the designated jack. Copy-protected signal 012 012 Timer Information box Displays the start time or date of a timed One-Touch Recording...
... have connected an Antenna or Cable TV signal to the IN EXT1 jacks on the left side of the screen when appropriate. See pages 10-17. Press MONITOR to the designated jack. Copy-protected signal 012 012 Timer Information box Displays the start time or date of a timed One-Touch Recording...
User manual
Page 57
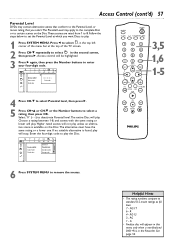
... with the same rating or lower will not play will be highlighted. 3 Press : again, then press the Number buttons to remove the menus. Press ; NC-17 6 - If no suitable alternative is found, play unless an alternative scene is in the top left corner of the TV screen. 2 Press CH-9 repeatedly to...
... with the same rating or lower will not play will be highlighted. 3 Press : again, then press the Number buttons to remove the menus. Press ; NC-17 6 - If no suitable alternative is found, play unless an alternative scene is in the top left corner of the TV screen. 2 Press CH-9 repeatedly to...

User manual
Page 69
Uncompressed digital (SPDIF - Sony Philips Digital Interface) • PCM 2-channel - 16, 20, 24 bit fs 48, 96 kHz AUDIO PERFORMANCE DA Converter AD Converter DVD Video CD Audio CD Signal-... Y: 1 Vpp into 75 Ohm C: 0.300 Vpp into 75 Ohm Y: 1 Vpp into 75 Ohm PB: 0.7 Vpp into 75 Ohm PR: 0.7 Vpp into 75 Ohm CABINET Dimensions (w x h x d): 17 x 3 x 13 inches Net weight: 8.8 lbs. Specifications 69 AUDIO FORMAT Compressed digital • Dolby Digital (AC-3) • DTS • MPEG1 • MPEG2 Play Multi-channel Multi...
Uncompressed digital (SPDIF - Sony Philips Digital Interface) • PCM 2-channel - 16, 20, 24 bit fs 48, 96 kHz AUDIO PERFORMANCE DA Converter AD Converter DVD Video CD Audio CD Signal-... Y: 1 Vpp into 75 Ohm C: 0.300 Vpp into 75 Ohm Y: 1 Vpp into 75 Ohm PB: 0.7 Vpp into 75 Ohm PR: 0.7 Vpp into 75 Ohm CABINET Dimensions (w x h x d): 17 x 3 x 13 inches Net weight: 8.8 lbs. Specifications 69 AUDIO FORMAT Compressed digital • Dolby Digital (AC-3) • DTS • MPEG1 • MPEG2 Play Multi-channel Multi...
User manual
Page 71
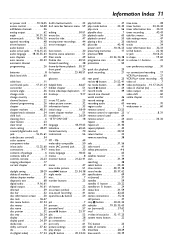
... .30, 37 front panel 24 fss button 23, 48, 51 glossary 65 helpful hints 66-67 hidden chapter 51 home videotape duplication . .17 hookups 9-17 in ext 1/2 jacks 25 index picture screen 32 information boxes 33 initial setup 18-19 insert chapter marker 51 installation 26-29 "IS TV...49 auto resume 20, 53 automatic channel programming 26 batteries 8 black level shift 60 cable box 11 cam1/cam2 jacks . . . . .17, 21, 24 camcorder 17 camera angle 36 change code 54 change country 58 channel buttons 22 channel programming 26 chapter 30 chapter markers 48, 51 chapter/track selection...
... .30, 37 front panel 24 fss button 23, 48, 51 glossary 65 helpful hints 66-67 hidden chapter 51 home videotape duplication . .17 hookups 9-17 in ext 1/2 jacks 25 index picture screen 32 information boxes 33 initial setup 18-19 insert chapter marker 51 installation 26-29 "IS TV...49 auto resume 20, 53 automatic channel programming 26 batteries 8 black level shift 60 cable box 11 cam1/cam2 jacks . . . . .17, 21, 24 camcorder 17 camera angle 36 change code 54 change country 58 channel buttons 22 channel programming 26 chapter 30 chapter markers 48, 51 chapter/track selection...

