Leaflet
Page 2
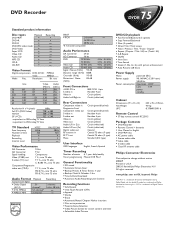
... Control • 37-key remote control RC25115 Package Contents • DVD Recorder • Remote Control + batteries • User Manual in U.S.A. 2002 © Koninklijke Philips Electronics N.V. DVD Recorder 75 DVDR Standard product information Disc types Playback DVD+RW • DVD+R • DVD-R • ...power cable • Stereo audio cable • Video cable • S-video cable • Coax RF antenna cable Philips Consumer Electronics Data subject to 250 analog TV lines TV Standard Scan frequency Number of lines Playback Recording Internal tuner NTSC ...
... Control • 37-key remote control RC25115 Package Contents • DVD Recorder • Remote Control + batteries • User Manual in U.S.A. 2002 © Koninklijke Philips Electronics N.V. DVD Recorder 75 DVDR Standard product information Disc types Playback DVD+RW • DVD+R • DVD-R • ...power cable • Stereo audio cable • Video cable • S-video cable • Coax RF antenna cable Philips Consumer Electronics Data subject to 250 analog TV lines TV Standard Scan frequency Number of lines Playback Recording Internal tuner NTSC ...

Quick start guide
Page 1
... to turn on the Recorder. Details are not using a Cable Box, you should see the DVD Recorder's owner's manual for details. EXT 2 VIDEO (CVBS) ANTENNA IN - The first time you see the blue Philips DVD background picture or the Initial Setup Screen on the TV (when the DVD Recorder is on). •... of the Recorder. You should remove the Demo Pin from the G-LINK jack on the front of the Recorder and the TV to your TV manual for connection instructions. 1 Your TV's remote may be called AUX or AUXILIARY IN, AUDIO/VIDEO or A/V IN, EXT1 or External In, etc., and may have...
... to turn on the Recorder. Details are not using a Cable Box, you should see the DVD Recorder's owner's manual for details. EXT 2 VIDEO (CVBS) ANTENNA IN - The first time you see the blue Philips DVD background picture or the Initial Setup Screen on the TV (when the DVD Recorder is on). •... of the Recorder. You should remove the Demo Pin from the G-LINK jack on the front of the Recorder and the TV to your TV manual for connection instructions. 1 Your TV's remote may be called AUX or AUXILIARY IN, AUDIO/VIDEO or A/V IN, EXT1 or External In, etc., and may have...

Quick start guide
Page 2
... cable in front of the Cable Box so it faces the remote sensor of your Cable Box. The G-Link cable's sensor should see the blue Philips DVD background picture or the Initial Setup Screen on the TV (when the DVD Recorder is still attached to the GLINK jack.) Place the sensor... Recorder. See your TV. 4 Connect the supplied audio cable(s) (with red/white markings) to the red/white, right/left AUDIO OUT 2 jacks on your TV manual for details. 3 Connect the supplied video cable (with yellow markings) to the DVD Recorder's ANTENNA jack IN - The IN jack may have a Satellite Receiver, the...
... cable in front of the Cable Box so it faces the remote sensor of your Cable Box. The G-Link cable's sensor should see the blue Philips DVD background picture or the Initial Setup Screen on the TV (when the DVD Recorder is still attached to the GLINK jack.) Place the sensor... Recorder. See your TV. 4 Connect the supplied audio cable(s) (with red/white markings) to the red/white, right/left AUDIO OUT 2 jacks on your TV manual for details. 3 Connect the supplied video cable (with yellow markings) to the DVD Recorder's ANTENNA jack IN - The IN jack may have a Satellite Receiver, the...
Quick start guide
Page 6
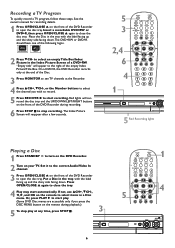
.../TV DISC CH+ OK SYSTEM CH- STOP Ç PLAY TV VOLUME SLOW PAUSE H k G 1 4 MENU LEFT GUIDE UP DOWN RIGHT DVDR 80 OPEN See the owner's manual for recording details. 1 Press OPEN/CLOSE A on the front of the DVD Recorder to turn on the DVD Recorder. 2 Turn on the front of the...
.../TV DISC CH+ OK SYSTEM CH- STOP Ç PLAY TV VOLUME SLOW PAUSE H k G 1 4 MENU LEFT GUIDE UP DOWN RIGHT DVDR 80 OPEN See the owner's manual for recording details. 1 Press OPEN/CLOSE A on the front of the DVD Recorder to turn on the DVD Recorder. 2 Turn on the front of the...
Quick start guide
Page 7
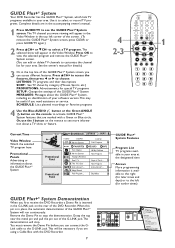
... to stop . Big Valley GUIDE Plus+® System Features Program List TV programs available in the accompanying owner's manual. 1 Press GUIDE/TV to the left corner of your area at the designated time Arrows More programming information is ... GUIDE Plus+® System screen, you can access different features. CONSUMERS RinbesemeforotrvetehuetshIiinRsgDetxehtmiesnoTdVPe.irnhaenred WARNING DAiWspAoYseFoRfOpMropCeHrlIyL. See the owner's manual for earlier times) GUIDE Plus+® System Demonstration When you need assistance or service. editshaisblDe ethmeoaPuitno.- SCHEDULE: Lists ...
... to stop . Big Valley GUIDE Plus+® System Features Program List TV programs available in the accompanying owner's manual. 1 Press GUIDE/TV to the left corner of your area at the designated time Arrows More programming information is ... GUIDE Plus+® System screen, you can access different features. CONSUMERS RinbesemeforotrvetehuetshIiinRsgDetxehtmiesnoTdVPe.irnhaenred WARNING DAiWspAoYseFoRfOpMropCeHrlIyL. See the owner's manual for earlier times) GUIDE Plus+® System Demonstration When you need assistance or service. editshaisblDe ethmeoaPuitno.- SCHEDULE: Lists ...
Quick start guide
Page 8
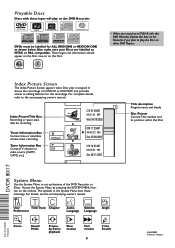
... Program name and details Disc Pointer Current Title number and its position within the Disc System Menu Use the System Menu to the accompanying owner's manual. SUPER AUDIO CD Recordable ReWritable DVDs must be labelled for recording 2 C10 07:56AM 00:01:24 . It shows the recordings of next timer recording... 3194/000 (WwnN N wnwWNnwNwn NnwWnwWnN) DVDR 80/17 M6 Sun 07/06/2003 L C10 12:01AM 00:58:53 . For details, see the accompanying owner's manual. Also make sure your Discs are labelled as shown below. ton on other DVD Players. M6 Wed 06/18/2003 K Timer Information Box Current time...
... Program name and details Disc Pointer Current Title number and its position within the Disc System Menu Use the System Menu to the accompanying owner's manual. SUPER AUDIO CD Recordable ReWritable DVDs must be labelled for recording 2 C10 07:56AM 00:01:24 . It shows the recordings of next timer recording... 3194/000 (WwnN N wnwWNnwNwn NnwWnwWnN) DVDR 80/17 M6 Sun 07/06/2003 L C10 12:01AM 00:58:53 . For details, see the accompanying owner's manual. Also make sure your Discs are labelled as shown below. ton on other DVD Players. M6 Wed 06/18/2003 K Timer Information Box Current time...

User manual
Page 1
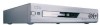
Digital Video Disc Recorder Owner's Manual ® DVDR75 Important! CALL US! WE WANT YOU TO START ENJOYING YOUR NEW PRODUCT RIGHT AWAY. PHILIPS REPRESENTATIVES ARE READY TO HELP YOU WITH ANY QUESTIONS ABOUT YOUR NEW PRODUCT. WE CAN GUIDE YOU THROUGH CONNECTIONS, FIRST-TIME SETUP, AND ANY OF THE FEATURES. See why inside. NEED HELP? CALL US BEFORE YOU CONSIDER RETURNING THE PRODUCT. 1-800-531-0039 OR VISIT US ON THE WEB AT WWW.PHILIPS.COM Return your Warranty Registration Card within 10 days.
Digital Video Disc Recorder Owner's Manual ® DVDR75 Important! CALL US! WE WANT YOU TO START ENJOYING YOUR NEW PRODUCT RIGHT AWAY. PHILIPS REPRESENTATIVES ARE READY TO HELP YOU WITH ANY QUESTIONS ABOUT YOUR NEW PRODUCT. WE CAN GUIDE YOU THROUGH CONNECTIONS, FIRST-TIME SETUP, AND ANY OF THE FEATURES. See why inside. NEED HELP? CALL US BEFORE YOU CONSIDER RETURNING THE PRODUCT. 1-800-531-0039 OR VISIT US ON THE WEB AT WWW.PHILIPS.COM Return your Warranty Registration Card within 10 days.
User manual
Page 6
... Search q VCR Plus+ Programming Package Contents q DVD Recorder q Remote control with two AA batteries q AC power cord q One blank Philips DVD+RW q One RF coaxial cable (black with silver tip, with videotapes. Please observe the local regulations regarding the disposal of Dolby ..., exhausted batteries, and old equipment. All rights reserved. Read this manual carefully to warm surroundings. Cleaning Discs q When a Disc becomes dirty, clean it with yellow markings) q This owner's manual and registration materials Environmental Information Your system has materials that can record...
... Search q VCR Plus+ Programming Package Contents q DVD Recorder q Remote control with two AA batteries q AC power cord q One blank Philips DVD+RW q One RF coaxial cable (black with silver tip, with videotapes. Please observe the local regulations regarding the disposal of Dolby ..., exhausted batteries, and old equipment. All rights reserved. Read this manual carefully to warm surroundings. Cleaning Discs q When a Disc becomes dirty, clean it with yellow markings) q This owner's manual and registration materials Environmental Information Your system has materials that can record...
User manual
Page 8
... features of Disc formats provided by pressing SYSTEM MENU on every Disc. DVD Player Upgrades If a DVD does not play properly, please contact Philips at the remote sensor on the current Disc. Features in the top left corner of some features of the TV screen if you cannot use... the Recorder's System Menu or Menu Bars to set up in this manual may require a playability enhancement. Due to make it will appear in this manual describe the DVD Disc Menus, which vary among DVDs. You will operate some Philips TVs. See pages 22-23. _ DVD Disc Menus... Some instructions ...
... features of Disc formats provided by pressing SYSTEM MENU on every Disc. DVD Player Upgrades If a DVD does not play properly, please contact Philips at the remote sensor on the current Disc. Features in the top left corner of some features of the TV screen if you cannot use... the Recorder's System Menu or Menu Bars to set up in this manual may require a playability enhancement. Due to make it will appear in this manual describe the DVD Disc Menus, which vary among DVDs. You will operate some Philips TVs. See pages 22-23. _ DVD Disc Menus... Some instructions ...
User manual
Page 9
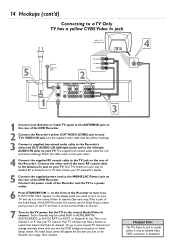
Your existing equipment, especially your TV, will determine your TV manual for details. See page 13. 55 Composite Video (a yellow Video jack) provides good picture quality. Connect the Recorder's Coaxial DIGITAL AUDIO OUT jack to a TV. ... channel directly. See pages 12 and 60. 555 S-Video provides excellent picture quality. Never make or change channels down until you can see the blue Philips DVD background picture on page 10. q Connect the Recorder directly to the correct channel or "source" mode. Your VCR may have only an RF-style...
Your existing equipment, especially your TV, will determine your TV manual for details. See page 13. 55 Composite Video (a yellow Video jack) provides good picture quality. Connect the Recorder's Coaxial DIGITAL AUDIO OUT jack to a TV. ... channel directly. See pages 12 and 60. 555 S-Video provides excellent picture quality. Never make or change channels down until you can see the blue Philips DVD background picture on page 10. q Connect the Recorder directly to the correct channel or "source" mode. Your VCR may have only an RF-style...
User manual
Page 10
...seconds, the display will appear the first time you turn it to channel 3.This is part of the Initial Setup.You cannot see the blue Philips DVD background picture or the Initial Setup screen on the remote instead.) Helpful Hint • If "IS TV ON? Set your TV. ... COMPONENT (CVBS) VIDEO V V S-VIDEO S-VIDEO (Y/C) L PB (Y/C) L PB AUDIO AUDIO R PR R PR Back of TV (example only) DIGITAL AUDIO OUT 1 Connect your TV's manual for this connection). If so, disconnect it from the TV and connect it to continue. Go to page 18 to channel 3. Your antenna or Cable...
...seconds, the display will appear the first time you turn it to channel 3.This is part of the Initial Setup.You cannot see the blue Philips DVD background picture or the Initial Setup screen on the remote instead.) Helpful Hint • If "IS TV ON? Set your TV. ... COMPONENT (CVBS) VIDEO V V S-VIDEO S-VIDEO (Y/C) L PB (Y/C) L PB AUDIO AUDIO R PR R PR Back of TV (example only) DIGITAL AUDIO OUT 1 Connect your TV's manual for this connection). If so, disconnect it from the TV and connect it to continue. Go to page 18 to channel 3. Your antenna or Cable...
User manual
Page 11
... To watch TV, put the Recorder in Monitor mode and on channel 3 or 4. (Press MONITOR on the Recorder's remote.) Change TV channels at your TV manual for step 3). Set your Cable Box or Satellite Receiver. • If "IS TV ON? If your TV. Or, use an Audio/Video connection between the... display will appear the first time you need to use channel 4 at your TV to channel 3. Check your TV instead. You cannot see the blue Philips DVD background picture or the Initial Setup screen on . C03" appears on the Recorder's display panel, press and hold the Number 4 button on the rear...
... To watch TV, put the Recorder in Monitor mode and on channel 3 or 4. (Press MONITOR on the Recorder's remote.) Change TV channels at your TV manual for step 3). Set your Cable Box or Satellite Receiver. • If "IS TV ON? If your TV. Or, use an Audio/Video connection between the... display will appear the first time you need to use channel 4 at your TV to channel 3. Check your TV instead. You cannot see the blue Philips DVD background picture or the Initial Setup screen on . C03" appears on the Recorder's display panel, press and hold the Number 4 button on the rear...
User manual
Page 12
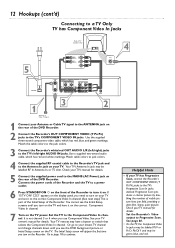
Check your TV's manual for details. 5 Connect the supplied power cord to the MAINS (AC Power) jack on the rear of visible picture lines per field, providing a jitter-free, ... the rear of the Recorder to turn on the TV and have a button or switch that selects the Component Video In channel. See your TV manual for details. Go to page 18 to the Component Video In channel. Use the supplied three-strand component video cable, which has red and white...
Check your TV's manual for details. 5 Connect the supplied power cord to the MAINS (AC Power) jack on the rear of visible picture lines per field, providing a jitter-free, ... the rear of the Recorder to turn on the TV and have a button or switch that selects the Component Video In channel. See your TV manual for details. Go to page 18 to the Component Video In channel. Use the supplied three-strand component video cable, which has red and white...
User manual
Page 13
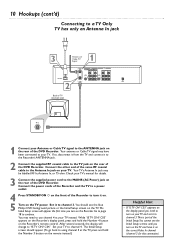
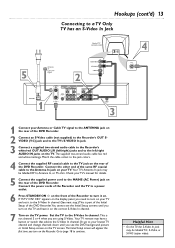
... is part of the Initial Setup of the DVD Recorder.You cannot see the Initial Setup screens until you are using S-Video. Check your TV's manual for details. 5 Connect the supplied power cord to the MAINS (AC Power) jack on the TV. Your TV's Antenna In jack may have it to...
... is part of the Initial Setup of the DVD Recorder.You cannot see the Initial Setup screens until you are using S-Video. Check your TV's manual for details. 5 Connect the supplied power cord to the MAINS (AC Power) jack on the TV. Your TV's Antenna In jack may have it to...
User manual
Page 14
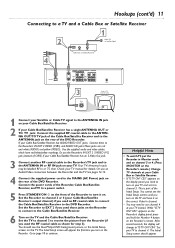
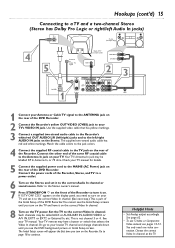
...'s white/red OUT AUDIO L/R (left/right) jacks and to the left/right AUDIO IN jacks on the rear of the DVD Recorder. See your TV manual. Your TV remote may be labelled RF In,Antenna In, or 75 ohm. Match the cable colors to the jack colors. 4 Connect the supplied RF... TV to continue. It may be called AUX or AUXILIARY IN, AUDIO/VIDEO or A/V IN, EXT1 or EXT2 or External In, etc. Check your TV manual for details. 5 Connect the supplied power cord to the MAINS (AC Power) jack on your TV. The Initial Setup screen will appear the first time...
...'s white/red OUT AUDIO L/R (left/right) jacks and to the left/right AUDIO IN jacks on the rear of the DVD Recorder. See your TV manual. Your TV remote may be labelled RF In,Antenna In, or 75 ohm. Match the cable colors to the jack colors. 4 Connect the supplied RF... TV to continue. It may be called AUX or AUXILIARY IN, AUDIO/VIDEO or A/V IN, EXT1 or EXT2 or External In, etc. Check your TV manual for details. 5 Connect the supplied power cord to the MAINS (AC Power) jack on your TV. The Initial Setup screen will appear the first time...
User manual
Page 15
... DVD Recorder.You cannot see the Initial Setup screens until you turn on your TV and set it on. Refer to the Stereo owner's manual. 7 Press STANDBY-ON y on the front of the Recorder, Stereo, and TV to a power outlet. 6 Turn on the Stereo... and set it to the correct Video In channel. (See next step.) This is not channel 3 or 4. See your TV manual for details. 5 Connect the supplied power cord to the MAINS (AC Power) jack on the rear of the DVD Recorder. Choose the correct...see pages 12-13. The supplied two-strand audio cable has red and white markings. Check your TV manual.
... DVD Recorder.You cannot see the Initial Setup screens until you turn on your TV and set it on. Refer to the Stereo owner's manual. 7 Press STANDBY-ON y on the front of the Recorder, Stereo, and TV to a power outlet. 6 Turn on the Stereo... and set it to the correct Video In channel. (See next step.) This is not channel 3 or 4. See your TV manual for details. 5 Connect the supplied power cord to the MAINS (AC Power) jack on the rear of the DVD Recorder. Choose the correct...see pages 12-13. The supplied two-strand audio cable has red and white markings. Check your TV manual.
User manual
Page 16
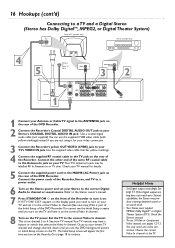
...channel and change channels down until you turn on your TV and set your TV. Helpful Hints • Set Digital output accordingly. Check the Stereo's manual. • To use the supplied CVBS video cable (with yellow markings) instead if you need one video connection. 16 Hookups (cont'd) Connecting to...your Stereo's capabilities, the Stereo may produce a strong, distorted sound or no sound at the TV. See page 61. Refer to the Stereo owner's manual. 7 Press STANDBY-ON y on the front of the Recorder to turn on the TV and have a button or switch that has yellow markings. 4...
...channel and change channels down until you turn on your TV and set your TV. Helpful Hints • Set Digital output accordingly. Check the Stereo's manual. • To use the supplied CVBS video cable (with yellow markings) instead if you need one video connection. 16 Hookups (cont'd) Connecting to...your Stereo's capabilities, the Stereo may produce a strong, distorted sound or no sound at the TV. See page 61. Refer to the Stereo owner's manual. 7 Press STANDBY-ON y on the front of the Recorder to turn on the TV and have a button or switch that has yellow markings. 4...
User manual
Page 17
These jacks are color coded. If your VCR/Camcorder manual. • Do not connect a Progressive Scan video source (such as a DVD Player) to the IN EXT 1 COMPONENT VIDEO jacks.The Recorder cannot receive Progressive Scan ...
These jacks are color coded. If your VCR/Camcorder manual. • Do not connect a Progressive Scan video source (such as a DVD Player) to the IN EXT 1 COMPONENT VIDEO jacks.The Recorder cannot receive Progressive Scan ...
User manual
Page 18
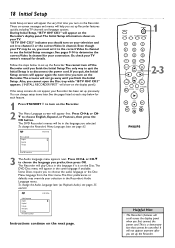
... Setup screens will appear again the next time you should turn on the display panel.) If the setup screens do not appear, your TV owner's manual for details. You can change the Recorder's Menu Language later, see pages 35 and 63. ~ Initial Setup Audio Language English K L Español Franç...
... Setup screens will appear again the next time you should turn on the display panel.) If the setup screens do not appear, your TV owner's manual for details. You can change the Recorder's Menu Language later, see pages 35 and 63. ~ Initial Setup Audio Language English K L Español Franç...
User manual
Page 28
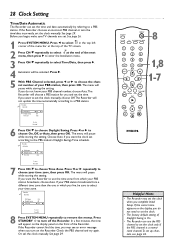
... can set up channels, see an error message when you live, be selected. If the Recorder cannot find the time, you may set the clock manually, choose Off.The Recorder will not update the time automatically according to set the clock when you want the Recorder to choose On, Off, or... REC/OTR PAUSE Helpful Hints • The Recorder may see page 26. If the correct time appears on the display, you and set the clock manually. See page 26. 1 Press SYSTEM MENU. Press ; See page 29. or : to use the PBS channel to set the clock only if the PBS channel...
... can set up channels, see an error message when you live, be selected. If the Recorder cannot find the time, you may set the clock manually, choose Off.The Recorder will not update the time automatically according to set the clock when you want the Recorder to choose On, Off, or... REC/OTR PAUSE Helpful Hints • The Recorder may see page 26. If the correct time appears on the display, you and set the clock manually. See page 26. 1 Press SYSTEM MENU. Press ; See page 29. or : to use the PBS channel to set the clock only if the PBS channel...

