User manual
Page 5
... time, unplug it from the type of antenna-discharge unit, connection to the product. Power-Cord Protection - Lightning - An outside antenna system should never be fatal. 17. Unauthorized substitutions may expose you are unable to insert the plug fully into this product ...5 IMPORTANT SAFETY INSTRUCTIONS 1. Attachments - Quick stops, excessive force, and uneven surfaces may fall into such power lines or circuits.When installing an outside antenna or cable system is connected to proper grounding of the mast and supporting structure, grounding of the lead-in damage...
... time, unplug it from the type of antenna-discharge unit, connection to the product. Power-Cord Protection - Lightning - An outside antenna system should never be fatal. 17. Unauthorized substitutions may expose you are unable to insert the plug fully into this product ...5 IMPORTANT SAFETY INSTRUCTIONS 1. Attachments - Quick stops, excessive force, and uneven surfaces may fall into such power lines or circuits.When installing an outside antenna or cable system is connected to proper grounding of the mast and supporting structure, grounding of the lead-in damage...
User manual
Page 9
...and other equipment as shown on the Recorder for the best sound quality. See your TV, Stereo, Cable Box, or other features. Your VCR may be called AUX or AUXILIARY IN, AUDIO/VIDEO or A/V...if the TV has Progressive Scan. Follow the steps for details. You can see the blue Philips DVD background picture on the other equipment so you choose the Video In channel directly. q ...picture and sound. This is channel 3 if you chose. See page 17 for the hookup you connect the Recorder directly to the power outlet. Or, your TV remote control may have only an RF-style...
...and other equipment as shown on the Recorder for the best sound quality. See your TV, Stereo, Cable Box, or other features. Your VCR may be called AUX or AUXILIARY IN, AUDIO/VIDEO or A/V...if the TV has Progressive Scan. Follow the steps for details. You can see the blue Philips DVD background picture on the other equipment so you choose the Video In channel directly. q ...picture and sound. This is channel 3 if you chose. See page 17 for the hookup you connect the Recorder directly to the power outlet. Or, your TV remote control may have only an RF-style...
User manual
Page 17
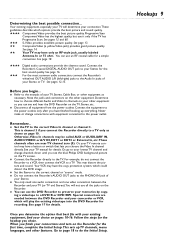
...Video In channel. If you used the connection shown on this page (with a Camcorder is supplied with the DVD Recorder.) 5 When all the equipment to power. See page 21. S-VIDEO VIDEO L AUDIO R CAM 1 DV S-VIDEO VIDEO AUDIO LEFT RIGHT Helpful Hints • Use the DV (Digital Video) ... shown here, using the CAM 1 AUDIO/VIDEO IN jacks on pages 9-16. Most audio cables are the most easily accessible. This is a common connection possibility. Hookups (cont'd) 17 Connecting to Other Equipment Dubbing Videotape to a DVD+R/DVD+RW STANDBY-ON OPEN/CLOSE You can use this jack to ...
...Video In channel. If you used the connection shown on this page (with a Camcorder is supplied with the DVD Recorder.) 5 When all the equipment to power. See page 21. S-VIDEO VIDEO L AUDIO R CAM 1 DV S-VIDEO VIDEO AUDIO LEFT RIGHT Helpful Hints • Use the DV (Digital Video) ... shown here, using the CAM 1 AUDIO/VIDEO IN jacks on pages 9-16. Most audio cables are the most easily accessible. This is a common connection possibility. Hookups (cont'd) 17 Connecting to Other Equipment Dubbing Videotape to a DVD+R/DVD+RW STANDBY-ON OPEN/CLOSE You can use this jack to ...
User manual
Page 21
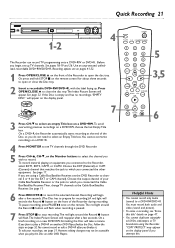
On a DVD+R, the Recorder automatically starts recording at the Cable Box/Satellite Receiver. See page 17. Recording will encircle the Record I to record. If you wish ... the disc tray. See page 32. To record material playing on the display panel. 7 POWER ON/OFF 3 Press CH-9 to the Recorder, select EXT1, EXT2, CAM1, or CAM2...changes may appear on page 47. • You cannot duplicate copyrighted DVDs, videotapes, or TV broadcasts using a Cable Box/Satellite Receiver, set up . Recording options are using the Recorder. MODE 123 456 789 DISC SELECT 0 ...
On a DVD+R, the Recorder automatically starts recording at the Cable Box/Satellite Receiver. See page 17. Recording will encircle the Record I to record. If you wish ... the disc tray. See page 32. To record material playing on the display panel. 7 POWER ON/OFF 3 Press CH-9 to the Recorder, select EXT1, EXT2, CAM1, or CAM2...changes may appear on page 47. • You cannot duplicate copyrighted DVDs, videotapes, or TV broadcasts using a Cable Box/Satellite Receiver, set up . Recording options are using the Recorder. MODE 123 456 789 DISC SELECT 0 ...
User manual
Page 25
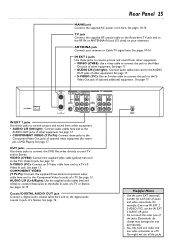
Rear Panel 25 MAINS jack Connect the supplied AC power cord here. See pages 10-16. See pages 10-16. Video Out jack of optional video equipment (for each pair of other equipment. See page 17. • COMPONENT VIDEO (Y PB PR): Connect these jacks to the Component Video Out jacks of ... jacks. • Do not touch the inner pins of other equipment. • AUDIO L/R (left /right): Connect audio cables here and to the Audio In jacks of a Stereo. See page 17. • AUDIO L/R (left /right): Connect audio cables here and to the RF IN or ANTENNA IN jack (75 ohm) on your antenna or...
Rear Panel 25 MAINS jack Connect the supplied AC power cord here. See pages 10-16. See pages 10-16. Video Out jack of optional video equipment (for each pair of other equipment. See page 17. • COMPONENT VIDEO (Y PB PR): Connect these jacks to the Component Video Out jacks of ... jacks. • Do not touch the inner pins of other equipment. • AUDIO L/R (left /right): Connect audio cables here and to the Audio In jacks of a Stereo. See page 17. • AUDIO L/R (left /right): Connect audio cables here and to the RF IN or ANTENNA IN jack (75 ohm) on your antenna or...
User manual
Page 71
... 35, 63 auto chapters 49 auto resume 20, 53 automatic channel programming 26 batteries 8 black level shift 60 cable box 11 cam1/cam2 jacks . . . . .17, 21, 24 camcorder 17 camera angle 36 change code 54 change country 58 channel buttons 22 channel programming 26 chapter 30 chapter markers 48,... ON? C03 18 language 18-19, 63 letterbox 60, 65 limited warranty 70 lock/unlock 56 M1 - M6 49 make edits compatible . . . . . .50 mains (AC power) jack . . . . . .25 menu bars 30 menu language 18, 63 menus 8 monitor button . . . . . .21-22, 41 name 47 new index picture 51 next ...
... 35, 63 auto chapters 49 auto resume 20, 53 automatic channel programming 26 batteries 8 black level shift 60 cable box 11 cam1/cam2 jacks . . . . .17, 21, 24 camcorder 17 camera angle 36 change code 54 change country 58 channel buttons 22 channel programming 26 chapter 30 chapter markers 48,... ON? C03 18 language 18-19, 63 letterbox 60, 65 limited warranty 70 lock/unlock 56 M1 - M6 49 make edits compatible . . . . . .50 mains (AC power) jack . . . . . .25 menu bars 30 menu language 18, 63 menus 8 monitor button . . . . . .21-22, 41 name 47 new index picture 51 next ...


