User manual
Page 6
...of Contents Special Functions 3 Care and Safety Information Setup 8 Cleaning discs 8 About recycling 8 General Information Introduction 9 Accessories supplied 9 Region codes 9 About YesDVD 9 TM Connecting to TV General 10 Selecting a suitable connection to your TV 10 Setting the TV to the correct ...S-VIDEO In or VIDEO In jack 18 Using analog audio output jacks 19 Using digital audio output jacks 19 Remote Control 20-21 Inserting batteries 22 Using the remote control to operate the system 22 Using the alphanumeric keypad to enter the characters 22 Front Panel 23 Jacks behind ...
...of Contents Special Functions 3 Care and Safety Information Setup 8 Cleaning discs 8 About recycling 8 General Information Introduction 9 Accessories supplied 9 Region codes 9 About YesDVD 9 TM Connecting to TV General 10 Selecting a suitable connection to your TV 10 Setting the TV to the correct ...S-VIDEO In or VIDEO In jack 18 Using analog audio output jacks 19 Using digital audio output jacks 19 Remote Control 20-21 Inserting batteries 22 Using the remote control to operate the system 22 Using the alphanumeric keypad to enter the characters 22 Front Panel 23 Jacks behind ...
User manual
Page 9
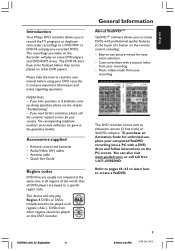
... software. Antenna cable - Easy-to be played in all DVD players are given in all regions of a button on the remote control, including: - You can be played on other DVD players. The corresponding telephone numbers and e-mail addresses are keyed to create...Code for unlimited use picture menus for your recording. - Case coversheet with a DVD drive and follow instructions on some DVD players and DVD-ROM drives. English Introduction Your Philips DVD recorder allows you to record the TV programs or duplicate camcorder recordings to read this DVD recorder. Remote control...
... software. Antenna cable - Easy-to be played in all DVD players are given in all regions of a button on the remote control, including: - You can be played on other DVD players. The corresponding telephone numbers and e-mail addresses are keyed to create...Code for unlimited use picture menus for your recording. - Case coversheet with a DVD drive and follow instructions on some DVD players and DVD-ROM drives. English Introduction Your Philips DVD recorder allows you to record the TV programs or duplicate camcorder recordings to read this DVD recorder. Remote control...
User manual
Page 20
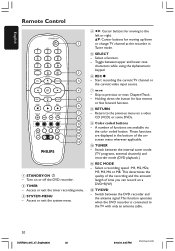
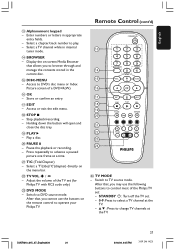
... are displayed in Tuner mode. 5 SELECT - Skip to the previous menu on a video CD (VCD) or some DVDs. 9 Color coded buttons - These functions are available via the color coded button. REC MODE - English Remote Control CH+ CH- 1 STANDBY-ON 2 - Access or exit the timer recording menu. 3 SYSTEM-MENU - Start recording the current TV channel...
... are displayed in Tuner mode. 5 SELECT - Skip to the previous menu on a video CD (VCD) or some DVDs. 9 Color coded buttons - These functions are available via the color coded button. REC MODE - English Remote Control CH+ CH- 1 STANDBY-ON 2 - Access or exit the timer recording menu. 3 SYSTEM-MENU - Start recording the current TV channel...
User manual
Page 21
... the volume of a DVD+R(W.) ^ OK - Press repeatedly to change TV channels at a time. ¡ T/C (Title/Chapter) - Switch to TV source mode. English Remote Control (cont'd) # Alphanumeric keypad - Store or confirm an entry. & EDIT - Stop playback/recording. - Access or exit the edit menu. * STOP 9 - Access to ...at the TV. Select a 'T'(title)/'C'(chapter) directly on the remote control to play. - STANDBY 2: Turn off the TV set (for Philips TV with RC5 code only.) £ DVD MODE - Select a chapter/track number to operate your Philips TV. 13 14 15 CH+ 16 17 CH- 18 ...
... the volume of a DVD+R(W.) ^ OK - Press repeatedly to change TV channels at a time. ¡ T/C (Title/Chapter) - Switch to TV source mode. English Remote Control (cont'd) # Alphanumeric keypad - Store or confirm an entry. & EDIT - Stop playback/recording. - Access or exit the edit menu. * STOP 9 - Access to ...at the TV. Select a 'T'(title)/'C'(chapter) directly on the remote control to play. - STANDBY 2: Turn off the TV set (for Philips TV with RC5 code only.) £ DVD MODE - Select a chapter/track number to operate your Philips TV. 13 14 15 CH+ 16 17 CH- 18 ...

User manual
Page 31
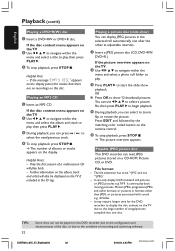
... on the screen. If the 'PBC' is turned on, the Audio CD display will appear on the TV 2 Use alphanumeric keypad 0-9 to input your pin code (password.) G For more playback features, see page 60.) Playing an audio CD 1 Insert an audio CD. ➜ Playback starts automatically. 2 To stop ... you want to remove this dialog for the inserted disc (see pages 62~64.) ➜ Use the alphanumeric keypad 0-9 on the remote control to enter your selection or use 3 4 to select a play option and press OK to confirm. Use alphanumeric keypad 0-9 to input your selection (e.g., subtitle...
... on the screen. If the 'PBC' is turned on, the Audio CD display will appear on the TV 2 Use alphanumeric keypad 0-9 to input your pin code (password.) G For more playback features, see page 60.) Playing an audio CD 1 Insert an audio CD. ➜ Playback starts automatically. 2 To stop ... you want to remove this dialog for the inserted disc (see pages 62~64.) ➜ Use the alphanumeric keypad 0-9 on the remote control to enter your selection or use 3 4 to select a play option and press OK to confirm. Use alphanumeric keypad 0-9 to input your selection (e.g., subtitle...
User manual
Page 32
...+RW, DVD+R.) If the picture overview appears on the TV due to start the slide show playback. Press EDIT and followed by the matching color coded button on the TV if included in the selected roll automatically one after the other than JPEG, or pictures associated with sound e.g. It may require..., or DVD. If the disc content menu appears on the TV 2 Use 1 2 3 4 to navigate within the menu and select a title to be displayed on the remote control. 5 To stop playback, press STOP 9. English Playback (cont'd) Playing a DVD+R(W) disc 1 Insert a DVD+RW or DVD+R disc. Helpful Hints: -
...+RW, DVD+R.) If the picture overview appears on the TV due to start the slide show playback. Press EDIT and followed by the matching color coded button on the TV if included in the selected roll automatically one after the other than JPEG, or pictures associated with sound e.g. It may require..., or DVD. If the disc content menu appears on the TV 2 Use 1 2 3 4 to navigate within the menu and select a title to be displayed on the remote control. 5 To stop playback, press STOP 9. English Playback (cont'd) Playing a DVD+R(W) disc 1 Insert a DVD+RW or DVD+R disc. Helpful Hints: -

User manual
Page 40
... the message disappears before removing the DVD+R(W). G To check the remaining recording time while recording in the menu. 3 Press the matching color coded button on the remote control to select { Delete .} ➜ The current recording will stop the recording, press STOP 9. ➜ 'MENU UPDATE' or 'CREATE ...recording available depends on the current recording mode and the amount of "Manual Recording" on pages 39~40. 2 Press REC 0 on the remote control twice to start play a DVD+R on other DVD players, see pages 57~58 "Accessing to the Preferences options - Deleting a recording You...
... the message disappears before removing the DVD+R(W). G To check the remaining recording time while recording in the menu. 3 Press the matching color coded button on the remote control to select { Delete .} ➜ The current recording will stop the recording, press STOP 9. ➜ 'MENU UPDATE' or 'CREATE ...recording available depends on the current recording mode and the amount of "Manual Recording" on pages 39~40. 2 Press REC 0 on the remote control twice to start play a DVD+R on other DVD players, see pages 57~58 "Accessing to the Preferences options - Deleting a recording You...

User manual
Page 42
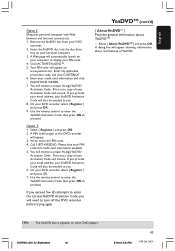
... 5. TIPS: The YesDVD disc is playable on other video content to a DVD+R(W) with a unique PIN code. Use the remote control to enter the YesDVD Activation Code, then press OK to select { YesDVD .} DVD-VIDEO-TITLE 04|CO1 YesDVD Preferences Status Message Register About ... reminders. - { Off } : Disable the messaging and reminders. Enter your Activation Code and invoice. Using this function is identified with the professional quality features found in Hollywood movies. 1 Press SYSTEM-MENU on the remote control. ➜ The system menu appears on the TV. 2 Press 4 repeatedly to...
... 5. TIPS: The YesDVD disc is playable on other video content to a DVD+R(W) with a unique PIN code. Use the remote control to enter the YesDVD Activation Code, then press OK to select { YesDVD .} DVD-VIDEO-TITLE 04|CO1 YesDVD Preferences Status Message Register About ... reminders. - { Off } : Disable the messaging and reminders. Enter your Activation Code and invoice. Using this function is identified with the professional quality features found in Hollywood movies. 1 Press SYSTEM-MENU on the remote control. ➜ The system menu appears on the TV. 2 Press 4 repeatedly to...
User manual
Page 43
...available. 5. If you provide your email address, your YesDVD Activation Code will appear. 3. Use the remote control to enter the YesDVD Activation Code, then press OK to proceed. Please have your Activation Code and invoice. Insert the YesDVD disc into the disc drive tray ...AboutYesDVDTM } and press OK. A dialog box will need to this PIN code. 4. Use the remote control to enter the YesDVD Activation Code, then press OK to proceed. Your PIN code will receive a unique 16-digit YesDVD Activation Code. Call 1-877-4YESDVD. You will appear on other DVD players. Enter...
...available. 5. If you provide your email address, your YesDVD Activation Code will appear. 3. Use the remote control to enter the YesDVD Activation Code, then press OK to proceed. Please have your Activation Code and invoice. Insert the YesDVD disc into the disc drive tray ...AboutYesDVDTM } and press OK. A dialog box will need to this PIN code. 4. Use the remote control to enter the YesDVD Activation Code, then press OK to proceed. Your PIN code will receive a unique 16-digit YesDVD Activation Code. Call 1-877-4YESDVD. You will appear on other DVD players. Enter...
User manual
Page 44
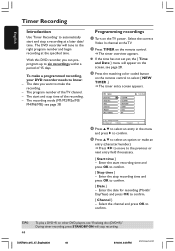
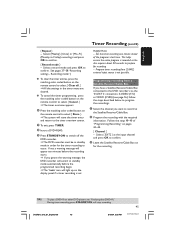
The program number of the recording. - The recording mode (M1/M2/M2x/M3/ M4/M6/M8,) see page 28. 3 Press the matching color coded button on the remote control to select { NEW TIMER .} ➜ The timer entry screen appears. Enter the stop a recording at a later date/ time. Select the channel... and press OK to confirm. { Date } - G If the time has not set yet, the { Time and Date } menu will appear on the remote control. ➜ The timer overview appears. Enter the date for recording (Month/ Day/Year) and press OK to know: - During timer recording, press STANDBY-ON...
The program number of the recording. - The recording mode (M1/M2/M2x/M3/ M4/M6/M8,) see page 28. 3 Press the matching color coded button on the remote control to select { NEW TIMER .} ➜ The timer entry screen appears. Enter the stop a recording at a later date/ time. Select the channel... and press OK to confirm. { Date } - G If the time has not set yet, the { Time and Date } menu will appear on the remote control. ➜ The timer overview appears. Enter the date for recording (Month/ Day/Year) and press OK to know: - During timer recording, press STANDBY-ON...
User manual
Page 45
...confirm. { Record mode } - G To cancel the timer programming, press the matching color coded button on the remote control to select { Cancel .} ➜ The timer overview appears. 6 Press the matching color coded button on for recording. - Select { EXT2 } as the disc requires about 30 seconds ...to confirm. 3 Leave the Satellite Receiver/Cable Box on the remote control to select { Store .} ➜ The system will stop recording. ...
...confirm. { Record mode } - G To cancel the timer programming, press the matching color coded button on the remote control to select { Cancel .} ➜ The timer overview appears. 6 Press the matching color coded button on for recording. - Select { EXT2 } as the disc requires about 30 seconds ...to confirm. 3 Leave the Satellite Receiver/Cable Box on the remote control to select { Store .} ➜ The system will stop recording. ...

User manual
Page 46
...Record Mode 12:00 PM 05:05 PM 12:31:2004 Once CH Off Delete New Timer Change VCR Plus+ 3 Press the matching color coded button on the remote control to select { Store .} ➜ The system will switch to select { VCR Plus+ .} ➜ The VCR Plus+® entry screen... PM 3139 246 14221 G To clear the PlusCode programming number, press the matching color coded button on the remote control to select { Clear .} G To cancel the VCR Plus+® programming, press the matching color coded button on the remote control to select { Cancel .} ➜ The timer overview appears. 5 Press OK to ...
...Record Mode 12:00 PM 05:05 PM 12:31:2004 Once CH Off Delete New Timer Change VCR Plus+ 3 Press the matching color coded button on the remote control to select { Store .} ➜ The system will switch to select { VCR Plus+ .} ➜ The VCR Plus+® entry screen... PM 3139 246 14221 G To clear the PlusCode programming number, press the matching color coded button on the remote control to select { Clear .} G To cancel the VCR Plus+® programming, press the matching color coded button on the remote control to select { Cancel .} ➜ The timer overview appears. 5 Press OK to ...

User manual
Page 47
...Change start time Clear all Store Cancel 3 Press 3 4 to select a timer program which you want to delete. 4 Press the matching color coded button on the remote control. ➜ The timer overview appears. Deleting a programmed recording 1 Turn on pages 44~45 to select { Delete .} ➜ The current... Video In channel at the TV. 2 Press TIMER on the remote control. ➜ The timer overview appears. 3 Press 3 4 to select a timer program which you want to change. 4 Press the matching color coded button on the remote control to select { Change .} ➜ The timer entry screen of...
...Change start time Clear all Store Cancel 3 Press 3 4 to select a timer program which you want to delete. 4 Press the matching color coded button on the remote control. ➜ The timer overview appears. Deleting a programmed recording 1 Turn on pages 44~45 to select { Delete .} ➜ The current... Video In channel at the TV. 2 Press TIMER on the remote control. ➜ The timer overview appears. 3 Press 3 4 to select a timer program which you want to change. 4 Press the matching color coded button on the remote control to select { Change .} ➜ The timer entry screen of...
User manual
Page 48
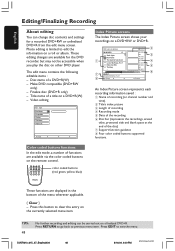
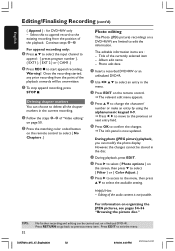
... on the currently selected menu item. Disc name of functions are available via the color coded buttons on the remote control. Color coded buttons functions In the edit mode, a number of a DVD+R(W) - color coded buttons (red, green, yellow, blue) These functions are available for a recorded DVD+...disc (DVD+R only) - These editing changes are displayed in the bottom of the disc) 7 Support function guidance 8 Four color coded buttons supported functions. Video editing +RW Disc Name Compatible Finalise Title Name Video Edit Clear Index Picture screens The Index Picture screen shows...
... on the currently selected menu item. Disc name of functions are available via the color coded buttons on the remote control. Color coded buttons functions In the edit mode, a number of a DVD+R(W) - color coded buttons (red, green, yellow, blue) These functions are available for a recorded DVD+...disc (DVD+R only) - These editing changes are displayed in the bottom of the disc) 7 Support function guidance 8 Four color coded buttons supported functions. Video editing +RW Disc Name Compatible Finalise Title Name Video Edit Clear Index Picture screens The Index Picture screen shows...
User manual
Page 50
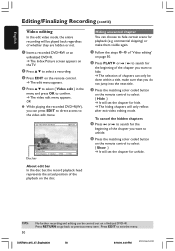
...2 Press PLAY 2 or ∞ / § to search for the beginning of the chapter you want to unhide. 5 Press the matching color coded button on the remote control to select { Show .} ➜ It will set the chapter for hide. ➜ The hiding chapters will set the chapter for unhide. Press EDIT...go back to hide certain scene for the beginning of the chapter you do not jump into the next title. 3 Press the matching color coded button on the remote control to confirm. ➜ The video edit menu appears. To cancel the hidden chapters 4 Press ∞ or § to search for ...
...2 Press PLAY 2 or ∞ / § to search for the beginning of the chapter you want to unhide. 5 Press the matching color coded button on the remote control to select { Show .} ➜ It will set the chapter for hide. ➜ The hiding chapters will set the chapter for unhide. Press EDIT...go back to hide certain scene for the beginning of the chapter you do not jump into the next title. 3 Press the matching color coded button on the remote control to confirm. ➜ The video edit menu appears. To cancel the hidden chapters 4 Press ∞ or § to search for ...
User manual
Page 51
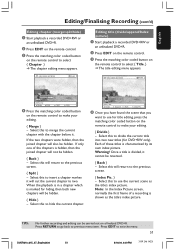
...Editing chapter (merge/split/hide) 1 Start playback a recorded DVD+RW or an unfinalized DVD+R. 2 Press EDIT on the remote control. 3 Press the matching color coded button on the remote control to select { Chapter .} ➜ The chapter editing menu appears. +RW | SHREK | EDIT MODE PAUSE Editing title ...(divide/append/Index picture) 1 Start playback a recorded DVD+RW or an unfinalized DVD+R. 2 Press EDIT on the remote control. 3 Press the matching color coded button on the remote control to select { Title .} ➜ The title editing menu appears. +RW | SHREK | EDIT MODE PAUSE 00:00...
...Editing chapter (merge/split/hide) 1 Start playback a recorded DVD+RW or an unfinalized DVD+R. 2 Press EDIT on the remote control. 3 Press the matching color coded button on the remote control to select { Chapter .} ➜ The chapter editing menu appears. +RW | SHREK | EDIT MODE PAUSE Editing title ...(divide/append/Index picture) 1 Start playback a recorded DVD+RW or an unfinalized DVD+R. 2 Press EDIT on the remote control. 3 Press the matching color coded button on the remote control to select { Title .} ➜ The title editing menu appears. +RW | SHREK | EDIT MODE PAUSE 00:00...
User manual
Page 52
... 3 4 to select an entry in the menu. 3 Press EDIT on a DVD+R(W) are : - However, the changes cannot be carried out on the remote control to edit the information. Press EDIT to confirm the changes. ➜ The info panel is not possible. DVDR610_615_37_Engfinal434 52 8/16/04, 4:09 PM 3139 246...you can be stored in the current recording. 1 Follow the steps 1~3 of "Video editing" on page 50. 2 Press the matching color coded button on a finalized DVD+R. Editing of the currently selected item - Once the recording started, any prior recording from the position of the playback ...
... 3 4 to select an entry in the menu. 3 Press EDIT on a DVD+R(W) are : - However, the changes cannot be carried out on the remote control to edit the information. Press EDIT to confirm the changes. ➜ The info panel is not possible. DVDR610_615_37_Engfinal434 52 8/16/04, 4:09 PM 3139 246...you can be stored in the current recording. 1 Follow the steps 1~3 of "Video editing" on page 50. 2 Press the matching color coded button on a finalized DVD+R. Editing of the currently selected item - Once the recording started, any prior recording from the position of the playback ...
User manual
Page 53
The information showed on the display panel varies for different types of the current title, press PLAY 2. color coded buttons (red, green, yellow, blue) These functions are available via the color coded buttons on the remote control. Remove the selected item in 90 degree clockwise increments. { ZOOM } - Delete the currently selected menu item. { PROTECT } / { UNPROTECT...
The information showed on the display panel varies for different types of the current title, press PLAY 2. color coded buttons (red, green, yellow, blue) These functions are available via the color coded buttons on the remote control. Remove the selected item in 90 degree clockwise increments. { ZOOM } - Delete the currently selected menu item. { PROTECT } / { UNPROTECT...
User manual
Page 54
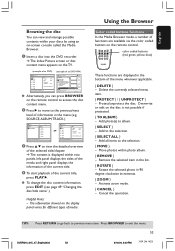
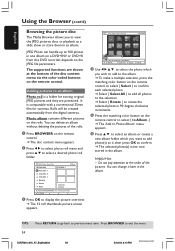
...coded buttons on the rolls. DVD / Photo / Photo Rolls Stop All Photo Rolls 01.02.2003 - 1 01.02.2003 - 1 01.02.2003 - 2 01.02.2003 - 3 Berwang Davoux Sylvia 01.02.2003 42 photos [PLAY] [RETURN] [BROWSER]. Adding pictures to the order of the rolls. 1 Press BROWSER on the remote control...picture overview. ➜ The 12 roll thumbnails picture screen appears. You can handle up to previous menu item. Photo album contains different pictures on the remote control. DVD / Photo / Rolls / Roll KYZ 06/06/2004 00:00 [PLAY] [OK] [RETURN] [EDIT] [BROWSER] To Album Select ...
...coded buttons on the rolls. DVD / Photo / Photo Rolls Stop All Photo Rolls 01.02.2003 - 1 01.02.2003 - 1 01.02.2003 - 2 01.02.2003 - 3 Berwang Davoux Sylvia 01.02.2003 42 photos [PLAY] [RETURN] [BROWSER]. Adding pictures to the order of the rolls. 1 Press BROWSER on the remote control...picture overview. ➜ The 12 roll thumbnails picture screen appears. You can handle up to previous menu item. Photo album contains different pictures on the remote control. DVD / Photo / Rolls / Roll KYZ 06/06/2004 00:00 [PLAY] [OK] [RETURN] [EDIT] [BROWSER] To Album Select ...
User manual
Page 62
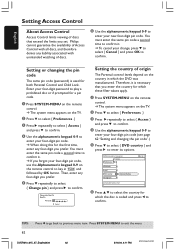
... doing this for which the DVD was manufactured. Enter your four-digit password to play a prohibited disc or if prompted for a pin code. 1 Press SYSTEM-MENU on the remote control. ➜ The system menu appears on the TV. 2 Press 4 to select { Preferences .} 3 Press 2 repeatedly to select {...-digit you prefer. 5 Press 4 repeatedly to select { Change pin } and press 2 to enter your new four-digit pin code. Philips cannot guarantee the availability of origin The Parental control levels depend on the TV. 2 Press 4 to select { Preferences .} 3 Press 2 repeatedly to select { Access } and press...
... doing this for which the DVD was manufactured. Enter your four-digit password to play a prohibited disc or if prompted for a pin code. 1 Press SYSTEM-MENU on the remote control. ➜ The system menu appears on the TV. 2 Press 4 to select { Preferences .} 3 Press 2 repeatedly to select {...-digit you prefer. 5 Press 4 repeatedly to select { Change pin } and press 2 to enter your new four-digit pin code. Philips cannot guarantee the availability of origin The Parental control levels depend on the TV. 2 Press 4 to select { Preferences .} 3 Press 2 repeatedly to select { Access } and press...


