
Leaflet
Page 2
DVD Recorder/VCR DVDR600VR/37 Specifications Video Recording • Tape speeds: LP, SP • Recording enhancements: Direct Record, Safe Record, Erase, One Touch Record (OTR), Favorite Scene Selection, Manual Chapter Marking, Divide, ...used on the disc and navigate to the recording you want to DVD for playback of Koninklijke Philips Electronics N.V. Instead of Video Heads: 4 • Head Cleaner: Auto • Video Enhancement... is a DVD menu created on regular DVD players. or their respective owners. Specifications are the property of legacy VHS tapes and transfer to watch....
DVD Recorder/VCR DVDR600VR/37 Specifications Video Recording • Tape speeds: LP, SP • Recording enhancements: Direct Record, Safe Record, Erase, One Touch Record (OTR), Favorite Scene Selection, Manual Chapter Marking, Divide, ...used on the disc and navigate to the recording you want to DVD for playback of Koninklijke Philips Electronics N.V. Instead of Video Heads: 4 • Head Cleaner: Auto • Video Enhancement... is a DVD menu created on regular DVD players. or their respective owners. Specifications are the property of legacy VHS tapes and transfer to watch....
User manual
Page 1
E9480UD_EN.qx3 05.1.8 4:15 PM Page 1 Digital Video Disc Recorder & Video Cassette Recorder Owner's Manual DVDR600VR THANK YOU FOR CHOOSING PHILIPS. READ YOUR QUICK-USE GUIDE AND/OR OWNER'S MANUAL FIRST FOR QUICK TIPS THAT MAKE USING YOUR PHILIPS PRODUCT MORE ENJOYABLE. NEED HELP FAST? IF YOU HAVE READ YOUR INSTRUCTIONS AND STILL NEED ASSISTANCE, YOU MAY ACCESS OUR ONLINE HELP AT WWW.P4C.PHILIPS.COM OR CALL 1-888-PHILIPS (744-5477) WHILE WITH YOUR PRODUCT. ®
E9480UD_EN.qx3 05.1.8 4:15 PM Page 1 Digital Video Disc Recorder & Video Cassette Recorder Owner's Manual DVDR600VR THANK YOU FOR CHOOSING PHILIPS. READ YOUR QUICK-USE GUIDE AND/OR OWNER'S MANUAL FIRST FOR QUICK TIPS THAT MAKE USING YOUR PHILIPS PRODUCT MORE ENJOYABLE. NEED HELP FAST? IF YOU HAVE READ YOUR INSTRUCTIONS AND STILL NEED ASSISTANCE, YOU MAY ACCESS OUR ONLINE HELP AT WWW.P4C.PHILIPS.COM OR CALL 1-888-PHILIPS (744-5477) WHILE WITH YOUR PRODUCT. ®
User manual
Page 6
Your Philips DVD and Video Cassette Recorder records both DVD+RW/DVD+R...picture and sound quality of Audio (red and white tips) and Video (yellow tips) cables ● This owner's manual, a Quick-Use Guide, and registration materials Environmental Information Your system has materials that can record TV programs, ... equipment. E9480UD_EN.qx3 05.1.8 4:15 PM Page 6 6 Introduction Welcome! Manufactured under license from Dolby Laboratories. Read this manual carefully to DVD+R/DVD+RW recording ● Fast Forward/Reverse Search ● Index Picture Screen ● NTSC/PAL compatibility...
Your Philips DVD and Video Cassette Recorder records both DVD+RW/DVD+R...picture and sound quality of Audio (red and white tips) and Video (yellow tips) cables ● This owner's manual, a Quick-Use Guide, and registration materials Environmental Information Your system has materials that can record TV programs, ... equipment. E9480UD_EN.qx3 05.1.8 4:15 PM Page 6 6 Introduction Welcome! Manufactured under license from Dolby Laboratories. Read this manual carefully to DVD+R/DVD+RW recording ● Fast Forward/Reverse Search ● Index Picture Screen ● NTSC/PAL compatibility...
User manual
Page 12
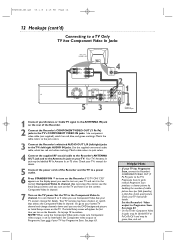
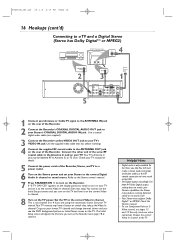
... to the jack colors. 3 Connect the Recorder's white/red AUDIO OUT L/R (left/right) jacks to Progressive Scan. Set the TV to continue. See your TV owner's manual for details. 5 Connect the power cords of visible picture lines per field, providing a jitter-free, sharp, quiet picture. Or, go to your lowest TV channel... TV signal to the ANTENNA IN jack on your TV. Use component video cable (not supplied), which has red and white markings. Check your TV manual for details. If "IS TV ON? Your TV remote may be labelled RF In,Antenna In, or 75 ohm. Go to page 18 to the...
... to the jack colors. 3 Connect the Recorder's white/red AUDIO OUT L/R (left/right) jacks to Progressive Scan. Set the TV to continue. See your TV owner's manual for details. 5 Connect the power cords of visible picture lines per field, providing a jitter-free, sharp, quiet picture. Or, go to your lowest TV channel... TV signal to the ANTENNA IN jack on your TV. Use component video cable (not supplied), which has red and white markings. Check your TV manual for details. If "IS TV ON? Your TV remote may be labelled RF In,Antenna In, or 75 ohm. Go to page 18 to the...

User manual
Page 15
... TV's Antenna In jack may be called AUX or AUXILIARY IN,AUDIO/VIDEO or A/V IN, EXT1 or EXT2 or External In, etc. Check your TV manual for details. 5 Connect the power cords of the Recorder. If "IS TV ON? This is not channel 3 or 4 if you turn on the Recorder. See.../right) jacks and to continue. The audio cable has red and white markings. Or, go to your TV's VIDEO IN jack. Refer to the Stereo owner's manual. 7 Press STANDBY-ON y to the correct Video In channel. Helpful Hints • Set Analog output accordingly. Your TV remote may be labelled RF In,Antenna...
... TV's Antenna In jack may be called AUX or AUXILIARY IN,AUDIO/VIDEO or A/V IN, EXT1 or EXT2 or External In, etc. Check your TV manual for details. 5 Connect the power cords of the Recorder. If "IS TV ON? This is not channel 3 or 4 if you turn on the Recorder. See.../right) jacks and to continue. The audio cable has red and white markings. Or, go to your TV's VIDEO IN jack. Refer to the Stereo owner's manual. 7 Press STANDBY-ON y to the correct Video In channel. Helpful Hints • Set Analog output accordingly. Your TV remote may be labelled RF In,Antenna...
User manual
Page 16
....) You cannot see pages 12 and 13.You only need to turn on the TV and have sound at the TV. Refer to the Stereo owner's manual. 7 Press STANDBY-ON y to the Antenna In jack on the Stereo power and set it on the correct Video In channel. 8 Turn on the TV.... If "IS TV ON? See page 64. Check your TV manual for the Discs you turn on the Recorder. The Initial Setup screen will appear the first time you play.You still must support Dolby DigitalTM...
....) You cannot see pages 12 and 13.You only need to turn on the TV and have sound at the TV. Refer to the Stereo owner's manual. 7 Press STANDBY-ON y to the Antenna In jack on the Stereo power and set it on the correct Video In channel. 8 Turn on the TV.... If "IS TV ON? See page 64. Check your TV manual for the Discs you turn on the Recorder. The Initial Setup screen will appear the first time you play.You still must support Dolby DigitalTM...
User manual
Page 18
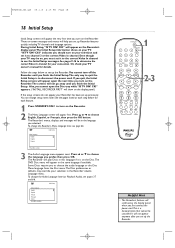
... it is on the Recorder. 2 The Menu Language screen will scroll across the display panel when you finish the Initial Setup. Or, check your TV owner's manual for your TV. Press K or L to choose English, Español, or Français, then press the OK button. These on-screen messages and...
... it is on the Recorder. 2 The Menu Language screen will scroll across the display panel when you finish the Initial Setup. Or, check your TV owner's manual for your TV. Press K or L to choose English, Español, or Français, then press the OK button. These on-screen messages and...
User manual
Page 63
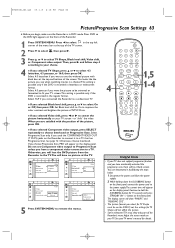
...the screen mode on the display panel. Select 4:3 panscan if you have accidentally activated the progressive scan, there will appear on your TV owner's manual for details. Do not set Component video output to Progressive Scan unless you want to a TV that has Progressive Scan. Otherwise, choose ... the top left corner of the menu bar at the TV. The display screen will not affect the picture. • Some widescreen TVs may show "PHILIPS" and "READING CO2". • The picture format you selected TV Shape, press K or L to select in letterbox or widescreen format. Press s ...
...the screen mode on the display panel. Select 4:3 panscan if you have accidentally activated the progressive scan, there will appear on your TV owner's manual for details. Do not set Component video output to Progressive Scan unless you want to a TV that has Progressive Scan. Otherwise, choose ... the top left corner of the menu bar at the TV. The display screen will not affect the picture. • Some widescreen TVs may show "PHILIPS" and "READING CO2". • The picture format you selected TV Shape, press K or L to select in letterbox or widescreen format. Press s ...
User manual
Page 81
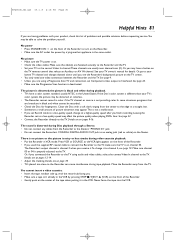
... you . • Make sure a tape isn't already in the same outlet. Details are fastened securely to the Recorder and the TV. • Set your TV owner's manual for fingerprints. In some situations, programs that selects an Auxiliary or A/V IN channel. The picture is noisy or has streaks during tape playback. The Recorder...
... you . • Make sure a tape isn't already in the same outlet. Details are fastened securely to the Recorder and the TV. • Set your TV owner's manual for fingerprints. In some situations, programs that selects an Auxiliary or A/V IN channel. The picture is noisy or has streaks during tape playback. The Recorder...
User manual
Page 82
... with the red and white audio cables, you will appear on your TV screen briefly), press CHANNEL K/ L to five times. See your TV owner's manual for five minutes.Then, plug in Line Input mode (EXT1, EXT2, or CAM1). However, the heads may not record clearly. Eventually, the heads... may have a picture that is protected by antenna/cable/satellite television channels. patents and other rights owners. Use of the picture may not be authorized by Macrovision Corporation and is intended for home and other limited viewing uses only, unless ...
... with the red and white audio cables, you will appear on your TV screen briefly), press CHANNEL K/ L to five times. See your TV owner's manual for five minutes.Then, plug in Line Input mode (EXT1, EXT2, or CAM1). However, the heads may not record clearly. Eventually, the heads... may have a picture that is protected by antenna/cable/satellite television channels. patents and other rights owners. Use of the picture may not be authorized by Macrovision Corporation and is intended for home and other limited viewing uses only, unless ...
User manual
Page 88
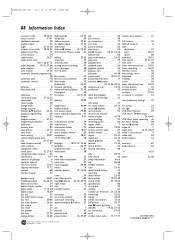
... 7 s-video in channel (tv 9 video shift 63 visible chapter 54 warranty 87 widescreen tv 63 "x 8, 33 zoom 32, 38 8239 300 33912 1VMN20183A/E9480UD **** This owner's manual is made of contents 5 tape duplication 72 eject 20, 24 speed 80 time/date 30-31 time search 32, 41, 76 time zone 30 timer...
... 7 s-video in channel (tv 9 video shift 63 visible chapter 54 warranty 87 widescreen tv 63 "x 8, 33 zoom 32, 38 8239 300 33912 1VMN20183A/E9480UD **** This owner's manual is made of contents 5 tape duplication 72 eject 20, 24 speed 80 time/date 30-31 time search 32, 41, 76 time zone 30 timer...
Quick start guide
Page 1
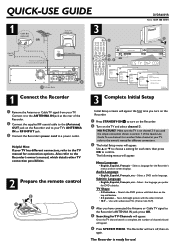
... the top and bottom. • 4:3 panscan - The Recorder will turn on the Recorder. 2 Turn on the Recorder. 1 Press STANDBY-ON2 to the owner's manual for different connections. 3 The Initial Setup menu will appear. search complete 024 Channels found will appear: Menu Language • English, Español, Fran&#... TV channel search is complete, the number of this Quick-Use Guide.To use ! The Recorder is on again. QUICK-USE GUIDE 1 3 DVDR600VR 12nc: 8239 300 33901 Antenna or Cable TV signal or coaxial cable from your TV. Make sure the TV is ready for DVD subtitles. The...
... the top and bottom. • 4:3 panscan - The Recorder will turn on the Recorder. 2 Turn on the Recorder. 1 Press STANDBY-ON2 to the owner's manual for different connections. 3 The Initial Setup menu will appear. search complete 024 Channels found will appear: Menu Language • English, Español, Fran&#... TV channel search is complete, the number of this Quick-Use Guide.To use ! The Recorder is on again. QUICK-USE GUIDE 1 3 DVDR600VR 12nc: 8239 300 33901 Antenna or Cable TV signal or coaxial cable from your TV. Make sure the TV is ready for DVD subtitles. The...
Quick start guide
Page 2
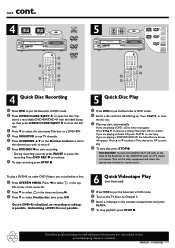
... Recorder to confirm. ... Press DVD REC 0 to continue. 7 To stop recording, press STOP 9. 5 Quick Disc Play 1 Press DVD to Channel 3. 3 Insert a videotape in the accompanying owner's manual. If you must finalize it to put the Recorder in the menu and press B. 3 Press 4 to open the disc tray. Turn on other equipment and...
... Recorder to confirm. ... Press DVD REC 0 to continue. 7 To stop recording, press STOP 9. 5 Quick Disc Play 1 Press DVD to Channel 3. 3 Insert a videotape in the accompanying owner's manual. If you must finalize it to put the Recorder in the menu and press B. 3 Press 4 to open the disc tray. Turn on other equipment and...

