
User manual
Page 1
Introduction Connections DIGITAL VIDEO DISC RECORDER DVDR3475/37 User Manual STOP ARRÊT ALTO Basic Setup Recording Playback Editing Function Setup Others E7E4AUD.indd 1 2007/06/20 13:09:48
Introduction Connections DIGITAL VIDEO DISC RECORDER DVDR3475/37 User Manual STOP ARRÊT ALTO Basic Setup Recording Playback Editing Function Setup Others E7E4AUD.indd 1 2007/06/20 13:09:48
User manual
Page 6
... FOR THE VIDEO INPUT 14 CONNECTION TO A TV 15 CONNECTION TO A TV WITH AN HDMI COMPATIBLE PORT 16 CONNECTION TO AN AUDIO SYSTEM 18 Basic Setup GUIDE TO ON-SCREEN DISPLAYS AND MENUS . . . . 19 On-Screen Display / Menu 19 Main Menu 21 INITIAL SETTING 22 SETTING THE CLOCK 23 Clock Setting... an External Device 34 Recording from an External Device 35 DV DUBBING 36 Guide to DV and On-Screen Display 36 DVC to DVD Dubbing 37 SETTING A DISC TO PROTECT 39 PLAYING THE DISCS IN OTHER DVD PLAYERS . . . . . 40 Finalizing a Disc 40 Auto Finalizing 41 6 EN E7E4AUD.indd 6 2007/05/16...
... FOR THE VIDEO INPUT 14 CONNECTION TO A TV 15 CONNECTION TO A TV WITH AN HDMI COMPATIBLE PORT 16 CONNECTION TO AN AUDIO SYSTEM 18 Basic Setup GUIDE TO ON-SCREEN DISPLAYS AND MENUS . . . . 19 On-Screen Display / Menu 19 Main Menu 21 INITIAL SETTING 22 SETTING THE CLOCK 23 Clock Setting... an External Device 34 Recording from an External Device 35 DV DUBBING 36 Guide to DV and On-Screen Display 36 DVC to DVD Dubbing 37 SETTING A DISC TO PROTECT 39 PLAYING THE DISCS IN OTHER DVD PLAYERS . . . . . 40 Finalizing a Disc 40 Auto Finalizing 41 6 EN E7E4AUD.indd 6 2007/05/16...
User manual
Page 21
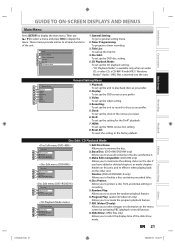
... Media™ Audio / JPEG files is inserted into the unit. 1 General Setting 2 Playback 3 Display 4 Video Recording 5 Clock 26 DivX HDMI 37 Reset All 48 General Setting Menu 1. Display: To set up the OSD screen as you have added or deleted chapters, or made chapters hidden on...Program Play: (audio CD/video CD only) Allows you to activate the program playback feature. 7. PBC (Video CD only): Allows you need. 6. Setup 1 General Setting 2 Timer Programming 3 Title List 4 Disc Edit 5 CD Playback Mode 1. Playback: To set up the unit to play back discs ...
... Media™ Audio / JPEG files is inserted into the unit. 1 General Setting 2 Playback 3 Display 4 Video Recording 5 Clock 26 DivX HDMI 37 Reset All 48 General Setting Menu 1. Display: To set up the OSD screen as you have added or deleted chapters, or made chapters hidden on...Program Play: (audio CD/video CD only) Allows you to activate the program playback feature. 7. PBC (Video CD only): Allows you need. 6. Setup 1 General Setting 2 Timer Programming 3 Title List 4 Disc Edit 5 CD Playback Mode 1. Playback: To set up the unit to play back discs ...
User manual
Page 37
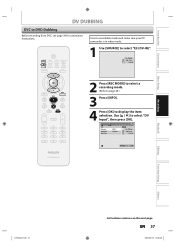
Introduction Connections Basic Setup DV DUBBING DVC to display the item selection. EN 37 2007/05/16 14:56:30 E3 (DV-IN) AB-1234 0:00:00 2 Press [REC MODE] to select a recording mode. (Refer to page 24.) 3 Press [...", then press [OK]. 1/ 1 1/ 1 Control DV Audio Start Rec DVD Stereo1 +RW E3 (DV-IN) AB-1234 0:00:00 SP(2Hr) 2:00 Recording Playback Editing Function Setup Others E7E4AUD.indd 37 Instructions continue on the next page.
Introduction Connections Basic Setup DV DUBBING DVC to display the item selection. EN 37 2007/05/16 14:56:30 E3 (DV-IN) AB-1234 0:00:00 2 Press [REC MODE] to select a recording mode. (Refer to page 24.) 3 Press [...", then press [OK]. 1/ 1 1/ 1 Control DV Audio Start Rec DVD Stereo1 +RW E3 (DV-IN) AB-1234 0:00:00 SP(2Hr) 2:00 Recording Playback Editing Function Setup Others E7E4AUD.indd 37 Instructions continue on the next page.
User manual
Page 61
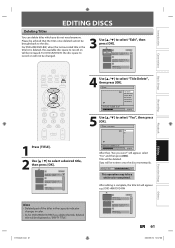
...11:35AM E1 EP NOV/22/07 0:10:33 3 EMPTY TITLE 1:37:52 SP(2Hr) 4 Use [K / L] to select "Yes", then press [OK]. E7E4AUD.indd 61 Editing Function Setup NOV/21/07 11:00AM E1 SP 0:00:59 After that the... EMPTY TITLE 0:21:14 SP(2Hr) 2 NOV/22/07 11:35AM E1 EP NOV/22/07 0:10:33 3 EMPTY TITLE 1:37:52 SP(2Hr) Others EN 61 2007/05/16 14:57:00 Title Delete 1 Yes No Recording Playback 1 Press [TITLE]. 2 ...07 0:20:44 2 NOV/22/07 11:35AM E1 EP NOV/22/07 0:10:33 3 EMPTY TITLE 1:37:52 SP(2Hr) Note • Deleted part of the titles in the capacity indicator changes in the title list ...
...11:35AM E1 EP NOV/22/07 0:10:33 3 EMPTY TITLE 1:37:52 SP(2Hr) 4 Use [K / L] to select "Yes", then press [OK]. E7E4AUD.indd 61 Editing Function Setup NOV/21/07 11:00AM E1 SP 0:00:59 After that the... EMPTY TITLE 0:21:14 SP(2Hr) 2 NOV/22/07 11:35AM E1 EP NOV/22/07 0:10:33 3 EMPTY TITLE 1:37:52 SP(2Hr) Others EN 61 2007/05/16 14:57:00 Title Delete 1 Yes No Recording Playback 1 Press [TITLE]. 2 ...07 0:20:44 2 NOV/22/07 11:35AM E1 EP NOV/22/07 0:10:33 3 EMPTY TITLE 1:37:52 SP(2Hr) Note • Deleted part of the titles in the capacity indicator changes in the title list ...

Quick start guide
Page 1
Quick Start Guide DIGITAL VIDEO DISC RECORDER DVDR3475/37 Playable Discs This unit is compatible to DVD+RW... Licensing Corporation. max. Settings For the Video Input You must perform "Make Edits Compatible" before making a recording. 1Press [SETUP] and use [K//L] to select "General Setting", then press [OK]. 2Use [K//L] to select "Video", then press [OK]....then press [OK]. 5Use [K//L] to select the input jack type to connect, then press [OK]. 6Press [SETUP] to once. General Setting Playback Display Video Recording Clock DivX HDMI Reset All Progressive Scan TV Aspect Video InpVuidteo ...
Quick Start Guide DIGITAL VIDEO DISC RECORDER DVDR3475/37 Playable Discs This unit is compatible to DVD+RW... Licensing Corporation. max. Settings For the Video Input You must perform "Make Edits Compatible" before making a recording. 1Press [SETUP] and use [K//L] to select "General Setting", then press [OK]. 2Use [K//L] to select "Video", then press [OK]....then press [OK]. 5Use [K//L] to select the input jack type to connect, then press [OK]. 6Press [SETUP] to once. General Setting Playback Display Video Recording Clock DivX HDMI Reset All Progressive Scan TV Aspect Video InpVuidteo ...

