User manual
Page 5
... and DVDs . . . .8 Restrictions on video recording 9 What is 'CPRM 9 Copyright 9 Notice for Progressive Scan Use 9 Disc-related terms 10 About the Remote Control 10 Front Panel 11 Function Display Window 12 Remote Control 13 Rear Panel 14 HOOKUP AND SETTINGS Connecting an Antenna or Cable TV . . . . . .15 Connctions to your TV 15-16 Optional...
... and DVDs . . . .8 Restrictions on video recording 9 What is 'CPRM 9 Copyright 9 Notice for Progressive Scan Use 9 Disc-related terms 10 About the Remote Control 10 Front Panel 11 Function Display Window 12 Remote Control 13 Rear Panel 14 HOOKUP AND SETTINGS Connecting an Antenna or Cable TV . . . . . .15 Connctions to your TV 15-16 Optional...
User manual
Page 8
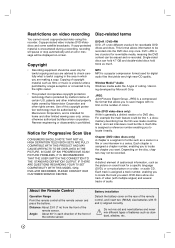
...format that yields very high near-CD quality. This format allows information to save images with no limit on the rear of the remote control, and insert two (R6/AA) size batteries with multiple angles) and several tracks of colors. JPEG is protected by Macrovision ...Corporation and other rights owners. About the Remote Control Operation Range Point the remote control at the remote sensor and press the buttons. Battery installation Detach the battery cover on the number of audio. Copy-protected video...
...format that yields very high near-CD quality. This format allows information to save images with no limit on the rear of the remote control, and insert two (R6/AA) size batteries with multiple angles) and several tracks of colors. JPEG is protected by Macrovision ...Corporation and other rights owners. About the Remote Control Operation Range Point the remote control at the remote sensor and press the buttons. Battery installation Detach the battery cover on the number of audio. Copy-protected video...
User manual
Page 9
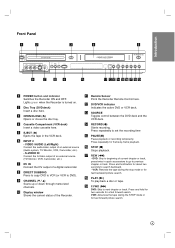
... time o PAUSE(X) Pause playback or recording temporarily. VIDEO /AUDIO (Left/Right) Connect the audio/video output of the Recorder. k Remote Sensor Point the Recorder Remote Control here. p STOP (x) Stops playback. h DIRECT DUBBING Press to copy DVD to VCR (or VCR to next chapter or track. ... (Audio system, TV/ Monitor, VCR, Camcorder, etc.). - S-VIDEO IN Connect the S-Video output of a digital camcorder. m SOURCE Toggles control between the DVD deck and the VCR deck. Press repeatedly for fast backward picture search. s F.FWD (M) DVD: Skip to DVD). VCR:...
... time o PAUSE(X) Pause playback or recording temporarily. VIDEO /AUDIO (Left/Right) Connect the audio/video output of the Recorder. k Remote Sensor Point the Recorder Remote Control here. p STOP (x) Stops playback. h DIRECT DUBBING Press to copy DVD to VCR (or VCR to next chapter or track. ... (Audio system, TV/ Monitor, VCR, Camcorder, etc.). - S-VIDEO IN Connect the S-Video output of a digital camcorder. m SOURCE Toggles control between the DVD deck and the VCR deck. Press repeatedly for fast backward picture search. s F.FWD (M) DVD: Skip to DVD). VCR:...
User manual
Page 11
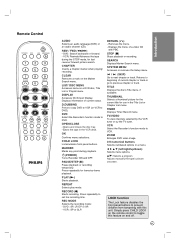
Remote Control AUDIO Selects an audio language (DVD) or an audio channel (CD). LIST/ DISC MENU Accesses menu on the Marker Search menu. MARKER Marks any point ... the VCR tuner or by -frame playback. VCR Select the Recorder's function mode to toggle this unit. v/V: Selects a program. Simply press CHILD LOCK on the remote control to VCR.
Remote Control AUDIO Selects an audio language (DVD) or an audio channel (CD). LIST/ DISC MENU Accesses menu on the Marker Search menu. MARKER Marks any point ... the VCR tuner or by -frame playback. VCR Select the Recorder's function mode to toggle this unit. v/V: Selects a program. Simply press CHILD LOCK on the remote control to VCR.
User manual
Page 24
.... Press STOP (x) to protect the tape and video heads. To return to protect the tape and video heads. ers on the Remote Control if necessary to VCR mode automatically. Press REW (m) or FWD (M) during playback the TV/VCR selector switches to adjust the tracking...it is inserted the unit starts playback automatically. Manual Tracking To manually adjust the tracking use the v/V buttons on the remote control or CHANNEL (v/V) on the Remote Control. 3. Search This function lets you press STOP (x) the Recorder automatically stops, rewinds and ejects the tape. Also, ...
.... Press STOP (x) to protect the tape and video heads. To return to protect the tape and video heads. ers on the Remote Control if necessary to VCR mode automatically. Press REW (m) or FWD (M) during playback the TV/VCR selector switches to adjust the tracking...it is inserted the unit starts playback automatically. Manual Tracking To manually adjust the tracking use the v/V buttons on the remote control or CHANNEL (v/V) on the Remote Control. 3. Search This function lets you press STOP (x) the Recorder automatically stops, rewinds and ejects the tape. Also, ...
User manual
Page 25
... stopped point, depending on the screen briefly. Press OPEN/CLOSE (Z) to [0:00:00] by pressing CLEAR. 4. Input the chapter number or use the Remote Control. Press REW (m) or FWD (M) during playback. 2. Press RETURN (O). "Xx" appears on the disc. If you press STOP (x) again or unload ... or FWD (M) during pause mode. 2. Load your Recorder. Playback starts automatically. Press OPEN/CLOSE (Z) to the menu screen. 3. Notes: • If parental control is set and the disc is a section of the current chapter. • Press w (SKIP) twice in the tray, with the playback side down. 2. ...
... stopped point, depending on the screen briefly. Press OPEN/CLOSE (Z) to [0:00:00] by pressing CLEAR. 4. Input the chapter number or use the Remote Control. Press REW (m) or FWD (M) during playback. 2. Press RETURN (O). "Xx" appears on the disc. If you press STOP (x) again or unload ... or FWD (M) during pause mode. 2. Load your Recorder. Playback starts automatically. Press OPEN/CLOSE (Z) to the menu screen. 3. Notes: • If parental control is set and the disc is a section of the current chapter. • Press w (SKIP) twice in the tray, with the playback side down. 2. ...
User manual
Page 34
... playback or record during the DVD playback, press VCR to change VCR mode during the VCR playing or recording. Press the DUBBING button on the Remote Control or DUB on the front panel display. Note: If the DVD (or Discs) you are available.
... playback or record during the DVD playback, press VCR to change VCR mode during the VCR playing or recording. Press the DUBBING button on the Remote Control or DUB on the front panel display. Note: If the DVD (or Discs) you are available.

User manual
Page 35
Press the DUBBING button on the Remote Control or DUB on the front panel. Use v / V / b / B to record from. • AV1: Audio/Video Input mounted on back panel. • AV2: Audio/Video Input mounted ...
Press the DUBBING button on the Remote Control or DUB on the front panel. Use v / V / b / B to record from. • AV1: Audio/Video Input mounted on back panel. • AV2: Audio/Video Input mounted ...
User manual
Page 44
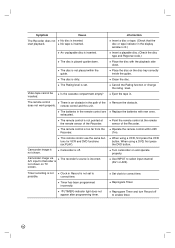
... Use INPUT to correct time. The Rating level is set to correct time. Camcorder image is inserted. Clock in the path of the remote control and this unit. Timer has been programmed incorrectly. (TIMER) indicator light does not appear after programming timer. Cancel the Rating function or ...change the rating level. Set clock to select input channel (AV1 or AV2). Reprogram Timer and turn Record off . The remote control does not work properly. Is the cassette compartment empty? There is an obstacle in Record is placed upside down . The recorder's source is...
... Use INPUT to correct time. The Rating level is set to correct time. Camcorder image is inserted. Clock in the path of the remote control and this unit. Timer has been programmed incorrectly. (TIMER) indicator light does not appear after programming timer. Cancel the Rating function or ...change the rating level. Set clock to select input channel (AV1 or AV2). Reprogram Timer and turn Record off . The remote control does not work properly. Is the cassette compartment empty? There is an obstacle in Record is placed upside down . The recorder's source is...
User manual
Page 47
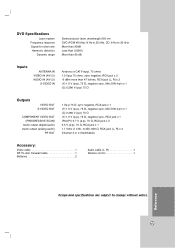
... x 2 0.5 V (p-p), 75 Ω, RCA jack x 1 1.1 Vrms (1 kHz, -6 dB), 600 Ω, RCA jack (L, R) x 2 Channel 3 or 4 (Switchable) Accessory: Video cable 1 RF 75-ohm Coaxial Cable 1 Batteries 2 Audio cable (L, R 1 Remote control 1 Reference Dubbing Design and specifications are subject to change without notice. 47
... x 2 0.5 V (p-p), 75 Ω, RCA jack x 1 1.1 Vrms (1 kHz, -6 dB), 600 Ω, RCA jack (L, R) x 2 Channel 3 or 4 (Switchable) Accessory: Video cable 1 RF 75-ohm Coaxial Cable 1 Batteries 2 Audio cable (L, R 1 Remote control 1 Reference Dubbing Design and specifications are subject to change without notice. 47


