Leaflet
Page 2
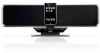
...dramatically enhanced bass and sound experience. USB/SD/MMC music playback Issue date 2010-07-14 Version: 2.0.3 12 NC: 8670 000 39145 UPC: 6 09585 15379 0 © 2010 Koninklijke Philips Electronics N.V. Simply plug your device into the USB port, or insert your memory card in the SD/... while it is docked. Use the remote control to change without notice. Docking Entertainment System Rotating dock USB and SD card slots Specifications DC910/37 Highlights iPod compatibility • Compatible with: iPod touch, iPod classic, iPod nano 3rd Generation, iPod 5th Generation, iPod with family...
...dramatically enhanced bass and sound experience. USB/SD/MMC music playback Issue date 2010-07-14 Version: 2.0.3 12 NC: 8670 000 39145 UPC: 6 09585 15379 0 © 2010 Koninklijke Philips Electronics N.V. Simply plug your device into the USB port, or insert your memory card in the SD/... while it is docked. Use the remote control to change without notice. Docking Entertainment System Rotating dock USB and SD card slots Specifications DC910/37 Highlights iPod compatibility • Compatible with: iPod touch, iPod classic, iPod nano 3rd Generation, iPod 5th Generation, iPod with family...
User manual
Page 6
... to your system Mounting the set onto wall 10 Using Remote Control 10 Controls Controls on the system 11 Controls on the remote control 12 Basic Functions Switching the system on 13 Switching the system to standby mode ........ 13 Switching the system to Eco Power Standby mode 13 ...Using playback features 16~17 Basic playback controls Different play modes: SHUFFLE and REPEAT Programming audio files Dock for iPod Playing Apple iPod using DC910 18 Compatible iPod player Dock adaptor Playing Apple iPod Charging iPod battery using the dock 18 AUX Listening to an external source 19 Clock/...
... to your system Mounting the set onto wall 10 Using Remote Control 10 Controls Controls on the system 11 Controls on the remote control 12 Basic Functions Switching the system on 13 Switching the system to standby mode ........ 13 Switching the system to Eco Power Standby mode 13 ...Using playback features 16~17 Basic playback controls Different play modes: SHUFFLE and REPEAT Programming audio files Dock for iPod Playing Apple iPod using DC910 18 Compatible iPod player Dock adaptor Playing Apple iPod Charging iPod battery using the dock 18 AUX Listening to an external source 19 Clock/...
User manual
Page 11
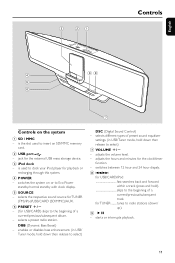
... Boost) - selects different types of preset sound equalizer settings. (in USB/ Tuner mode, hold skips to the beginning of a current/previous/subsequent album. - switches between 12 hour and 24 hour dispaly. 8 S/T for USB/CARD) skips to insert an SD/MMC memory card. 2 USB port - starts or interrupts playback. 11 is the...
... Boost) - selects different types of preset sound equalizer settings. (in USB/ Tuner mode, hold skips to the beginning of a current/previous/subsequent album. - switches between 12 hour and 24 hour dispaly. 8 S/T for USB/CARD) skips to insert an SD/MMC memory card. 2 USB port - starts or interrupts playback. 11 is the...
User manual
Page 12
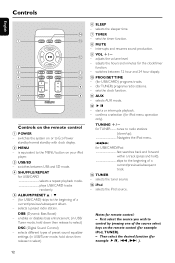
swicthes between 12 hour and 24 hour dispaly. 0 PROG/SET TIME - (for USB/CARD) programs tracks. - (for TUNER) programs radio stations. - adjusts the volume level. - sets the clock ... mode plays USB/CARD tracks randomly. 5 ALBUM/PRESET 3 / 4 - (for remote control: - selects AUX mode. @ ÉÅ - adjusts the hours and minutes for example ÉÅ, S , T ). 12 confirms a selection (for TUNER ........ sets the timer function. 8 MUTE - selects the tuner source $ iPod - First select the source you wish to control by pressing one...
swicthes between 12 hour and 24 hour dispaly. 0 PROG/SET TIME - (for USB/CARD) programs tracks. - (for TUNER) programs radio stations. - adjusts the volume level. - sets the clock ... mode plays USB/CARD tracks randomly. 5 ALBUM/PRESET 3 / 4 - (for remote control: - selects AUX mode. @ ÉÅ - adjusts the hours and minutes for example ÉÅ, S , T ). 12 confirms a selection (for TUNER ........ sets the timer function. 8 MUTE - selects the tuner source $ iPod - First select the source you wish to control by pressing one...
User manual
Page 13
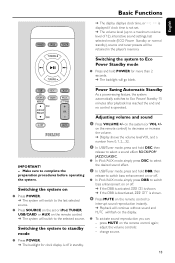
... ● Press POWER. ➜ The backlight for more than 2 seconds. ➜ The backlight will be retained in standby. Make sure to a maximum volume level of 12), interactive sound settings, last selected mode (ECO Power Standby or normal standby), source and tuner presets will go blank. change source. 13 Adjusting volume and...
... ● Press POWER. ➜ The backlight for more than 2 seconds. ➜ The backlight will be retained in standby. Make sure to a maximum volume level of 12), interactive sound settings, last selected mode (ECO Power Standby or normal standby), source and tuner presets will go blank. change source. 13 Adjusting volume and...
User manual
Page 20
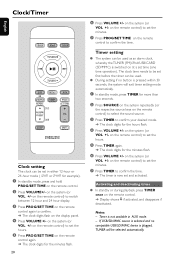
on the remote control) to switch between 12 hour and 24 hour display. 3 Press PROG/SET TIME on the remote control again to confirm. ➜ The clock digits flash on the remote control) ... time operation). Timer setting ● The system can be used . ● During setting, if no compatible USB/SD/MMC device is not available in either 12-hour or 24-hour mode (12HR or 24HR for example). 1 In standby mode, press and hold PROG/SET TIME on the remote control to confirm...
on the remote control) to switch between 12 hour and 24 hour display. 3 Press PROG/SET TIME on the remote control again to confirm. ➜ The clock digits flash on the remote control) ... time operation). Timer setting ● The system can be used . ● During setting, if no compatible USB/SD/MMC device is not available in either 12-hour or 24-hour mode (12HR or 24HR for example). 1 In standby mode, press and hold PROG/SET TIME on the remote control to confirm...
Quick start guide
Page 2
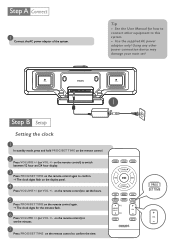
... any other equipment to confirm. ➜ The clock digits flash on the remote control. 2 Press VOLUME +/- (or VOL +/- on the remote control) to switch between 12 hour and 24 hour display. 3 Press PROG/SET TIME on the remote control again to this system. - on the remote control) to set the hours...
... any other equipment to confirm. ➜ The clock digits flash on the remote control. 2 Press VOLUME +/- (or VOL +/- on the remote control) to switch between 12 hour and 24 hour display. 3 Press PROG/SET TIME on the remote control again to this system. - on the remote control) to set the hours...


